
After learning Mitragynine was the cure for my five year cough I realized most of my stay in Bali put me one island from the source of the herbal remedy I now drink as tea daily. Given my medical journey and newfound love of Kratom it seems fitting to set-up an online shop to better take advantage of this miracle plant. After some trial and error the platform I’ve landed on for commerce is called Reaction Commerce. And in this post I’ll show you how to use it to set-up a simple ACH payment system using Reaction on your own website.
Tip: If you’re looking to try out Reaction Commerce online, there’s a useful tool to automate installation to Digital Ocean. Mind you this is for demo purposes and not for a production set-up, which requires security hardening.
Out of the box Reaction supports Stripe as a payment provider, enabling users to set-up a storefront online and start accepting credit cards right away. But if you’re in a high-risk business such as technical support or, in my case, selling tree leaf extracts Stripe isn't going to work for you. Enter ACH payments.
Reaction is built around a pluggable API. And while it has no native ACH capabilities adding support for ACH payments essentially boils down to:
- Holding a US bank account with the ability to receive ACH payments.
- Creating an ACH payment provider plugin for the Reaction API.
- Adding a step at Checkout to convey ACH payment details.
Assuming you have the ability to receive ACH payments, let’s look at the remaining two steps.
Creating an ACH payment plugin
As mentioned Reaction has no native ACH capabilities. What it does have, however, is an extensible API and documentation on how to add a payment method. Use those docs, the plugin how-to docs and the IOU example to put together an ACH plugin of your own if you want to understand how it works.
Alternatively you can use the ACH payment plugin I created by:
- Traversing to the
reactiondirectory. - Running
npm i -S api-plugin-payments-achto install the plug-in source code. - Adding
api-plugin-payments-achto plugins.json in the same directory. - Restarting the API container.
- And monitoring the logs with
docker-compose logs -f api.
If everything worked, you will see the following in the logs:
INFO Reaction: Startup function "achPaymentsStartup" for plugin "payments-ach" finished in 0ms
If you don’t see the above, shell into container and install the plugin NPM module manually or delete the API node modules volume as suggested in the docs after bringing down the container, then restart it again.
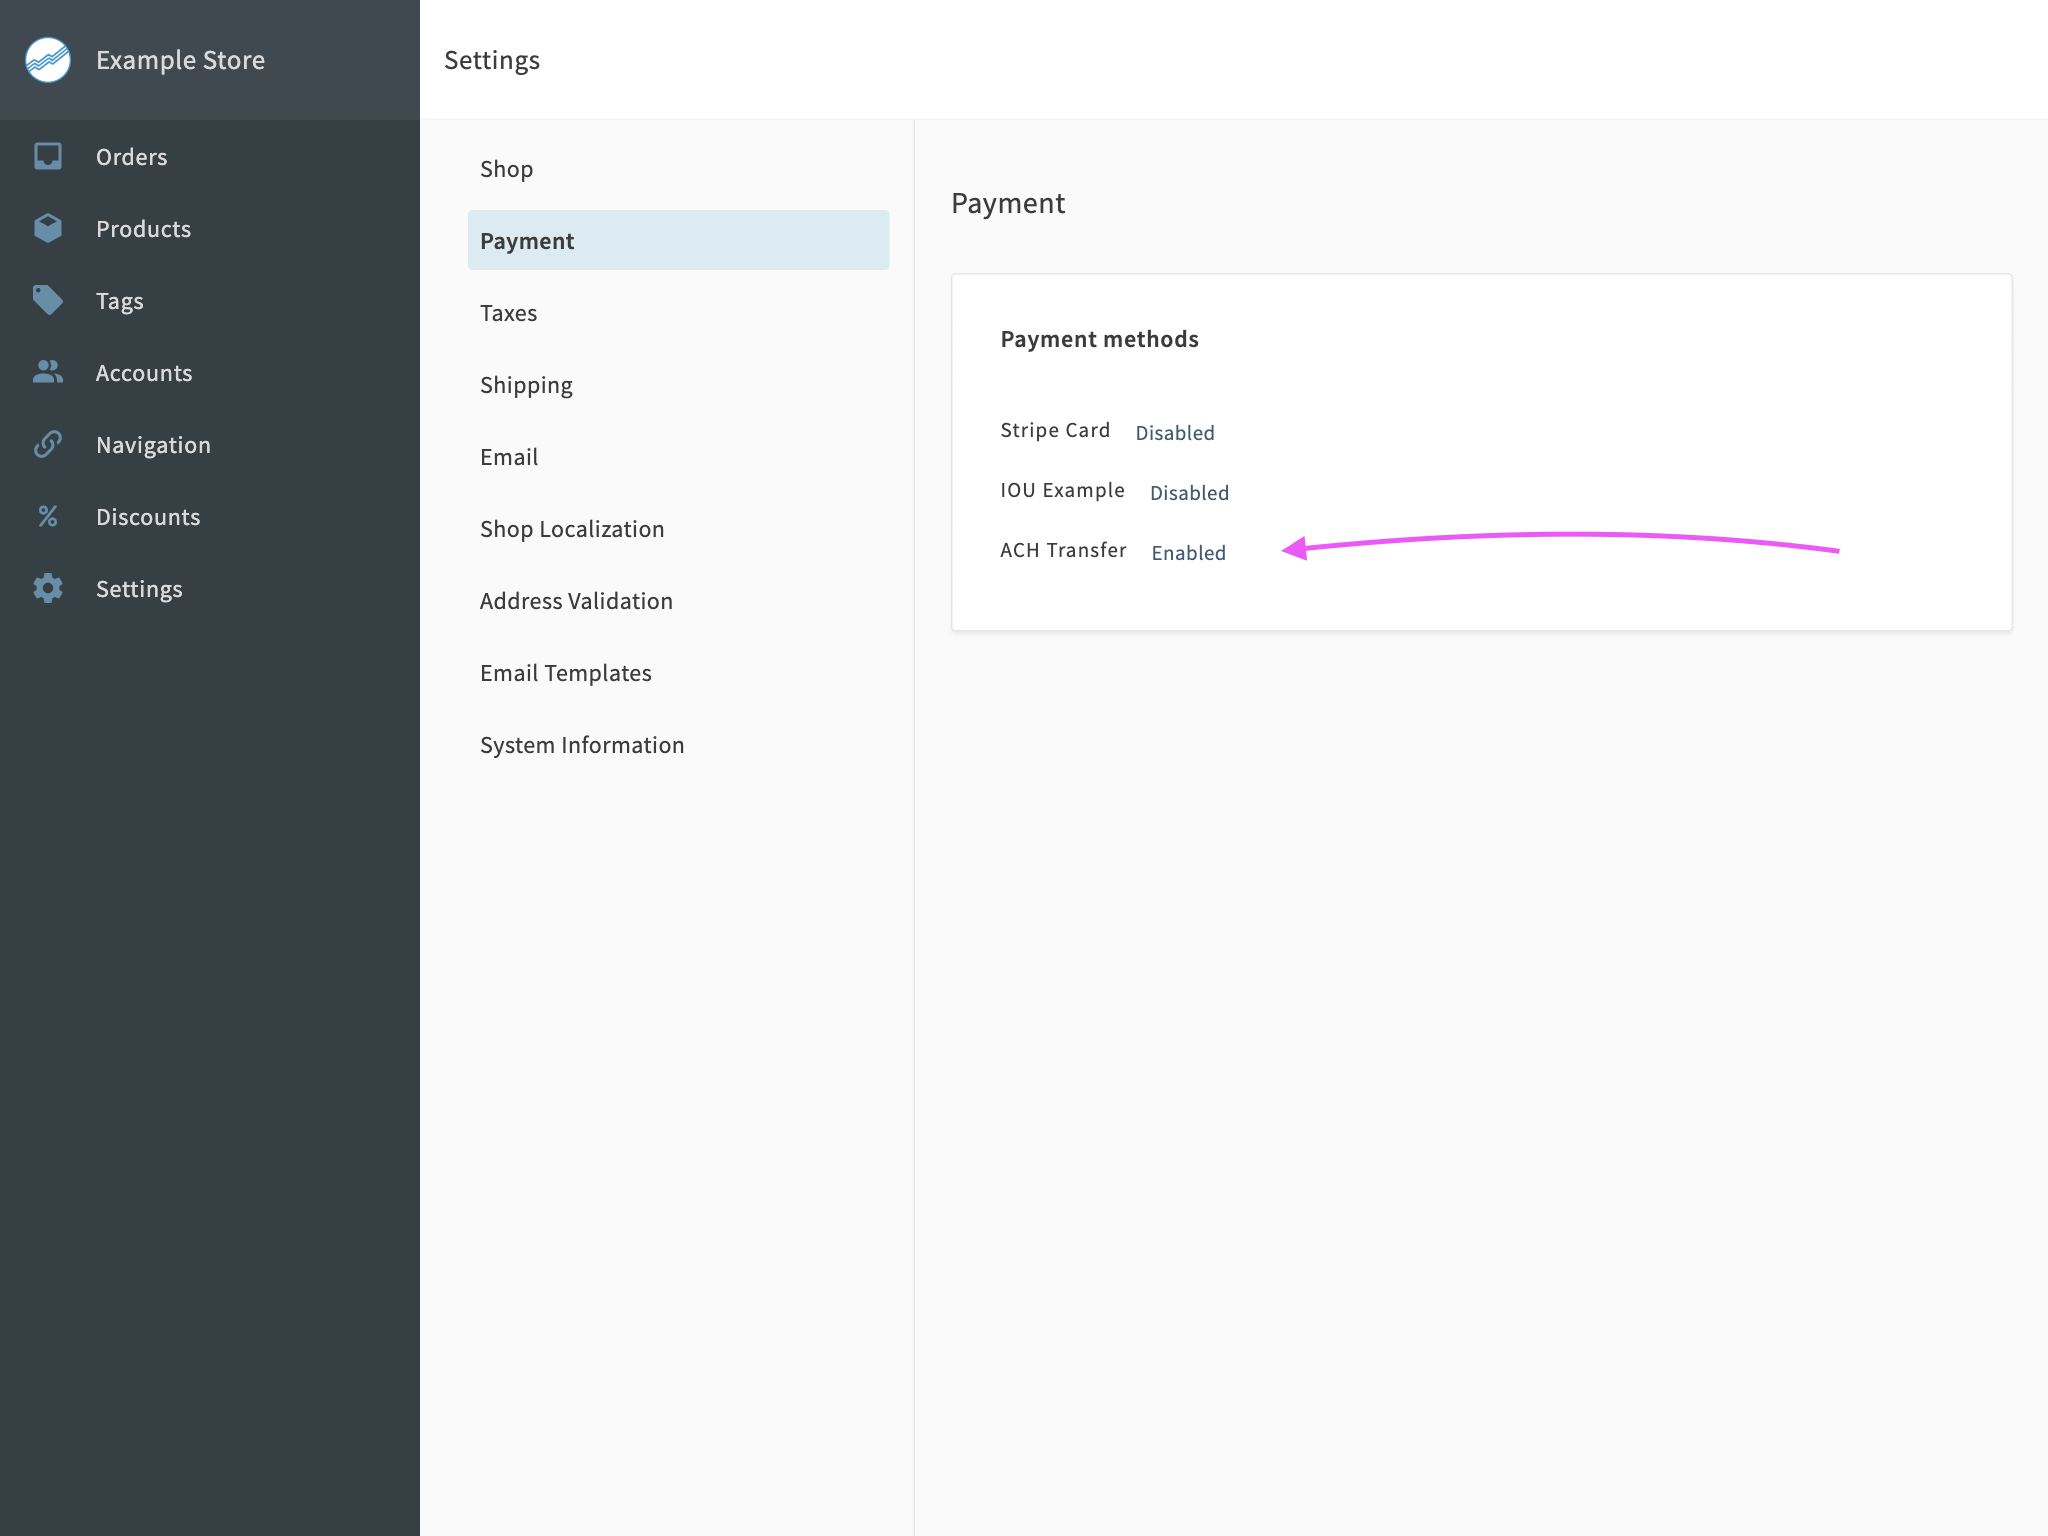
Once your logs look good log-in to Reaction Admin and enable the plugin from Settings > Payments > Payment Options as shown here:
The next step is to make it appear as an option during Checkout.
Add step at checkout
To do this you can modify the example storefront which ships with the
Reaction Development Platform. I’m going to assume you’re using storefront version 3.1.0 because it’s the most stable to date. If you’re using a different version these steps will likely need to be adjusted.
First start the storefront in development mode by running the following command from the dev platform root directory (run make list for a list of commands):
make stop-example-storefront && \
make dev-link-example-storefront && \
make start-example-storefront
Next open the storefront in an editor and add to paymentMethods.js the following:
{
  displayName: "ACH Transfer",
  InputComponent: ACHPaymentForm,
  name: "ach_transfer",
  shouldCollectBillingAddress: false
}
Then create a file called ACHPaymentForm.js in the src/custom directory and paste in the following contents adapted from the IOU example from the reaction components library with changes highlighted:
Expand to view code
  1import React, { forwardRef, useImperativeHandle, useRef, useState } from "react";
  2import PropTypes from "prop-types";
  3import { useReactoForm } from "reacto-form";
  4import { uniqueId } from "lodash";
  5import { withComponents } from "@reactioncommerce/components-context";
  6import Typography from "@material-ui/core/Typography";
  7import { Paper, withStyles, FormHelperText } from "@material-ui/core";
  8
  9/**
 10 * Convert the form document to the object structure
 11 * expected by `PaymentsCheckoutAction`
 12 * @param {Object} Form object
 13 * @returns {Object} Transformed object
 14 */
 15function buildResult({ amount, accountHolder = null }) {
 16  let floatAmount = amount ? parseFloat(amount) : null;
 17  if (isNaN(floatAmount)) floatAmount = null;
 18
 19  return {
 20    amount: floatAmount,
 21    data: { accountHolder },
 22    displayName: accountHolder ? `ACH from ${accountHolder}` : null
 23  };
 24}
 25
 26const styles = ({ spacing, palette }) => ({
 27  root: {
 28    padding: spacing.unit * 2,
 29    border: palette.borders.default
 30  }
 31});
 32
 33function PaymentInfo({ classes }) {
 34  return (
 35    <Paper elevation={0} className={classes.root}>
 36      <Typography><b>Account name:</b> COMPANY NAME</Typography>
 37      <Typography><b>Currency:</b> USD</Typography>
 38      <Typography><b>Bank:</b> JPMorgan Chase Bank</Typography>
 39      <Typography><b>Bank address:</b> 10 S Dearborn. Chicago, IL 60603</Typography>
 40      <Typography><b>Routing #:</b> 071000013</Typography>
 41      <Typography><b>Account #:</b> 000000000</Typography>
 42    </Paper>
 43  )
 44}
 45
 46ACHPaymentForm.propTypes = {
 47  classes: PropTypes.object,
 48}
 49
 50PaymentInfo = withStyles(styles, { withTheme: true })(PaymentInfo);
 51
 52/**
 53 * @summary ACHPaymentForm component
 54 * @param {Object} props Props
 55 * @param {Object} ref Ref
 56 * @return {Object} React render
 57 */
 58function ACHPaymentForm(props, ref) {
 59  const lastDocRef = useRef();
 60  const isReadyRef = useRef();
 61
 62  const [uniqueInstanceIdentifier, setUniqueInstanceIdentifier] = useState();
 63  if (!uniqueInstanceIdentifier) {
 64    setUniqueInstanceIdentifier(uniqueId("ACHPaymentForm"));
 65  }
 66
 67  const {
 68    className,
 69    components: {
 70      ErrorsBlock,
 71      Field,
 72      TextInput
 73    },
 74    isSaving,
 75    onChange,
 76    onReadyForSaveChange,
 77    onSubmit
 78  } = props;
 79
 80  const {
 81    getErrors,
 82    getInputProps,
 83    submitForm
 84  } = useReactoForm({
 85    isReadOnly: isSaving,
 86    onChange(formData) {
 87      const resultDoc = buildResult(formData);
 88      const stringDoc = JSON.stringify(resultDoc);
 89      if (stringDoc !== lastDocRef.current) {
 90        onChange(resultDoc);
 91      }
 92      lastDocRef.current = stringDoc;
 93
 94      const isReady = !!formData.accountHolder;
 95      if (isReady !== isReadyRef.current) {
 96        onReadyForSaveChange(isReady);
 97      }
 98      isReadyRef.current = isReady;
 99    },
100    onSubmit: (formData) => onSubmit(buildResult(formData))
101  });
102
103  useImperativeHandle(ref, () => ({
104    submit() {
105      submitForm();
106    }
107  }));
108
109  const accountHolderInputId = `accountHolder_${uniqueInstanceIdentifier}`;
110  const amountInputId = `amount_${uniqueInstanceIdentifier}`;
111
112  return (
113    <div className={className}>
114      <Typography>Currently we support ACH payments. Please send your order total amount via electronic funds transfer to the account provided below. We will plan to ship your order within 2 business days after the funds have settled into our account.</Typography>
115      <Field name="accountHolder" errors={getErrors(["accountHolder"])} label="Sending account holder" labelFor={accountHolderInputId}>
116        <TextInput id={accountHolderInputId} {...getInputProps("accountHolder")} />
117        <FormHelperText>Individual or business sending the funds.</FormHelperText>
118        <ErrorsBlock errors={getErrors(["accountHolder"])} />
119      </Field>
120      <Field name="amount" errors={getErrors(["amount"])} label="Amount (optional)" labelFor={amountInputId}>
121        <TextInput id={amountInputId} {...getInputProps("amount")} />
122        <FormHelperText>Leave blank unless you intend to split order total across multiple transfers.</FormHelperText>
123        <ErrorsBlock errors={getErrors(["amount"])} />
124      </Field>
125      <PaymentInfo />
126    </div>
127  );
128}
129
130ACHPaymentForm = withComponents(forwardRef(ACHPaymentForm));
131
132ACHPaymentForm.propTypes = {
133  className: PropTypes.string,
134  components: PropTypes.any,
135  isSaving: PropTypes.bool,
136  onChange: PropTypes.func,
137  onReadyForSaveChange: PropTypes.func,
138  onSubmit: PropTypes.func
139};
140
141ACHPaymentForm.defaultProps = {
142  isSaving: false,
143  onChange() {},
144  onReadyForSaveChange() {},
145  onSubmit() {}
146};
147
148export default ACHPaymentForm;
Tip: Improve your workflow by Developing inside a Container with VSCode.
Open paymentMethods.js once more and add the following import to use the custom form you created above:
import ACHPaymentForm from "./components/ACHPaymentForm"
And, finally, restart the example storefront using make as described earlier or from the example-storefront directory with command:
docker-compose down && docker-compose up -d
At this point you should have the ability to checkout using your new payment method. The checkout will look something like:
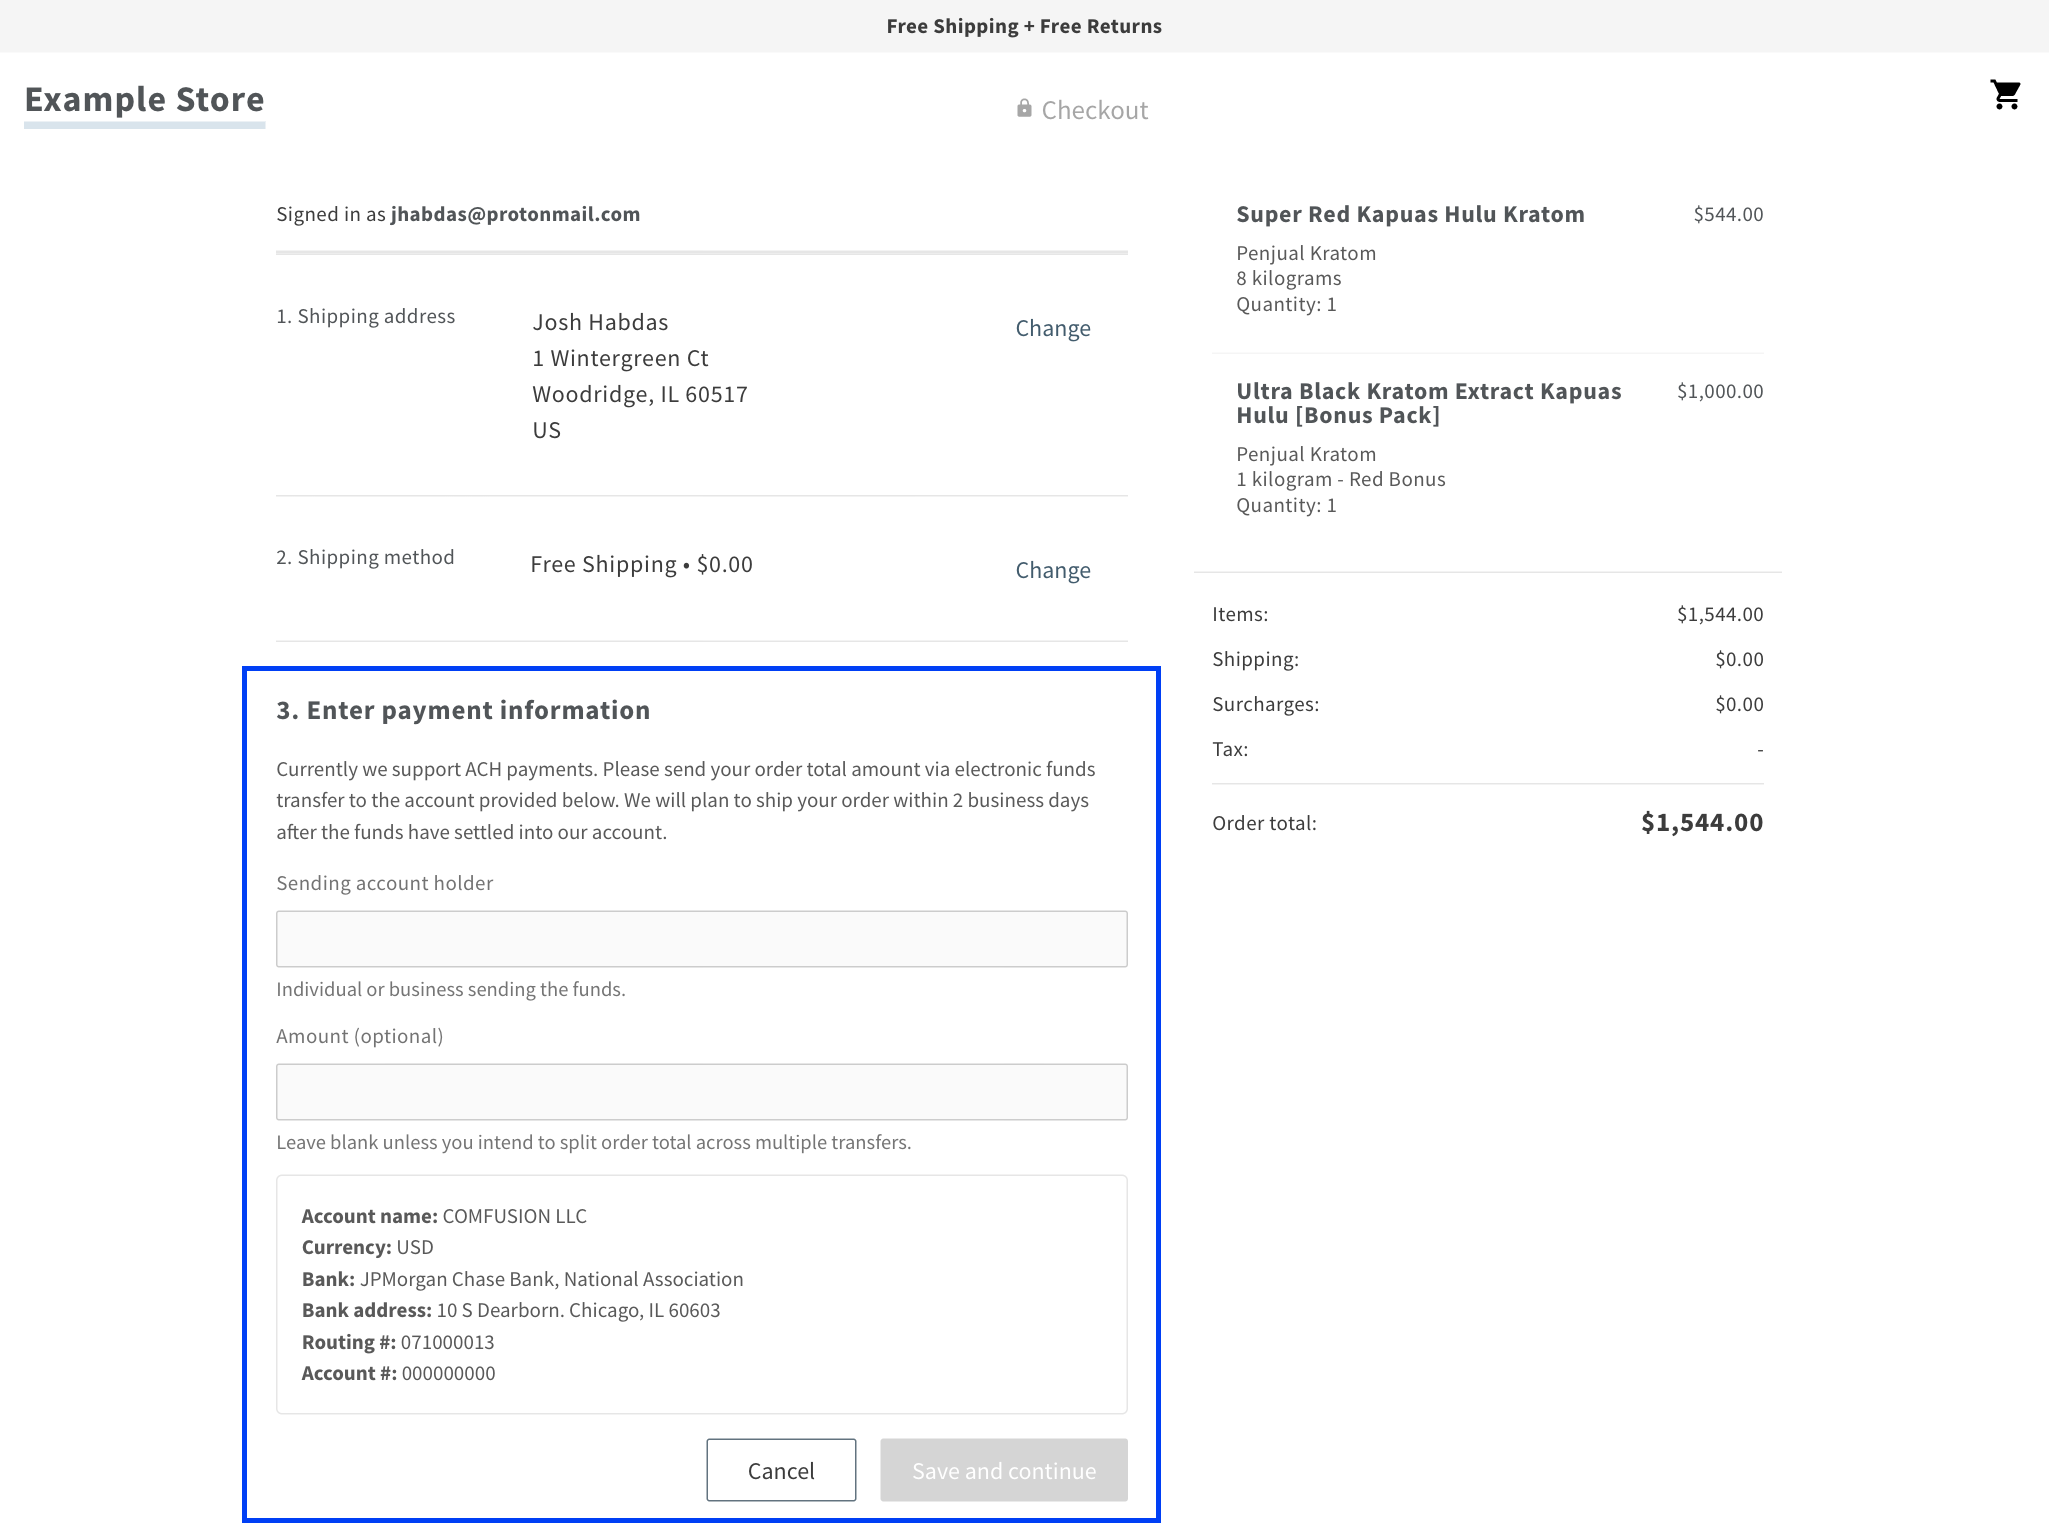
Add whatever details you want and complete the Checkout flow.
Once you’ve placed an order using ACH it will begin appearing along with the order in Reaction Admin as shown in the screenshot in the plug-in repo.
Make any additional changes desired and enjoy your new ACH payments in Reaction Commerce. Should you yourself be working on a store Stripe doesn’t support or are just looking to give users more options ACH may be just what you’re looking for.
I hope this was helpful. If you have any questions about the plugin or this article please open an issue in the plug-in code repository linked above. Otherwise please direct all feedback to the Reaction Commerce team. Thanks!