
I loved my database courses in college. 20 years ago I could have written you a perfectly normalized relational database with a binder full of DB2 SQL queries that looked like magic. Since then much of that knowledge has begun to escape me as I haven’t had a strong desire to delve back into databases. Not because I don’t find them fascinating. But because getting them up correctly can be a pain.
Fast-forward a few years and DB2 has been superseded by Postgres and thanks to Supabase making relational databases super easy to set-up I find myself reaching back for that DB structures knowledge once again. Only now we’ll be working with something that didn’t exist back then: JSON.
In this post I’ll explain how to upload and extract JSON data into rows in a Postgres database using SvelteKit and Supabase. And though processing data this way seems like it would be a fairly common task, I wasn’t able to find a guide online describing how to do this. As a result, I thought it worthwhile to jot down how to do it.
Obtain JSON to Process
First you need to get your hands on some structured JSON data. I found mine in my Logseq smart notes application. If you don’t have a JSON file to work with already, you can use Logseq as well. Simply download and install the app, create a few pages of data and then export as JSON and you’re good to go. If you’re in a rush, I’ve provided a sample JSON export a couple sections down.
Create Web Form
Next create a web form with a file input and an endpoint to send the data to Supabase. For this task we’ll use SvelteKit with a simple web form:
<form method="post" enctype="multipart/form-data" accept="application/json">
  <label for="file">Choose an export to upload</label>
  <input type="file" id="file" name="file" />
  <button>Submit</button>
</form>
Drop that into a file named upload.svelte and place it in your routes directory then create a page endpoint in the same directory called upload.js like:
import { createClient } from '@supabase/supabase-js';

const supabase = createClient(
  import.meta.env.VITE_SUPABASE_PROJECT_URL,
  import.meta.env.VITE_SUPABASE_PUBLIC_ANON_KEY,
);

export const post = async ({ request }) => {
  const formData = await request.formData();
  const file = formData.get('file');

  const payload = {
      name: file.name,
      type: file.type,
      size: file.size,
      last_modified: file.lastModified,
      data: JSON.parse(await file.text())
    };

  const { data: body, error } = await supabase.from('export').insert(payload);

  if (error) {
    return { status: 404, body: 'Error inserting export reported by server.' };
  }

  return { status: 201, body };
};
Here supabase is the supabase-js client. You will need to install it as a dependency in your SvelteKit project in order to be able to import it as shown in the page endpoint above. The endpoint is configured to extract meaningful file metadata, parse the JSON inside the file and insert them into a table named export in Postgres, which we’ll create next.
Define Tables in Postgres
Since we’re using Supabase creating tables in Postgres can be achieved using the table editor UI built for the purpose. However, we want to define our tables in code so their creation can be repeated without having to remember how it was done. Following are SQL statements to create two tables in Postgres:
-- Create table to store Logseq exports
create table export (
  id bigint generated by default as identity primary key,
  inserted_at timestamp with time zone default timezone('utc'::text, now()) not null,
  name varchar(255) not null,
  type varchar(255) not null,
  size bigint not null,
  last_modified bigint not null,
  data jsonb not null
);

-- Create table to extract export page blocks
create table page (
  id uuid primary key,
  "page-name" text,
  properties jsonb,
  format text,
  children jsonb
);
The first table is for uploading JSON data and related metadata, and the other is going to be used for storing extracts of the data. The fields in the second table correspond to the top-level properties found in the array of blocks in a Logseq export. In case you don’t have a Logseq JSON export available to reference here’s an example export with a single page block:
{
  "version": 1,
  "blocks": [
    {
      "id": "50b2d115-ef02-4882-ae87-a8b3cd441c44",
      "page-name": "Contents",
      "children": [
        {
          "id": "6270b7dc-4b18-4893-9332-439b9a14f318",
          "format": "markdown",
          "children": [],
          "content": ""
        }
      ]
    }
  ]
}
Notice the fields within the block correspond with the second table created in the SQL statements shown above. Also observe the format field in the table defined earlier isn’t present. Because the shape of data may change page to page we allow null values in the page table.
Now that we’ve covered the two tables let’s go ahead and create them. In Supabase, create a new project, save your credentials and open the SQL editor within the UI. From the SQL editor select New query and paste in the SQL to create the two tables as shown here:
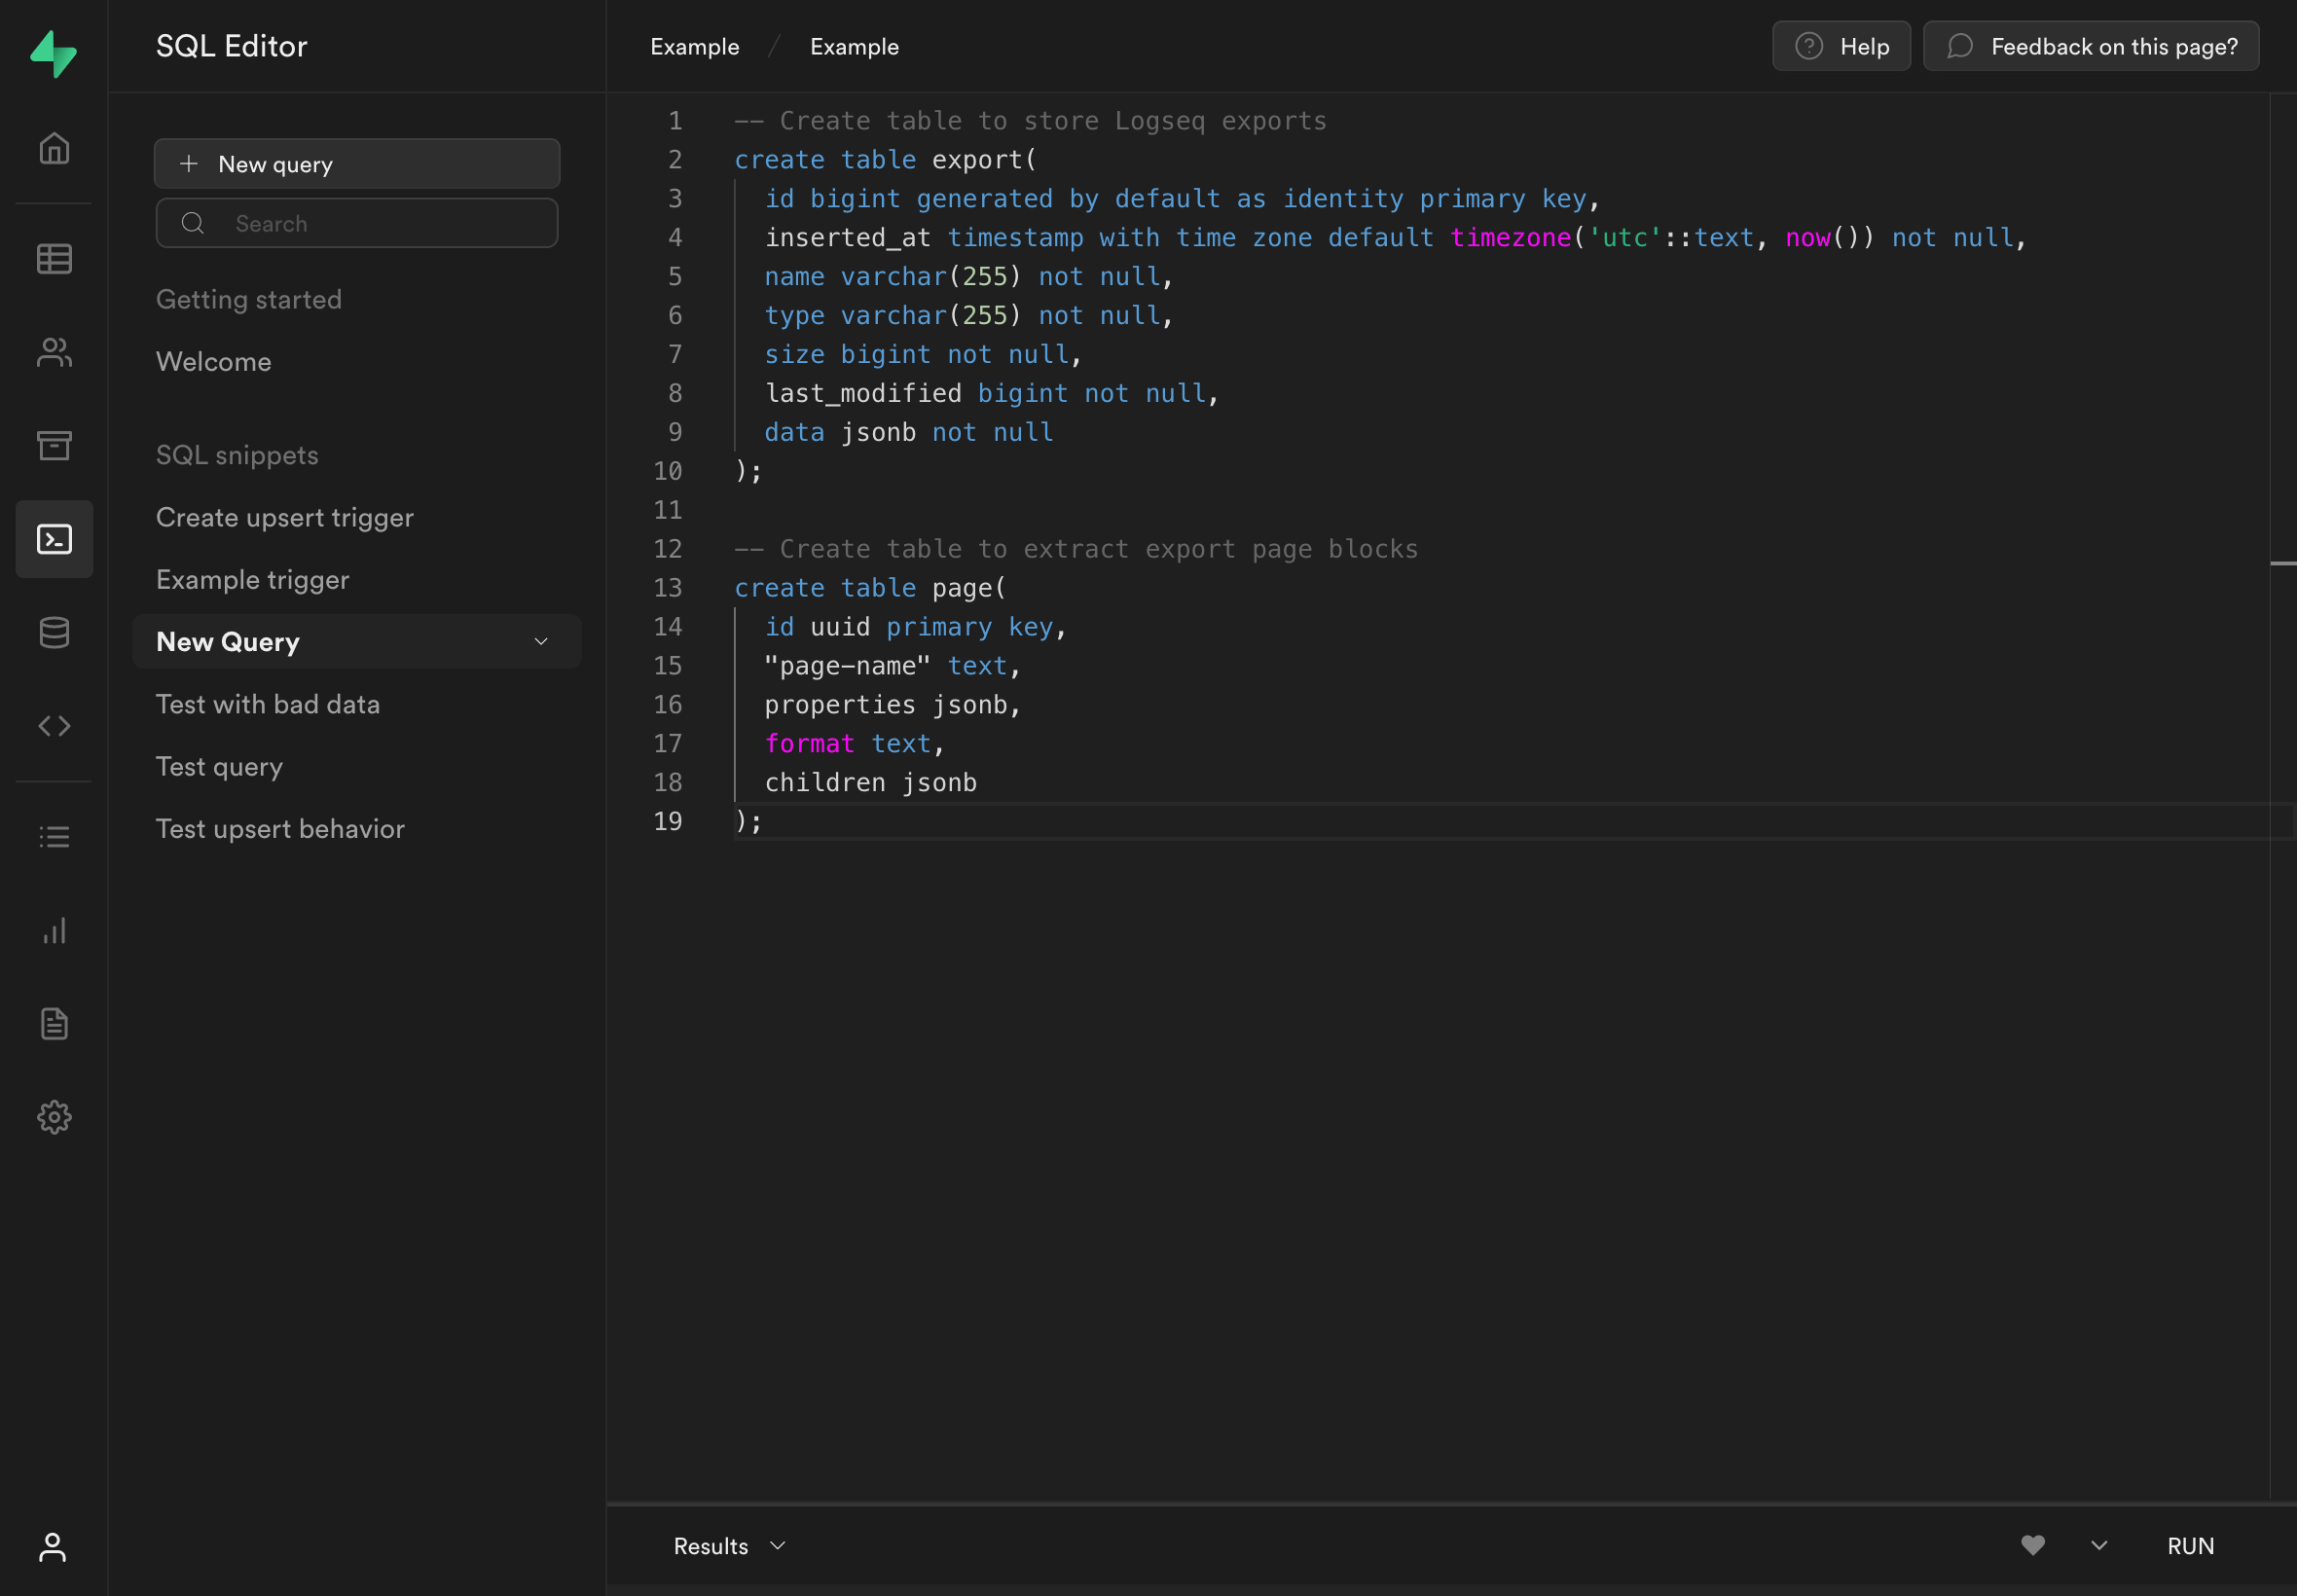
Press RUN to create your tables. If at any point you want to drop the tables and recreate them you can use the following SQL:
-- Debugging
drop table if exists export;
drop table if exists page;
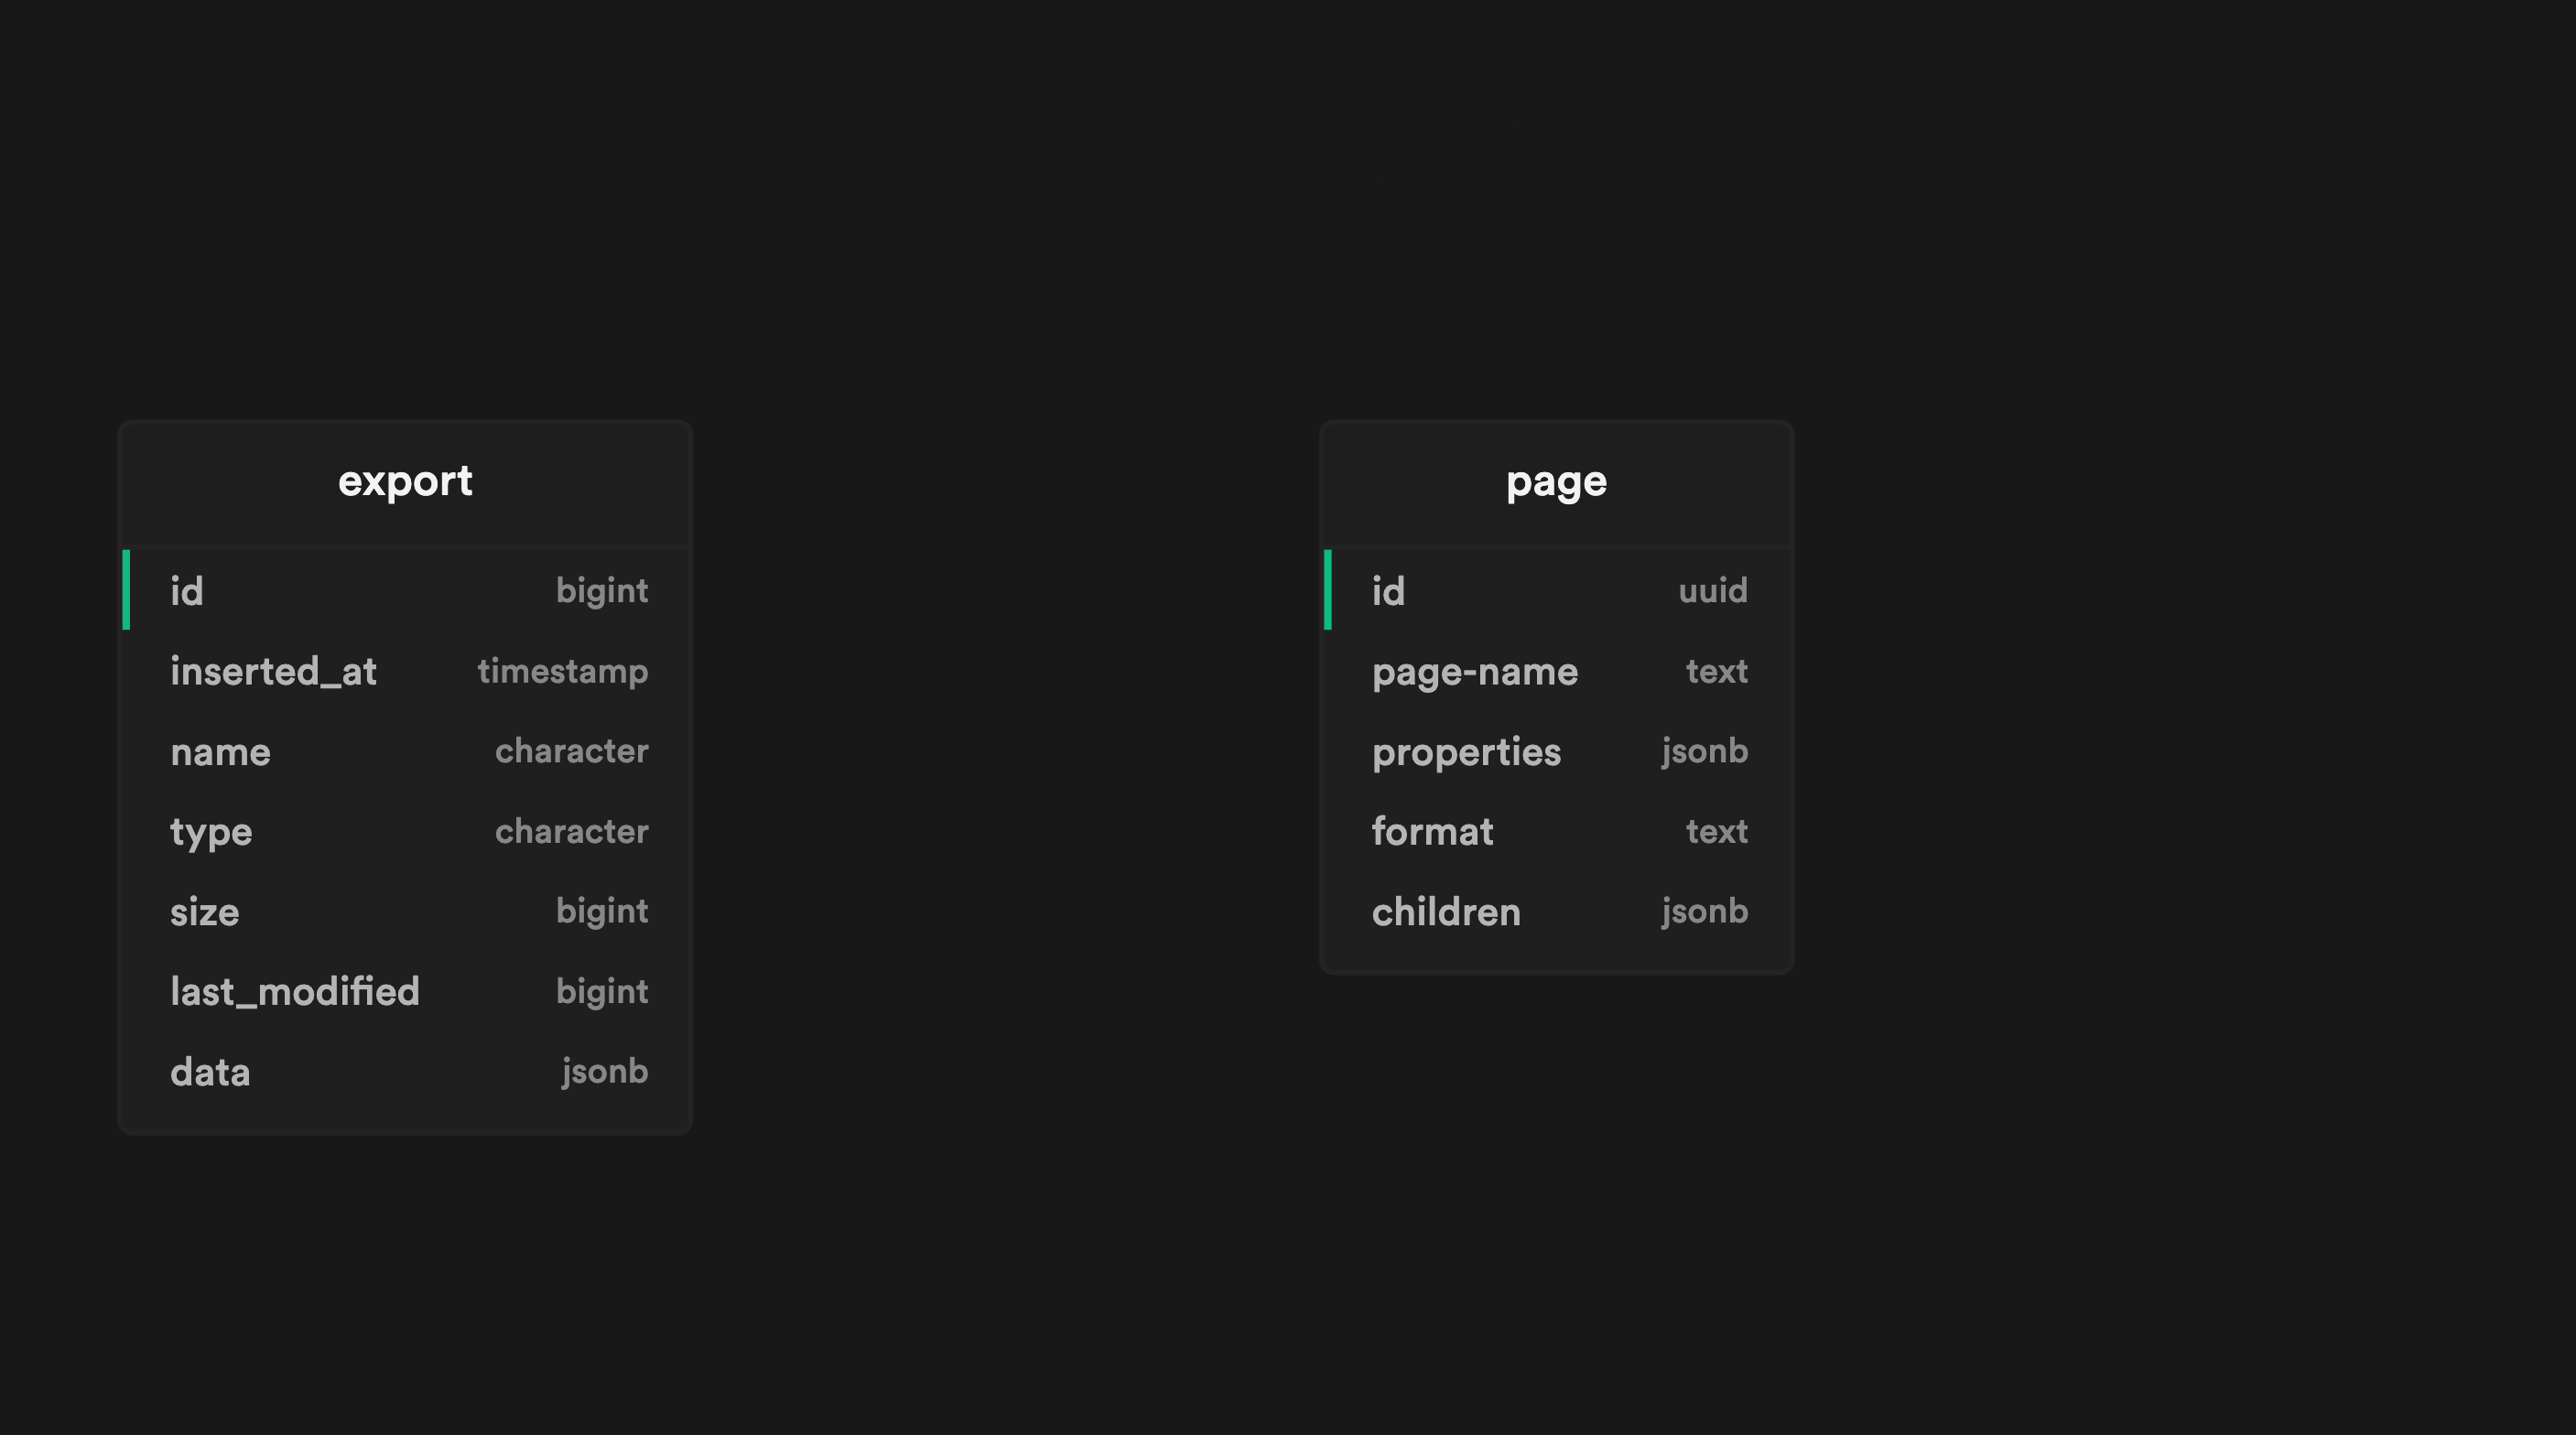
Once finished you will have two tables with the following DB schema:
When the tables are defined you’re ready to begin uploading files!
Enable File Uploads
Earlier we used SvelteKit to create a web form and endpoint to upload a JSON file to Supabase. What’s missing however are the Supabase credentials obtained in the last section. To use them create a file called .env.local the src directory of your SvelteKit project and paste in the following:
VITE_SUPABASE_PUBLIC_ANON_KEY=eyJhbGciOiJIUzI1NiIsInR5cCI6IkpXVJC6.eyJpc3MiOiJzdXBhYmFzZSIsInJlZI6ImlpeXphbWxieXlsZHlha2djemFrIllwicm9sZSI6ImFub24iLCJpYXQiOjE2NTE2ODM5NTgsImV4cIC6MTk2zNI13Tk1OH0.shcRvrAsjJU9UMNe8Xmuc-L0YFgTNvaBFP7jLzQGpFg
VITE_SUPABASE_PROJECT_URL=https://iiyamlzbxxldyaygczak.supabase.co
Substitute the values above for your own. This will allow your endpoint to function so that when the web form is submitted the file and its data will be uploaded to Supabase and inserted into the export table.
VITE_ they will not be exposed when using page endpoints.
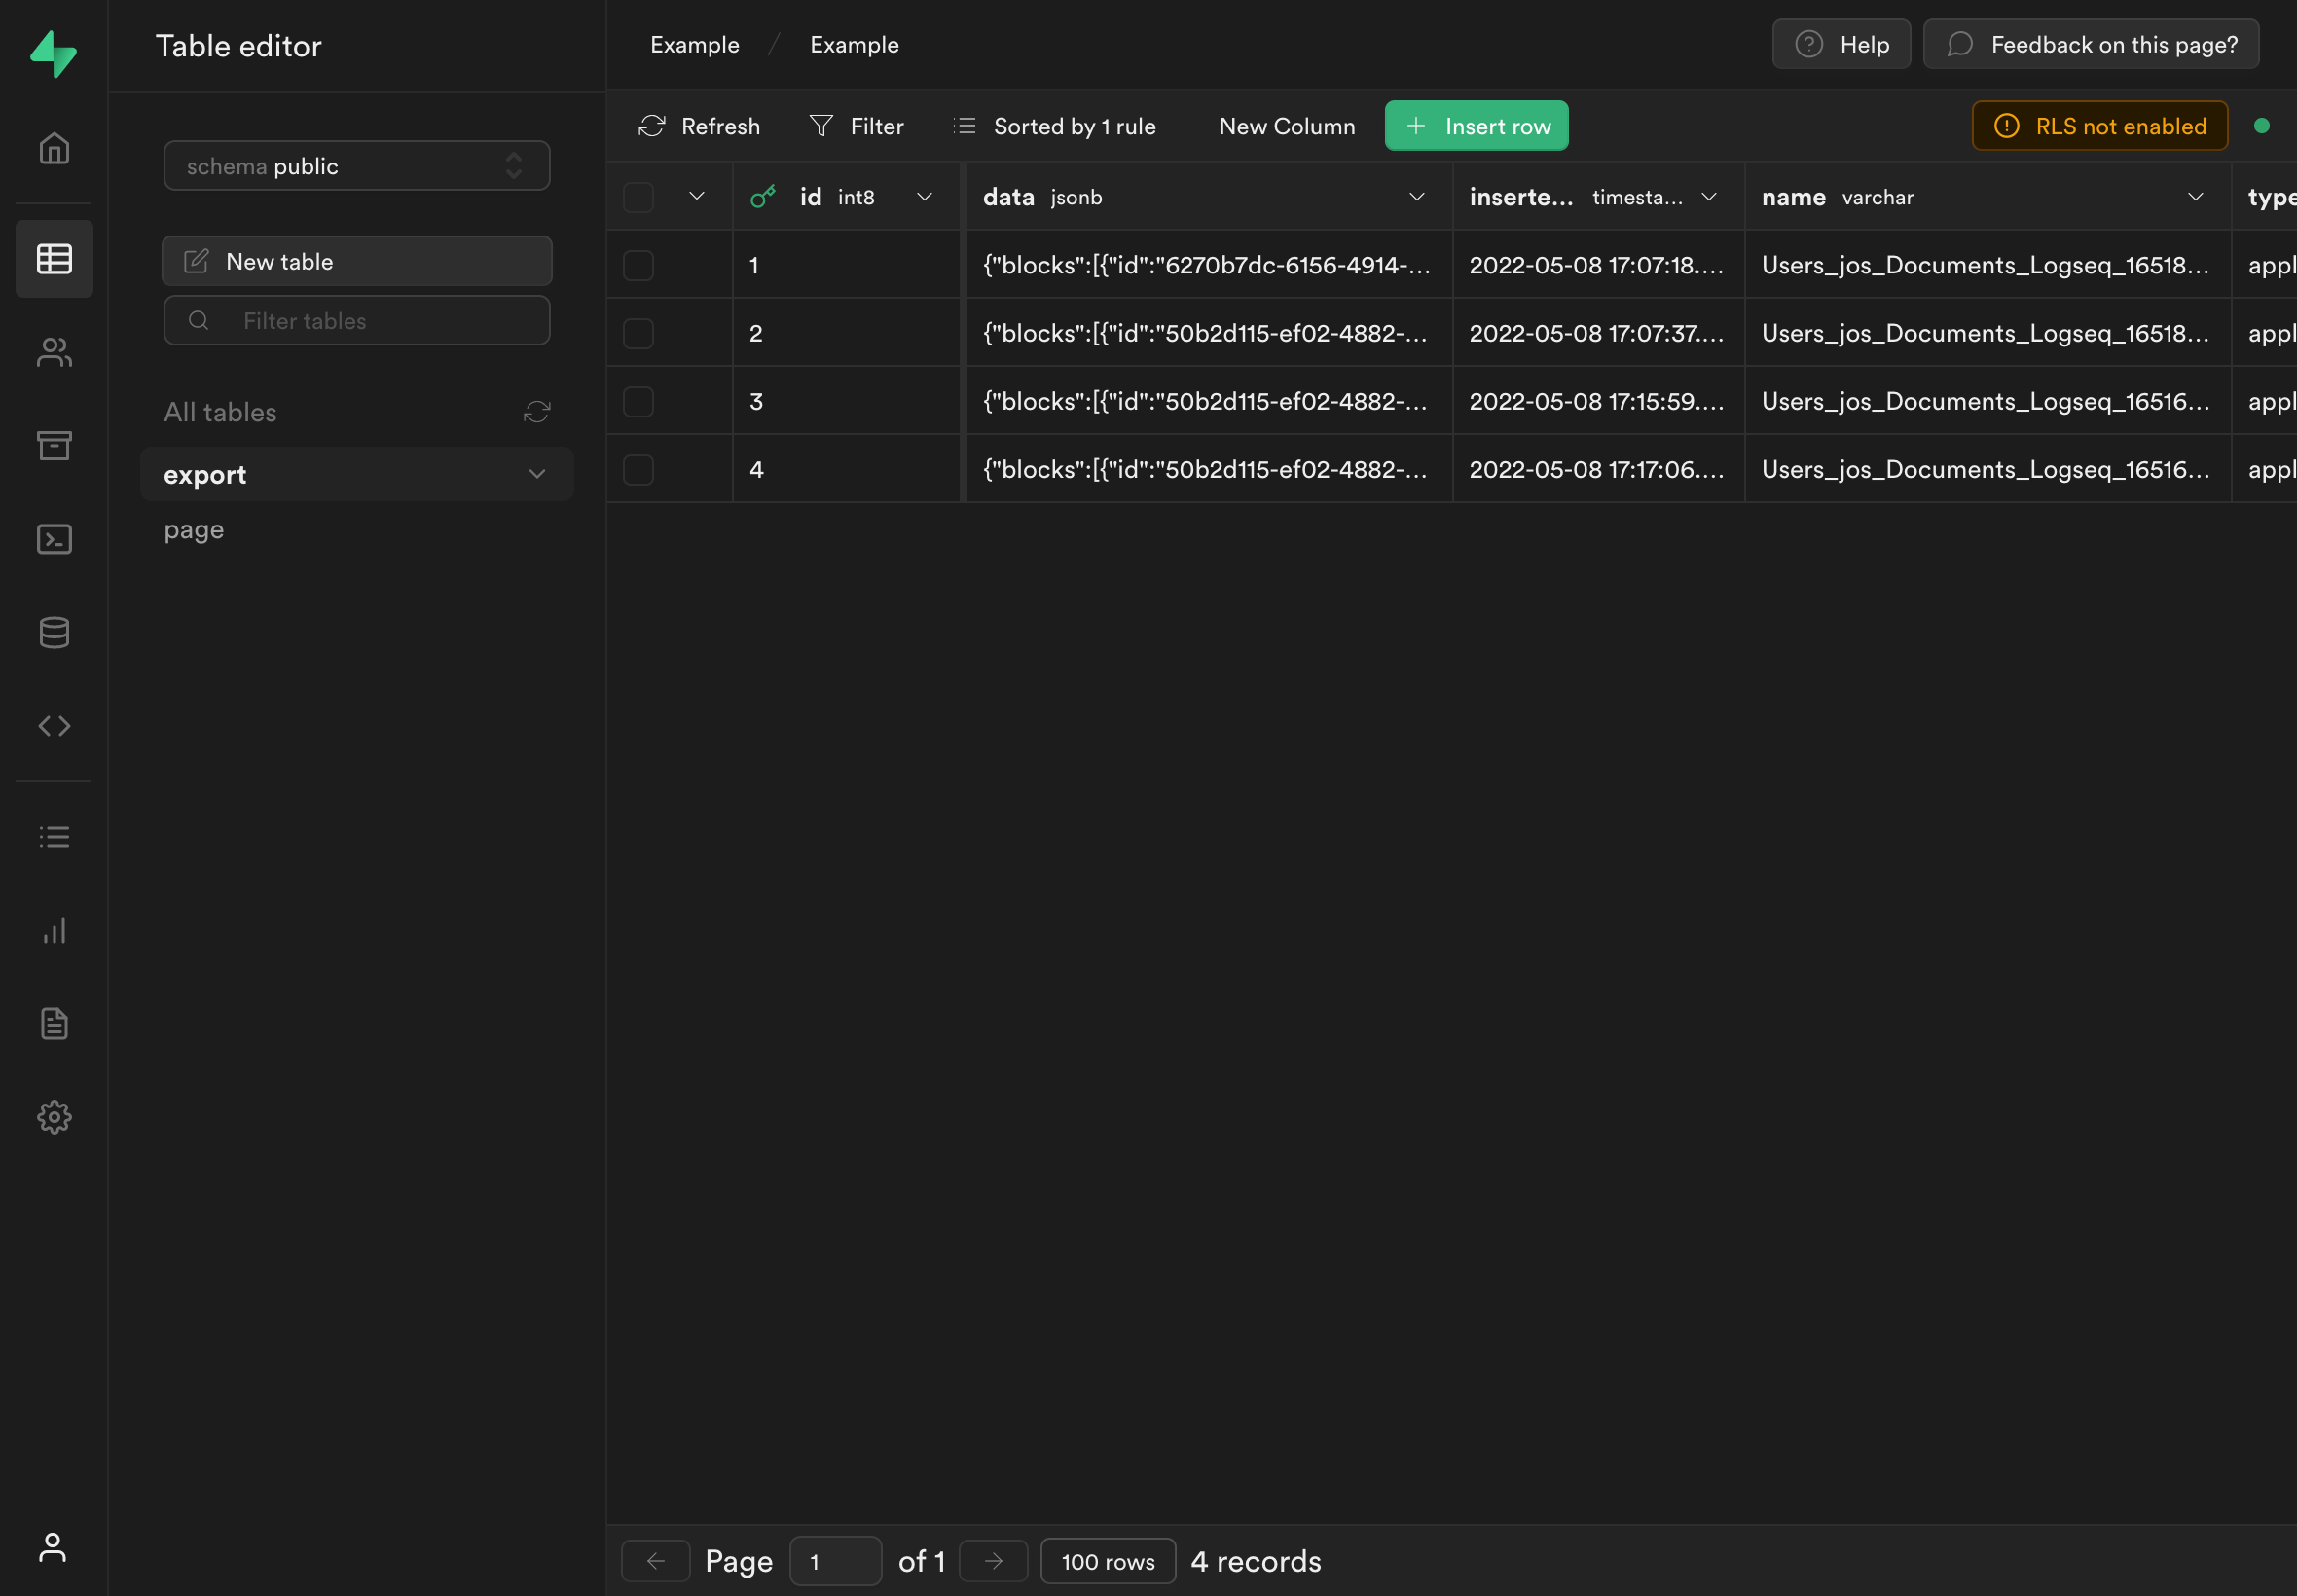
Go ahead and try it out using your own Logseq JSON export or the example export provided earlier. To do so run npm run dev to start your SvelteKit dev server and navigate to localhost:3000/upload to view and submit your web form. If you’re returned straight back to the upload page, it probably worked! Check the export table in Supabase to verify. You should see something like this:
If the file upload didn’t work yet don’t fret. Go back and retrace your steps and debug any errors present before proceeding. For help check out the SvelteKit and Supabase Discord servers linked from their respective websites.
Create Trigger Function
With file uploads working you will notice JSON data in the export table but nothing is showing up in the page table. That’s because we haven’t told Postgres what to do with the data yet. Let’s remedy that shall we?
Vaguely recalling something called Stored Procedures from school I remembered they were used to run some operation on data within the database itself. So I looked for an analog in Postgres and came across trigger functions.
To handle JSON extraction we’re going to use a trigger function and tell it to run each time a new record is inserted into the export table. The trigger function will be responsible for accessing the JSON data uploaded and extracting it into the page table. Rather than bore you with the details here it is:
-- Define trigger function to populate page table
create or replace function extract_page_records ()
  returns trigger
  language plpgsql
  as $$
begin
  insert into page
  select
    *
  from
    jsonb_populate_recordset(null::page, new.data::jsonb -> 'blocks')
  on conflict (id)
    do update set
      "page-name" = excluded. "page-name",
      properties = excluded.properties,
      format = excluded.format,
      children = excluded.children;
  return new;
end
$$;

create trigger extract_page_records
  before insert on export for each row
  execute procedure extract_page_records ();
Use the Supabase SQL Editor again to create a new query and dump in the above trigger function definition. The function uses some embedded language features to create a page entity for each block found in the data colum of export records as they are inserted. If an id already exists in the page table the trigger function will update the information instead of inserting it (a technique called upserting).
Run the above SQL query from the Supabase editor then use your web form to upload another JSON file. If the trigger function is successful, you will have 1 new record in the export table and N records in the page table where N represents the number of blocks present in the export data.
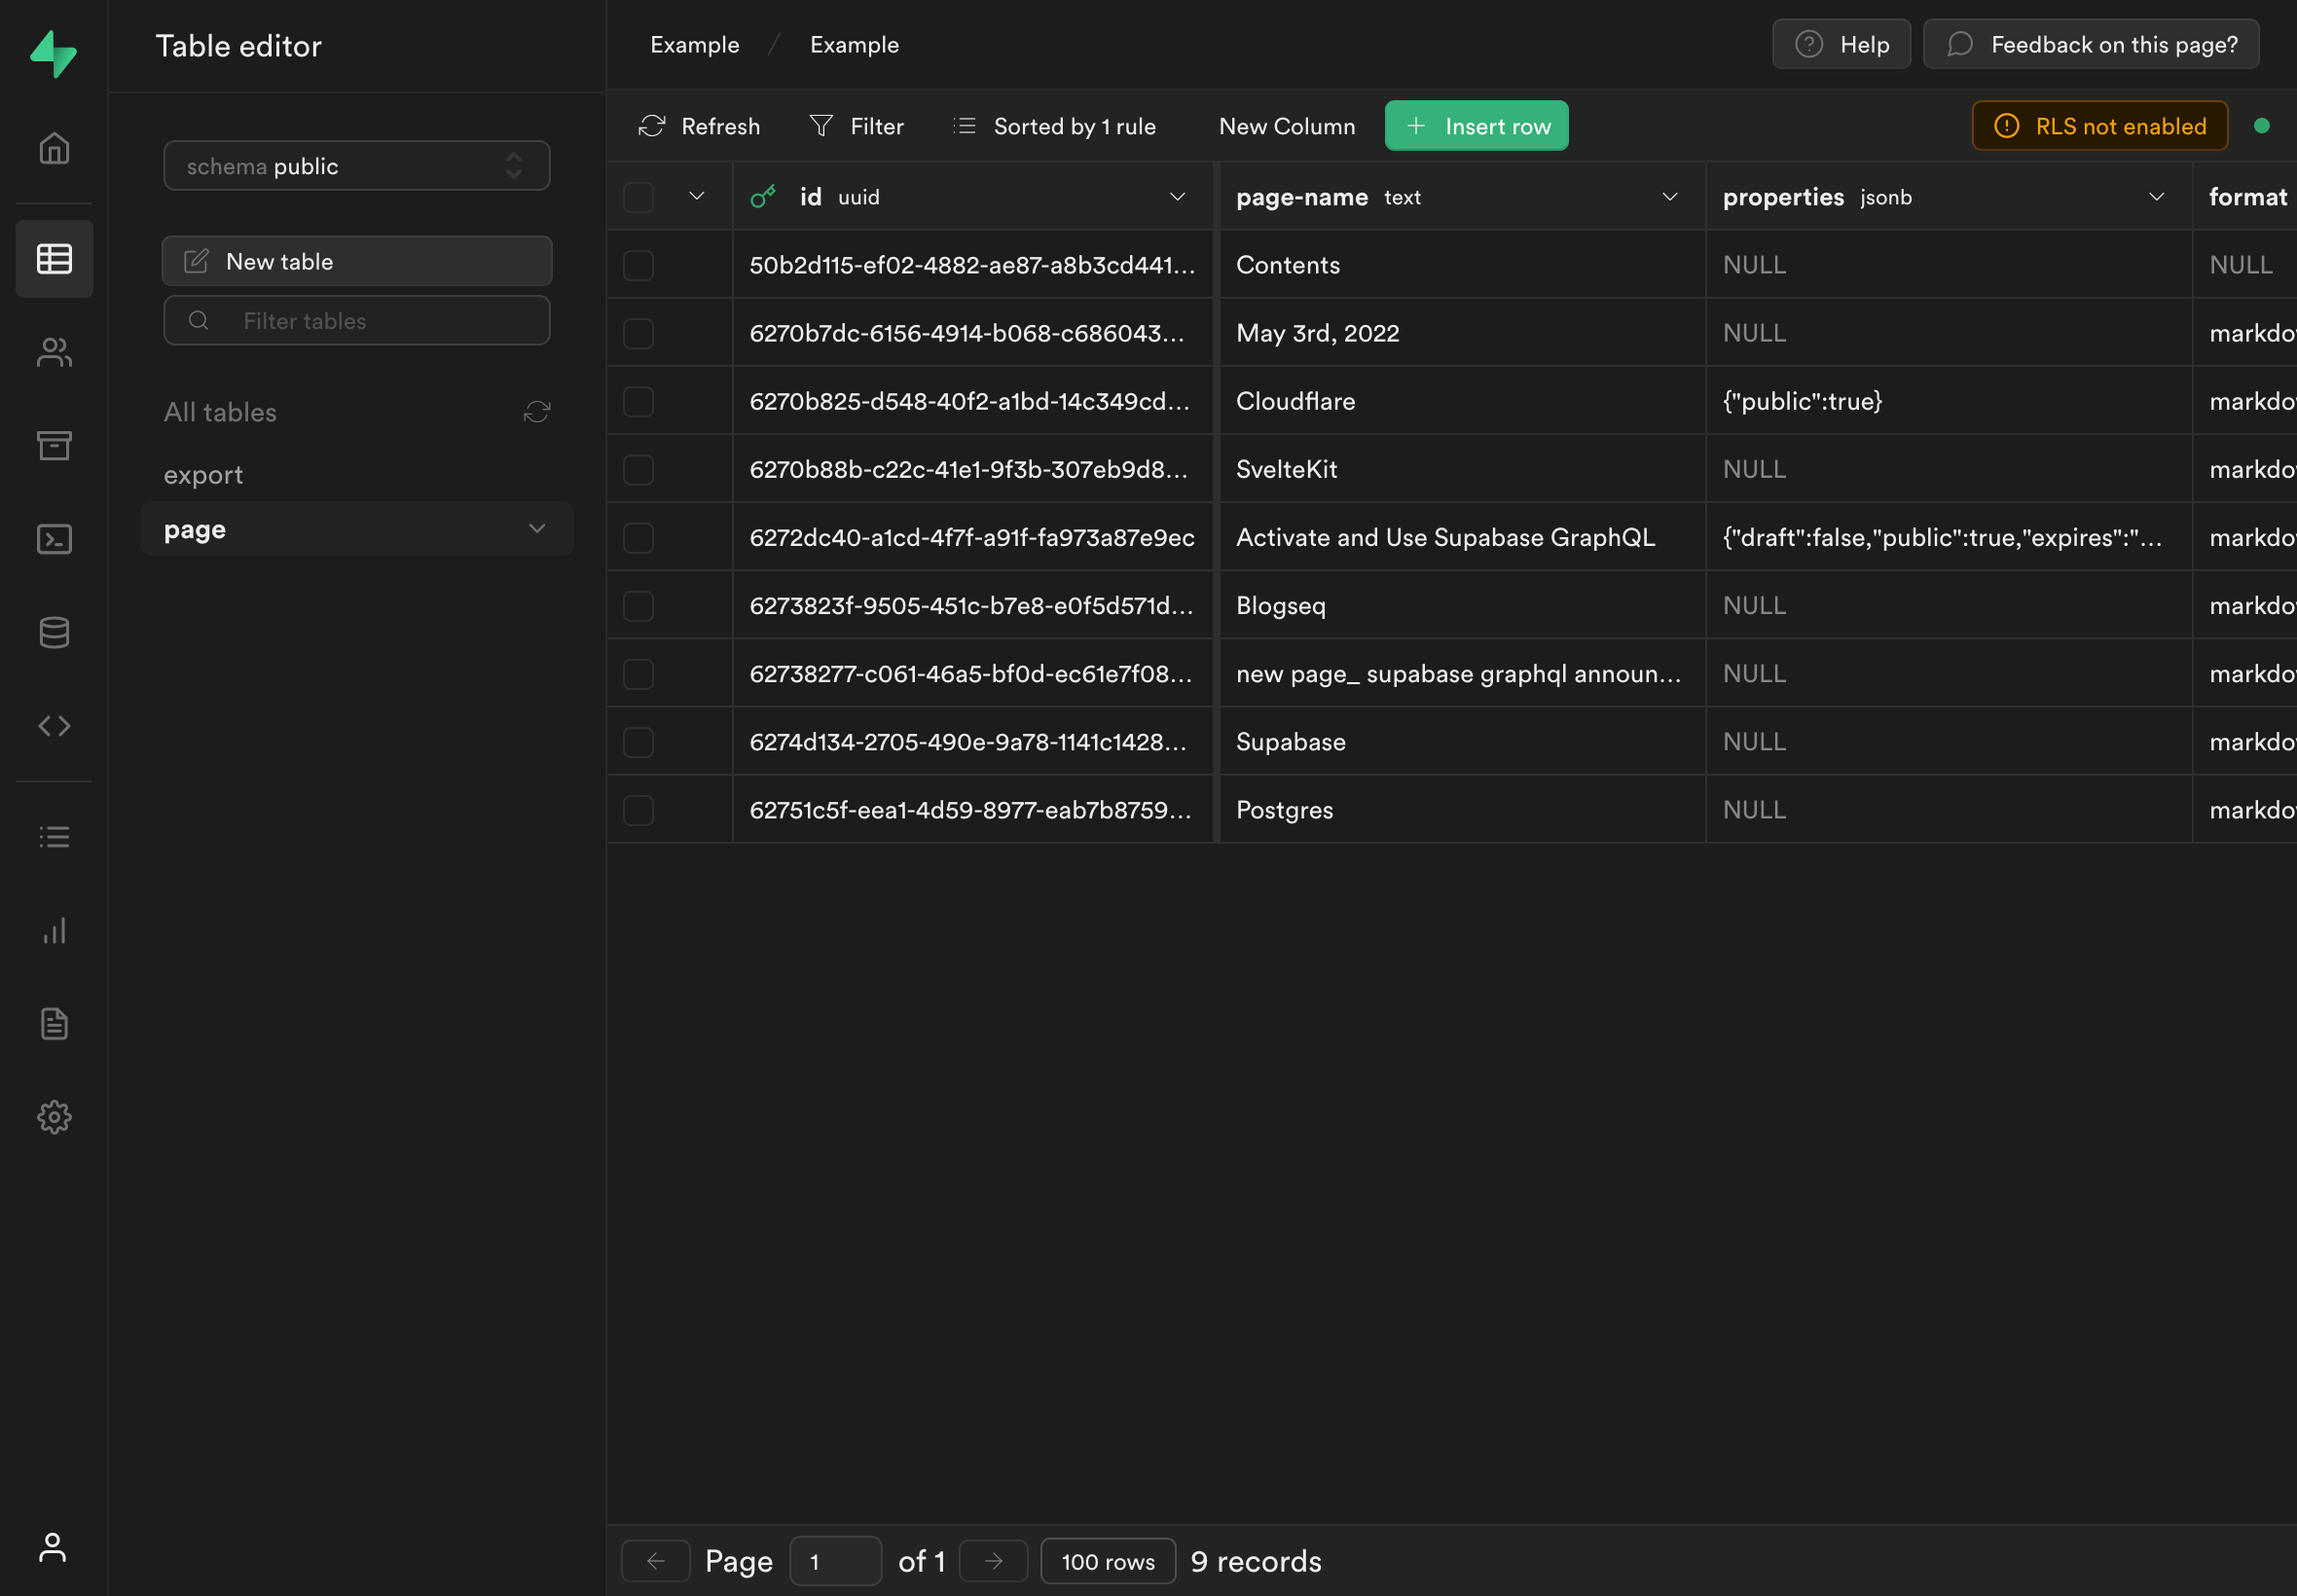
Verify by checking the that your extracts are appearing like so:
Go ahead and modify some of the data or edit it in Logseq and export a new JSON file and use your web form to upload it to Supabase and watch your trigger function update your page extracts just as fast it receives them. Pretty cool right? And that’s just the tip of the iceberg.
Summary
In this post I’ve show you how to create JSON extracts in Supabase, end-to-end from raw data. We created a web form to upload the data. A page endpoint with SvelteKit to send it to Supabase, the database to store it and utilized Postgres trigger functions to turn the JSON into meaningful data which could be further processed or queried for use in another application.
If you’re not familiar with the tools used in this post such as SvelteKit and Supabase, give them a try. You might decide they’re not for you and that’s okay. Though you just may fall in love. I know I did because I can finally utilize the knowledge I gained from my favorite college courses without the final exams.