In this post we’re going to take a quick look at how to run Rancher in a Kubernetes cluster locally on macOS for development and testing purposes. There are several different ways to run Kubernetes for local development. In this guide I’m going to focus on just one way: K3D.
K3D is a lightweight wrapper to run Rancher Labs’ K3s in Docker. K3s is a certified Kubernetes distribution for edge and IoT applications with a small resource footprint and ARMv7 support. Like KiND, K3D uses a container runtime as opposed to a virtual machine — saving precious resources. Unlike KiND, K3D supports the ARM architecture and requires about 16x less RAM.
When you’re finished you’ll have a functional K3s Kubernetes cluster running on your Mac with Rancher UI for cluster management. This guide assumes you’ve never run Kubernetes before and, therefore, also serves as a practical starting point, though I won’t be going into detail about the nuts and bolts of Kubernetes.
Objectives
- Create a multi-node K8s cluster for local development
- Install Rancher to help manage the cluster
- Manage cluster lifecycle from the command line
- Learn things you can do with Rancher
Requirements
You need to have a few things on your computer. The version of macOS you’re running shouldn’t matter. This guide was written using Big Sur beta.
- Docker Desktop (Kubernetes disabled)
- Homebrew brew
- Command Line Tools for Xcode
- Kubernetes CLI kubectl
- Powerlevel10k (optional)
Install K3s using K3d
Start by installing k3d, Helm and the Kubernetes CLI using Homebrew:
HOMEBREW_NO_AUTO_UPDATE=1 \
  brew install k3d helm@3 kubectl
Tip: k3d installation requires Xcode CLT so be sure that’s installed first.
Once the k3d installation finishes use it to create a test cluster:
k3d cluster create
You should see output like:
Expand to view sample output
INFO[0000] Created network 'k3d-k3s-default'
INFO[0000] Created volume 'k3d-k3s-default-images'
INFO[0001] Creating node 'k3d-k3s-default-server-0'
INFO[0011] Creating LoadBalancer 'k3d-k3s-default-serverlb'
INFO[0012] (Optional) Trying to get IP of the docker host and inject it into the cluster as 'host.k3d.internal' for easy access
INFO[0017] Successfully added host record to /etc/hosts in 2/2 nodes and to the CoreDNS ConfigMap
INFO[0017] Cluster 'k3s-default' created successfully!
INFO[0017] You can now use it like this:
kubectl cluster-info
Introspect on the test cluster with the Kubernetes CLI:
kubectl get nodes
You should see output like:
NAME                       STATUS   ROLES    AGE     VERSION
k3d-k3s-default-server-0   Ready    master   5m17s   v1.19.4+k3s1
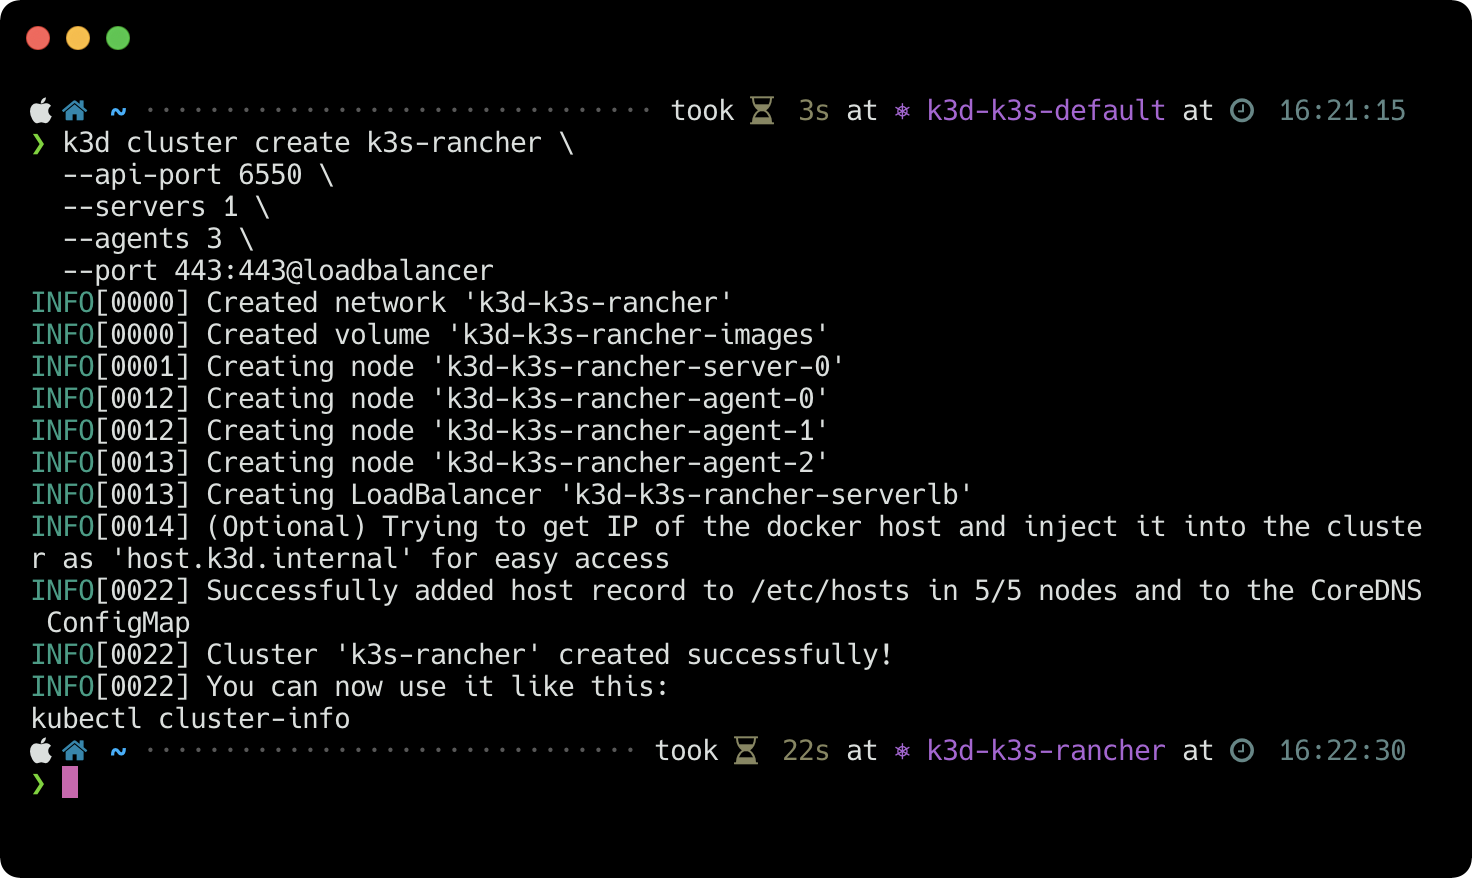
You now have a single-node test cluster running on your machine. Leave it and create a second cluster called k3s-rancher with 1 server and 3 agent nodes:
k3d cluster create k3s-rancher \
  --api-port 6550 \
  --servers 1 \
  --agents 3 \
  --port 443:443@loadbalancer
You should see output like:
Expand to view sample output
INFO[0000] Created network 'k3d-k3s-rancher'
INFO[0000] Created volume 'k3d-k3s-rancher-images'
INFO[0001] Creating node 'k3d-k3s-rancher-server-0'
INFO[0012] Creating node 'k3d-k3s-rancher-agent-0'
INFO[0012] Creating node 'k3d-k3s-rancher-agent-1'
INFO[0013] Creating node 'k3d-k3s-rancher-agent-2'
INFO[0013] Creating LoadBalancer 'k3d-k3s-rancher-serverlb'
INFO[0014] (Optional) Trying to get IP of the docker host and inject it into the cluster as 'host.k3d.internal' for easy access
INFO[0022] Successfully added host record to /etc/hosts in 5/5 nodes and to the CoreDNS ConfigMap
INFO[0022] Cluster 'k3s-rancher' created successfully!
INFO[0022] You can now use it like this:
kubectl cluster-info
If you’re using Powerlevel10k, your tabline should show the new context:
In this case the new context is k3d-k3s-rancher. If it doesn’t, review the k3d quickstart instructions for help updating your kubeconfig.
Next use the Kubernetes CLI to introspect the cluster:
kubectl get nodes,all
You should see output like:
node/k3d-k3s-rancher-agent-0    Ready    <none>   4m52s   v1.19.4+k3s1
node/k3d-k3s-rancher-agent-1    Ready    <none>   4m52s   v1.19.4+k3s1
node/k3d-k3s-rancher-agent-2    Ready    <none>   4m51s   v1.19.4+k3s1
node/k3d-k3s-rancher-server-0   Ready    master   5m1s    v1.19.4+k3s1

NAME                 TYPE        CLUSTER-IP   EXTERNAL-IP   PORT(S)   AGE
service/kubernetes   ClusterIP   10.43.0.1    <none>        443/TCP   5m2s
Notice the EXTERNAL-IP is <none>. That’s expected.
Install Rancher
Follow along to install Rancher. If you get stuck, full instructions for Rancher are available on the Rancher website. The installation process is fast.
Install Cert Manager
cert-manager is a prerequisite for installing Rancher. Install and verify cert-manager. Install with regular manifests so you have a better understanding of what the Helm chart does since this is an important part of the infrastructure.
Once cert-manager is installed and verified run:
kubectl get pods --namespace cert-manager
You should see output like:
NAME                                      READY   STATUS              RESTARTS   AGE
cert-manager-cainjector-bd5f9c764-x2rp6   0/1     ContainerCreating   0          14s
cert-manager-5597cff495-c7fvd             0/1     ContainerCreating   0          14s
cert-manager-webhook-5f57f59fbc-npzpb     0/1     ContainerCreating   0          14s
Wait for all pods to be READY and confirm the deployment rolled-out:
kubectl -n cert-manager rollout status deploy/cert-manager
The deployment should eventuall roll out:
Waiting for deployment "cert-manager" rollout to finish: 0 of 1 updated replicas are available...
deployment "cert-manager" successfully rolled out
Once rolled out successfully the cert-manager installation is complete.
Run Helm Chart
With cert-manager deployed, use Helm to install Rancher into the cluster:
helm repo add rancher-latest https://releases.rancher.com/server-charts/latest && \
helm repo update && \
kubectl create namespace cattle-system && \
helm install rancher rancher-latest/rancher \
  --namespace cattle-system \
  --set hostname=rancher.k3d.localhost
You should see output like:
Expand to view sample output
"rancher-latest" has been added to your repositories
Hang tight while we grab the latest from your chart repositories...
...Successfully got an update from the "rancher-latest" chart repository
Update Complete. ⎈Happy Helming!⎈
namespace/cattle-system created
NAME: rancher
LAST DEPLOYED: Sat Nov 28 17:02:42 2020
NAMESPACE: cattle-system
STATUS: deployed
REVISION: 1
TEST SUITE: None
NOTES:
Rancher Server has been installed.

NOTE: Rancher may take several minutes to fully initialize. Please standby while Certificates are be
ing issued and Ingress comes up.

Check out our docs at https://rancher.com/docs/rancher/v2.x/en/

Browse to https://rancher.k3d.localhost

Happy Containering!
Monitor status of the Rancher deployment rollout with:
kubectl -n cattle-system rollout status deploy/rancher
You should see output like:
Waiting for deployment "rancher" rollout to finish: 0 of 3 updated replicas are available...
Waiting for deployment "rancher" rollout to finish: 1 of 3 updated replicas are available...
Waiting for deployment "rancher" rollout to finish: 2 of 3 updated replicas are available...
deployment "rancher" successfully rolled out
On a 2.3 GHz 8-Core Intel Core i9 the rollout should take about 3-4 minutes to complete. Once the Rancher deployment is rolled out inspect installation with:
kubectl -n cattle-system get rs,pods,ingresses
You should see output like:
NAME                                         DESIRED   CURRENT   READY   AGE
replicaset.apps/rancher-webhook-698dd9dc76   1         1         1       99m
replicaset.apps/rancher-644d688cfd           3         3         3       99m

NAME                           READY   STATUS    RESTARTS   AGE
pod/rancher-644d688cfd-rvfrz   1/1     Running   0          99s
pod/rancher-644d688cfd-z7r46   1/1     Running   0          99s
pod/rancher-644d688cfd-r454r   1/1     Running   0          99s

NAME                         CLASS    HOSTS                   ADDRESS         PORTS     AGE
ingress.extensions/rancher   <none>   rancher.k3d.localhost   192.168.192.3   80, 443   99s
Verify the Rancher server successfully deployed:
kubectl -n cattle-system get deploy rancher
You should see output like:
NAME      READY   UP-TO-DATE   AVAILABLE   AGE
rancher   3/3     3            3           2m10s
Next run docker ps and verify port 443 of the Rancher load balancer is mapped:
CONTAINER ID        IMAGE                      COMMAND                  CREATED             STATUS              PORTS                                                  NAMES
c005216b6acb        rancher/k3d-proxy:v3.3.0   "/bin/sh -c nginx-pr…"   46 minutes ago      Up 46 minutes       80/tcp, 0.0.0.0:443->443/tcp, 0.0.0.0:6550->6443/tcp   k3d-k3s-rancher-serverlb
b04a08abd440        rancher/k3s:latest         "/bin/k3s agent"         46 minutes ago      Up 46 minutes                                                              k3d-k3s-rancher-agent-2
53e0f0763f28        rancher/k3s:latest         "/bin/k3s agent"         46 minutes ago      Up 46 minutes                                                              k3d-k3s-rancher-agent-1
620afd352bbe        rancher/k3s:latest         "/bin/k3s agent"         46 minutes ago      Up 46 minutes                                                              k3d-k3s-rancher-agent-0
89483a618dbf        rancher/k3s:latest         "/bin/k3s server --t…"   46 minutes ago      Up 46 minutes                                                              k3d-k3s-rancher-server-0
9d18672b25eb        rancher/k3d-proxy:v3.3.0   "/bin/sh -c nginx-pr…"   2 hours ago         Up 2 hours          80/tcp, 0.0.0.0:64232->6443/tcp                        k3d-k3s-default-serverlb
d5b22c2d2788        rancher/k3s:latest         "/bin/k3s server --t…"   2 hours ago         Up 2 hours                                                                 k3d-k3s-default-server-0
Specifically look for 0.0.0.0:443->443/tcp of k3d-k3s-rancher-serverlb. Without the 443 port binding you will not be able to connect to Rancher running inside the cluster using https from your localhost. Notice port 80 was left unbound.
If you’re wondering why there are two proxies, that’s because you have two clusters running. Verify with k3d cluster list. You should see output like:
NAME          SERVERS   AGENTS   LOADBALANCER
k3s-default   1/1       0/0      true
k3s-rancher   1/1       3/3      true
Since k3s-default isn’t doing anything right now go ahead and delete it:
k3d cluster delete k3s-default
You should see output like:
Expand to view sample output
INFO[0000] Deleting cluster 'k3s-default'
INFO[0000] Deleted k3d-k3s-default-serverlb
INFO[0002] Deleted k3d-k3s-default-server-0
INFO[0002] Deleting cluster network '784550dca344f63aaa789a17f688f8d843f4a085c451035efef7431ad94aea6
5'
INFO[0002] Deleting image volume 'k3d-k3s-default-images'
INFO[0002] Removing cluster details from default kubeconfig...
INFO[0002] Removing standalone kubeconfig file (if there is one)...
INFO[0002] Successfully deleted cluster k3s-default!
And now your down to one cluster running Rancher. The cluster consists of 1 server and 3 agent nodes. Verify this with kubectl get nodes.
You should see output like:
k3d-k3s-rancher-server-0   Ready    master   25m   v1.19.4+k3s1
k3d-k3s-rancher-agent-1    Ready    <none>   25m   v1.19.4+k3s1
k3d-k3s-rancher-agent-2    Ready    <none>   25m   v1.19.4+k3s1
k3d-k3s-rancher-agent-0    Ready    <none>   25m   v1.19.4+k3s1
To see what’s going on each of the nodes run:
docker exec -it k3d-k3s-rancher-server-0 crictl ps && \
docker exec -it k3d-k3s-rancher-agent-1 crictl ps && \
docker exec -it k3d-k3s-rancher-agent-2 crictl ps && \
docker exec -it k3d-k3s-rancher-agent-0 crictl ps
You should see output like:
Expand to view sample output
CONTAINER           IMAGE               CREATED             STATE               NAME                     ATTEMPT             POD ID
92317d4ecc162       a9c87ad9294e5       16 minutes ago      Running             fleet-agent              0                   0023e463c8182
5cec59ae7851a       bdf5bdf4a545f       16 minutes ago      Running             rancher-operator         0                   d9fa64c4973dd
019890f678af7       89ac08abb5004       25 minutes ago      Running             cert-manager             0                   d19982b27df09
0452070679651       897ce3c5fc8ff       30 minutes ago      Running             lb-port-443              0                   cc58baefe472f
77a93a17ec101       897ce3c5fc8ff       30 minutes ago      Running             lb-port-80               0                   cc58baefe472f
65616b7e98353       e422121c9c5f9       30 minutes ago      Running             local-path-provisioner   0                   2f05b7ebeb701
CONTAINER           IMAGE               CREATED             STATE               NAME                ATTEMPT             POD ID
d40d2cc636ed3       2b258c75d19af       17 minutes ago      Running             gitjob              0                   dd002866c9b52
c52dfd25fa7ff       4251f6ed7d4e1       19 minutes ago      Running             rancher             0                   bd45b5b63bd25
9ee5e98d161a5       aa764f7db3051       30 minutes ago      Running             traefik             0                   6b14c5a9449b9
6edb165809df1       897ce3c5fc8ff       30 minutes ago      Running             lb-port-443         0                   e7d548c6bed79
c3d7363881384       897ce3c5fc8ff       30 minutes ago      Running             lb-port-80          0                   e7d548c6bed79
0a36f2779bf93       4e797b3234604       30 minutes ago      Running             coredns             0                   b6e7a5f6da6a0
CONTAINER           IMAGE               CREATED             STATE               NAME                ATTEMPT             POD ID
0a2ce643c2e10       9396c89b38782       15 minutes ago      Running             rancher-webhook     0                   9a96e28e2bb56
488997f4ec0a2       73b4cce2500a3       17 minutes ago      Running             fleet-controller    0                   5f4102f144a45
ec7b49cf1e7ad       4251f6ed7d4e1       19 minutes ago      Running             rancher             0                   fdaa68b52fd80
16c0cd3bcbf74       897ce3c5fc8ff       30 minutes ago      Running             lb-port-443         0                   8e38e3cbab2e2
3b8bd12227c38       897ce3c5fc8ff       30 minutes ago      Running             lb-port-80          0                   8e38e3cbab2e2
65515884025ee       9dd718864ce61       31 minutes ago      Running             metrics-server      0                   d84b8df86cedb
CONTAINER           IMAGE               CREATED             STATE               NAME                ATTEMPT             POD ID
c520c32f80854       4251f6ed7d4e1       18 minutes ago      Running             rancher             1                   f9afb04a5bff7
22ac800e4b18c       b8d1297ad40fb       25 minutes ago      Running             cert-manager        0                   47dd9623a58a9
c669296f7cc06       f37c0bf206855       25 minutes ago      Running             cert-manager        0                   802f863e2a809
9ce2d063c66b1       897ce3c5fc8ff       30 minutes ago      Running             lb-port-443         0                   c41d49ffe09ec
838b9cfb75380       897ce3c5fc8ff       30 minutes ago      Running             lb-port-80          0                   c41d49ffe09ec
Note there are 23 containers running with work spread among the agents. To inspect resource usage run kubectl top node. You should see output like:
NAME                       CPU(cores)   CPU%   MEMORY(bytes)   MEMORY%
k3d-k3s-rancher-agent-0    142m         1%     622Mi           7%
k3d-k3s-rancher-agent-1    132m         1%     532Mi           6%
k3d-k3s-rancher-agent-2    136m         1%     464Mi           5%
k3d-k3s-rancher-server-0   408m         3%     1343Mi          16%
Now graphically next to htop showing the actual machine state:

Let’s see how some of these metrics look inside the Rancher UI.
Update Hosts File
Before launching the Rancher UI, edit your /etc/hosts file to add rancher.k3d.localhost (specified when setting up Rancher) pointed at the local loopback address. Run grep rancher /etc/hosts and verify the output is what you expect, i.e. 127.0.0.1 rancher.k3d.localhost.
Launch Rancher UI
Then browse to rancher.k3d.localhost over HTTPS. If you’re running a Chrome browser you’ll be greeted with an error:
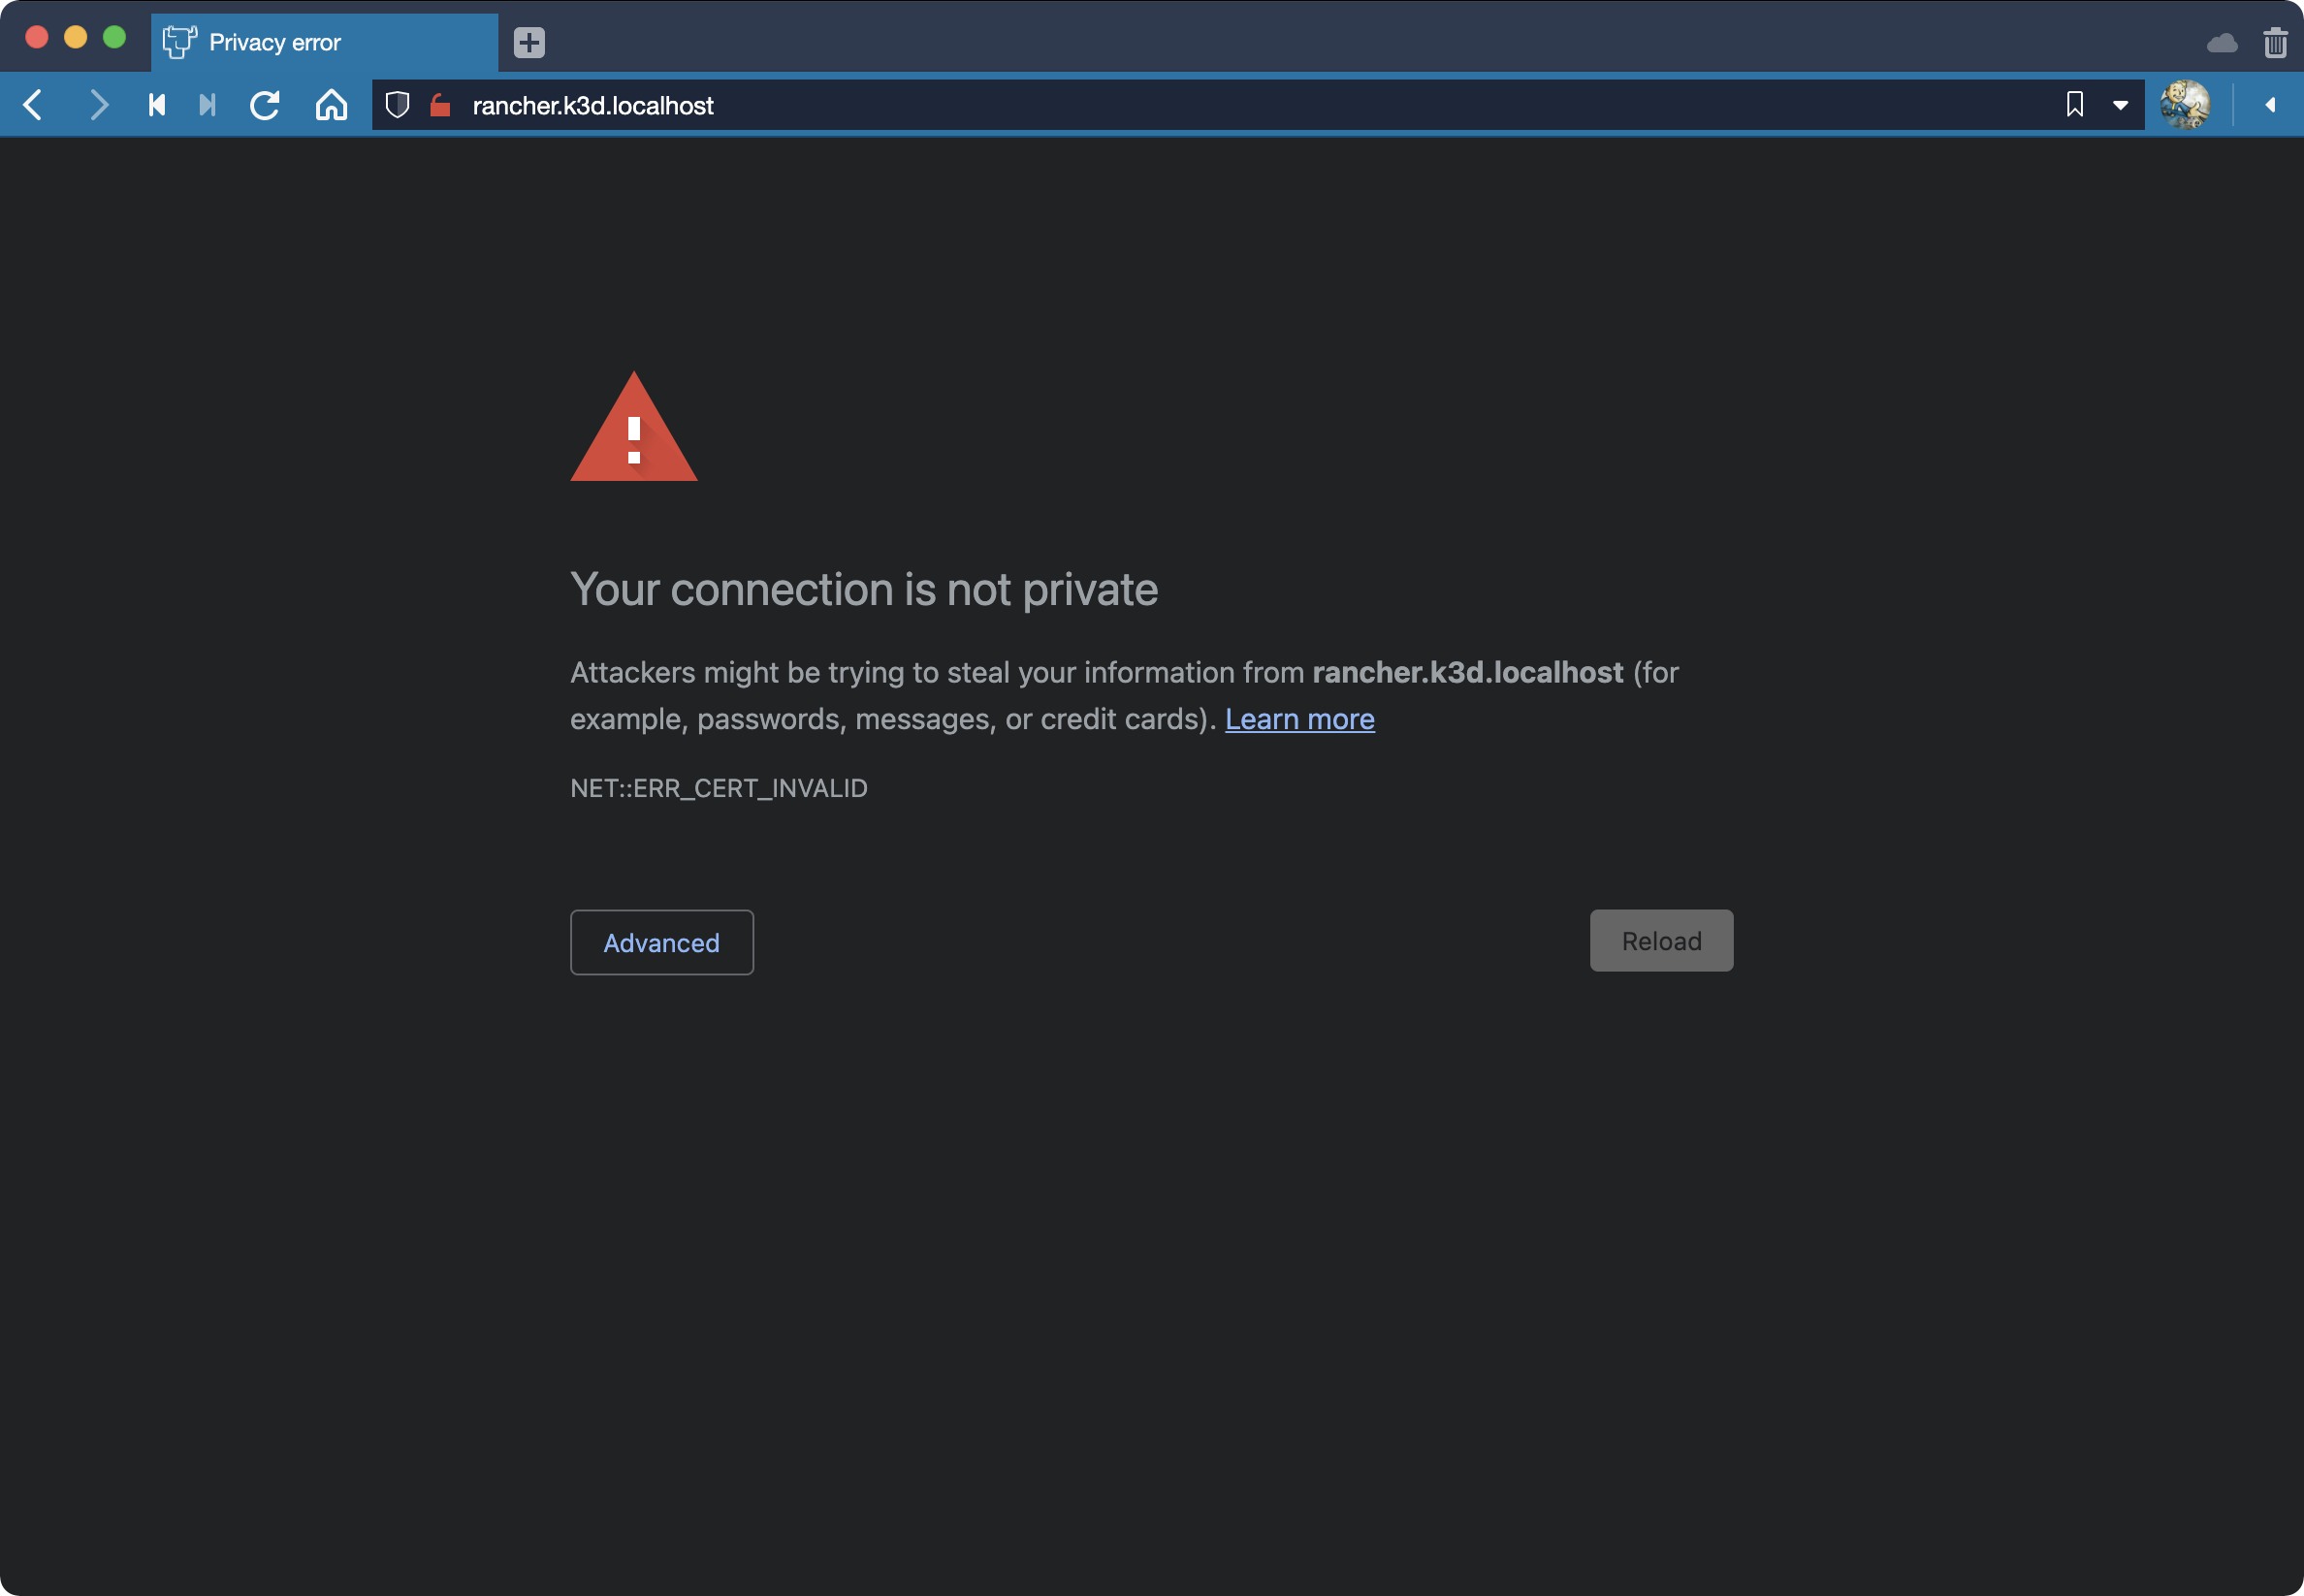
The ERR_CERT_INVALID error is warning you the certificate being used isn’t trusted by the browser. On macOS you cannot bypass the error after clicking Advanced but you can get even more advanced and type thisisunsafe.
Note: The option to Always Trust the certificate after clicking the 🔓 icon in the address bar won’t work either, at least in Chrome/Vivaldi (pictured).
Once you bypass security you’ll be wisked away to the Welcome to Rancher page where you’ll be prompted to create an admin password:
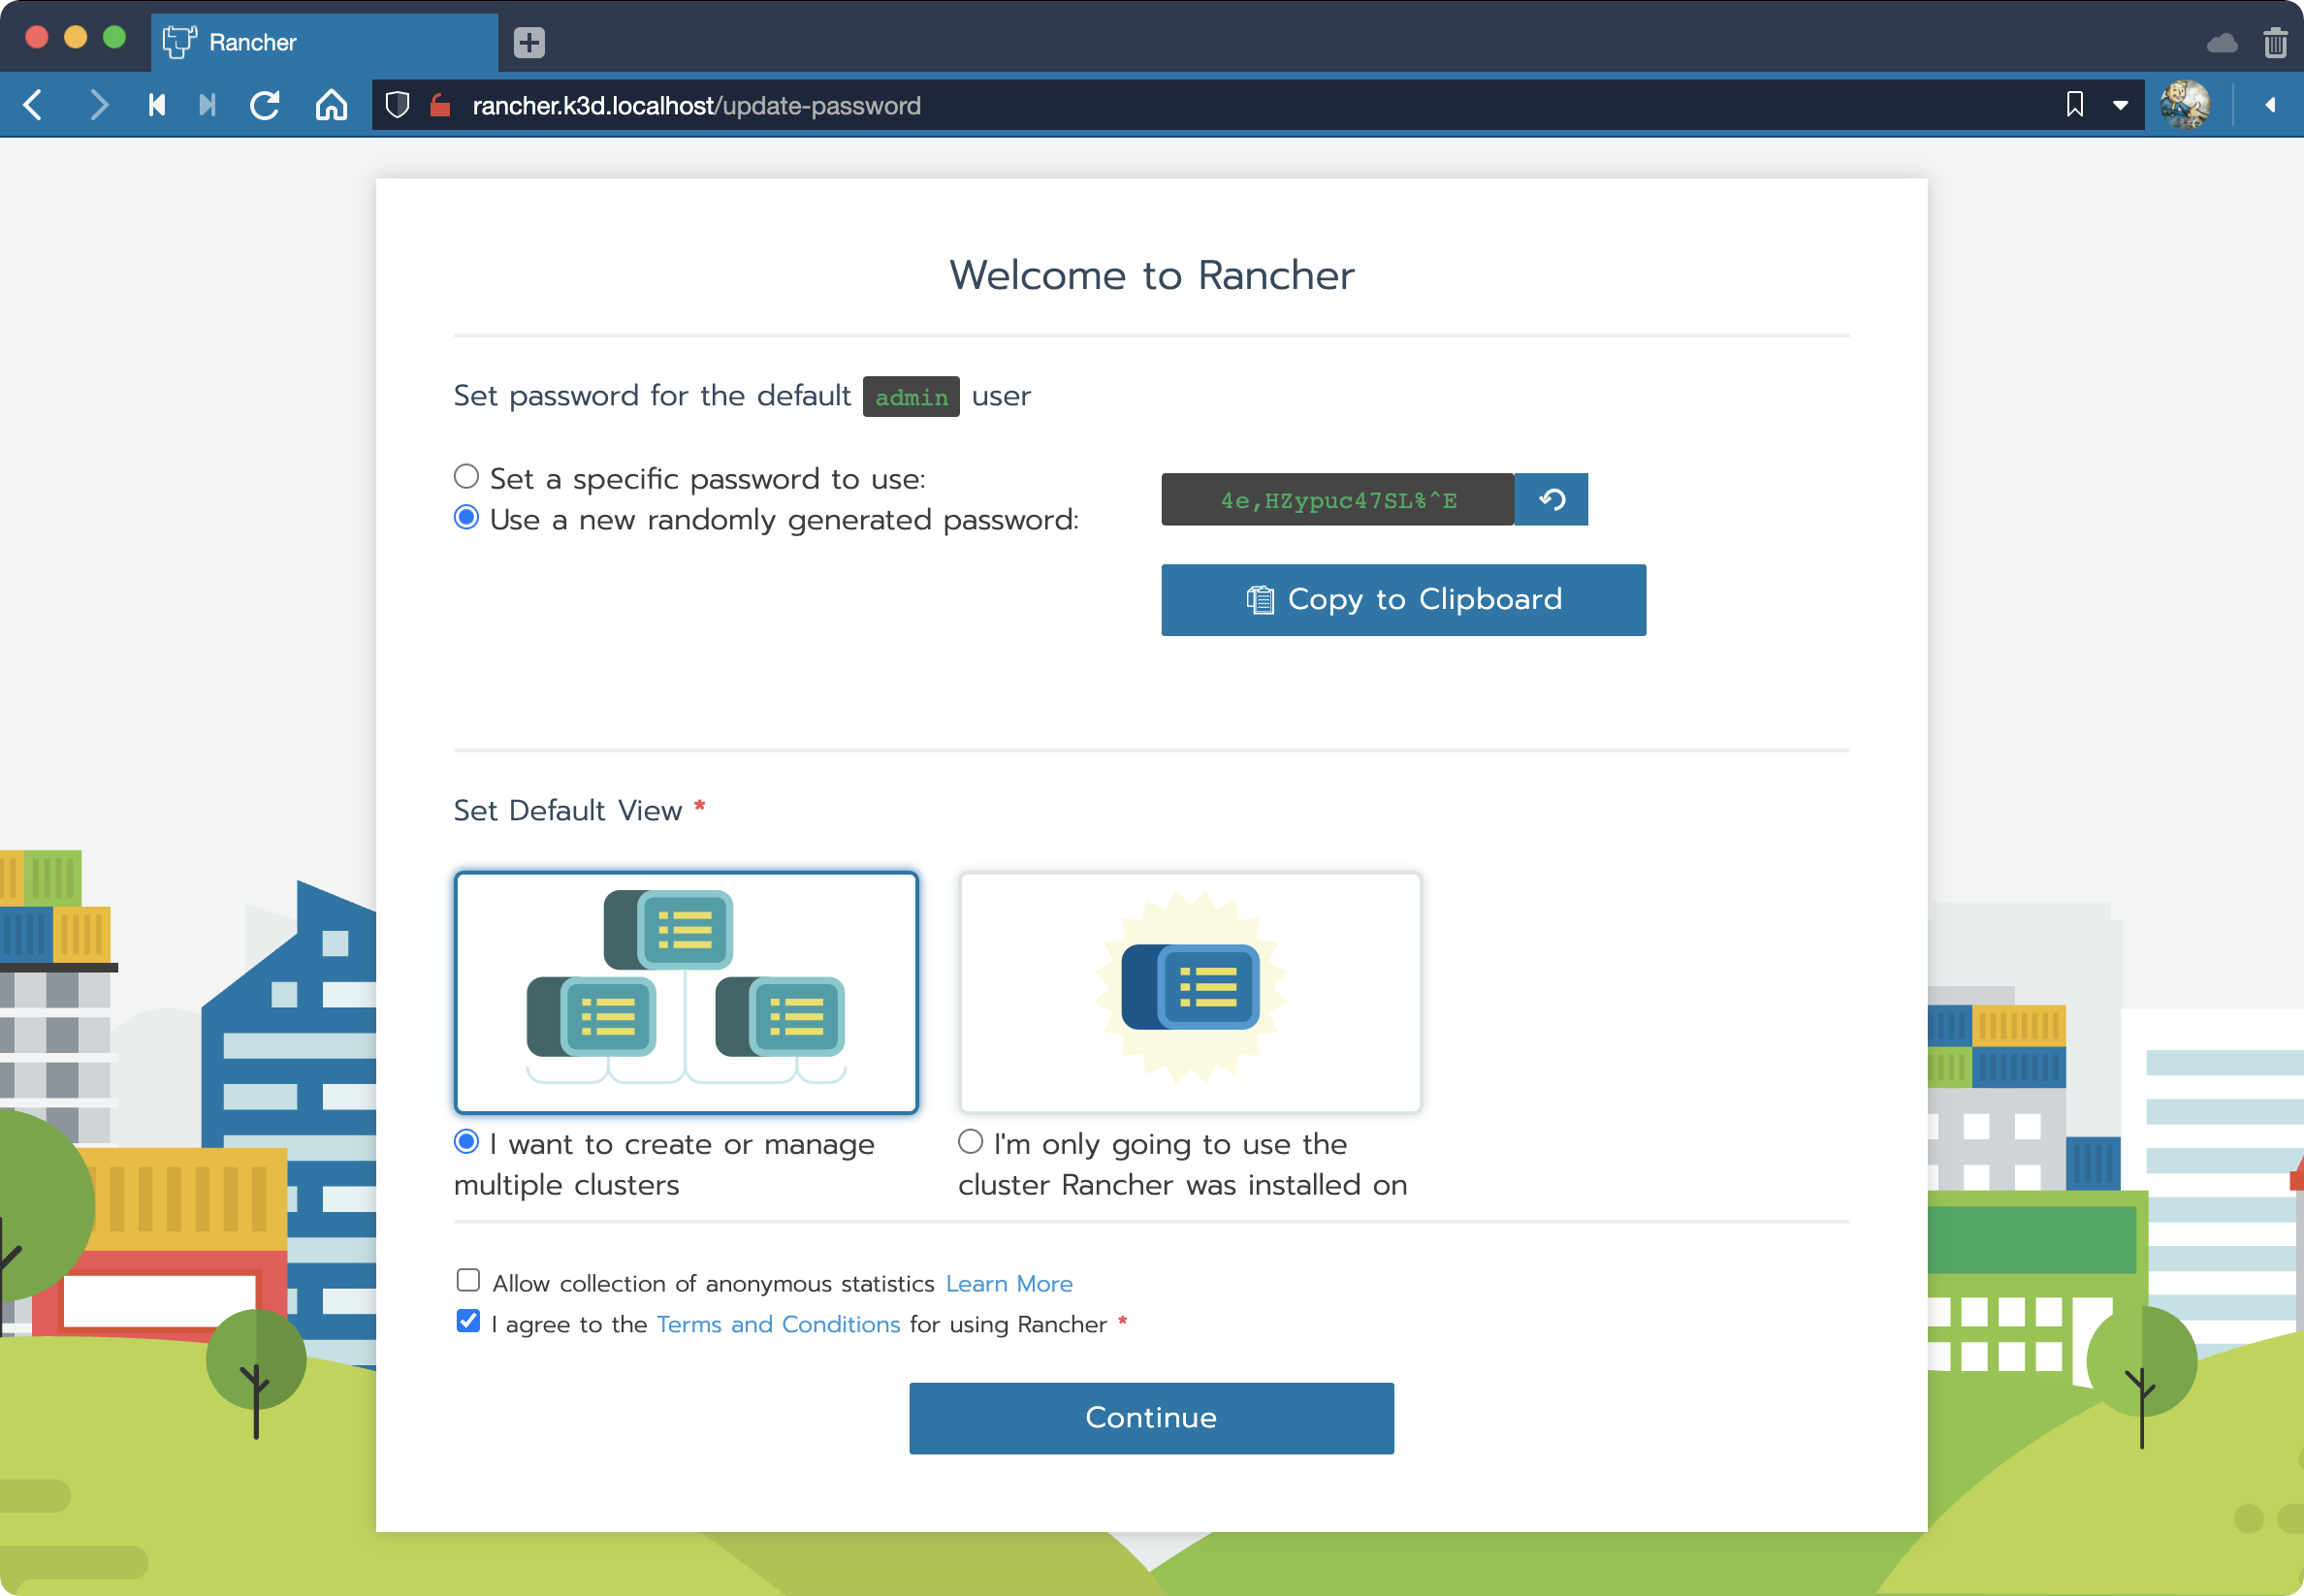
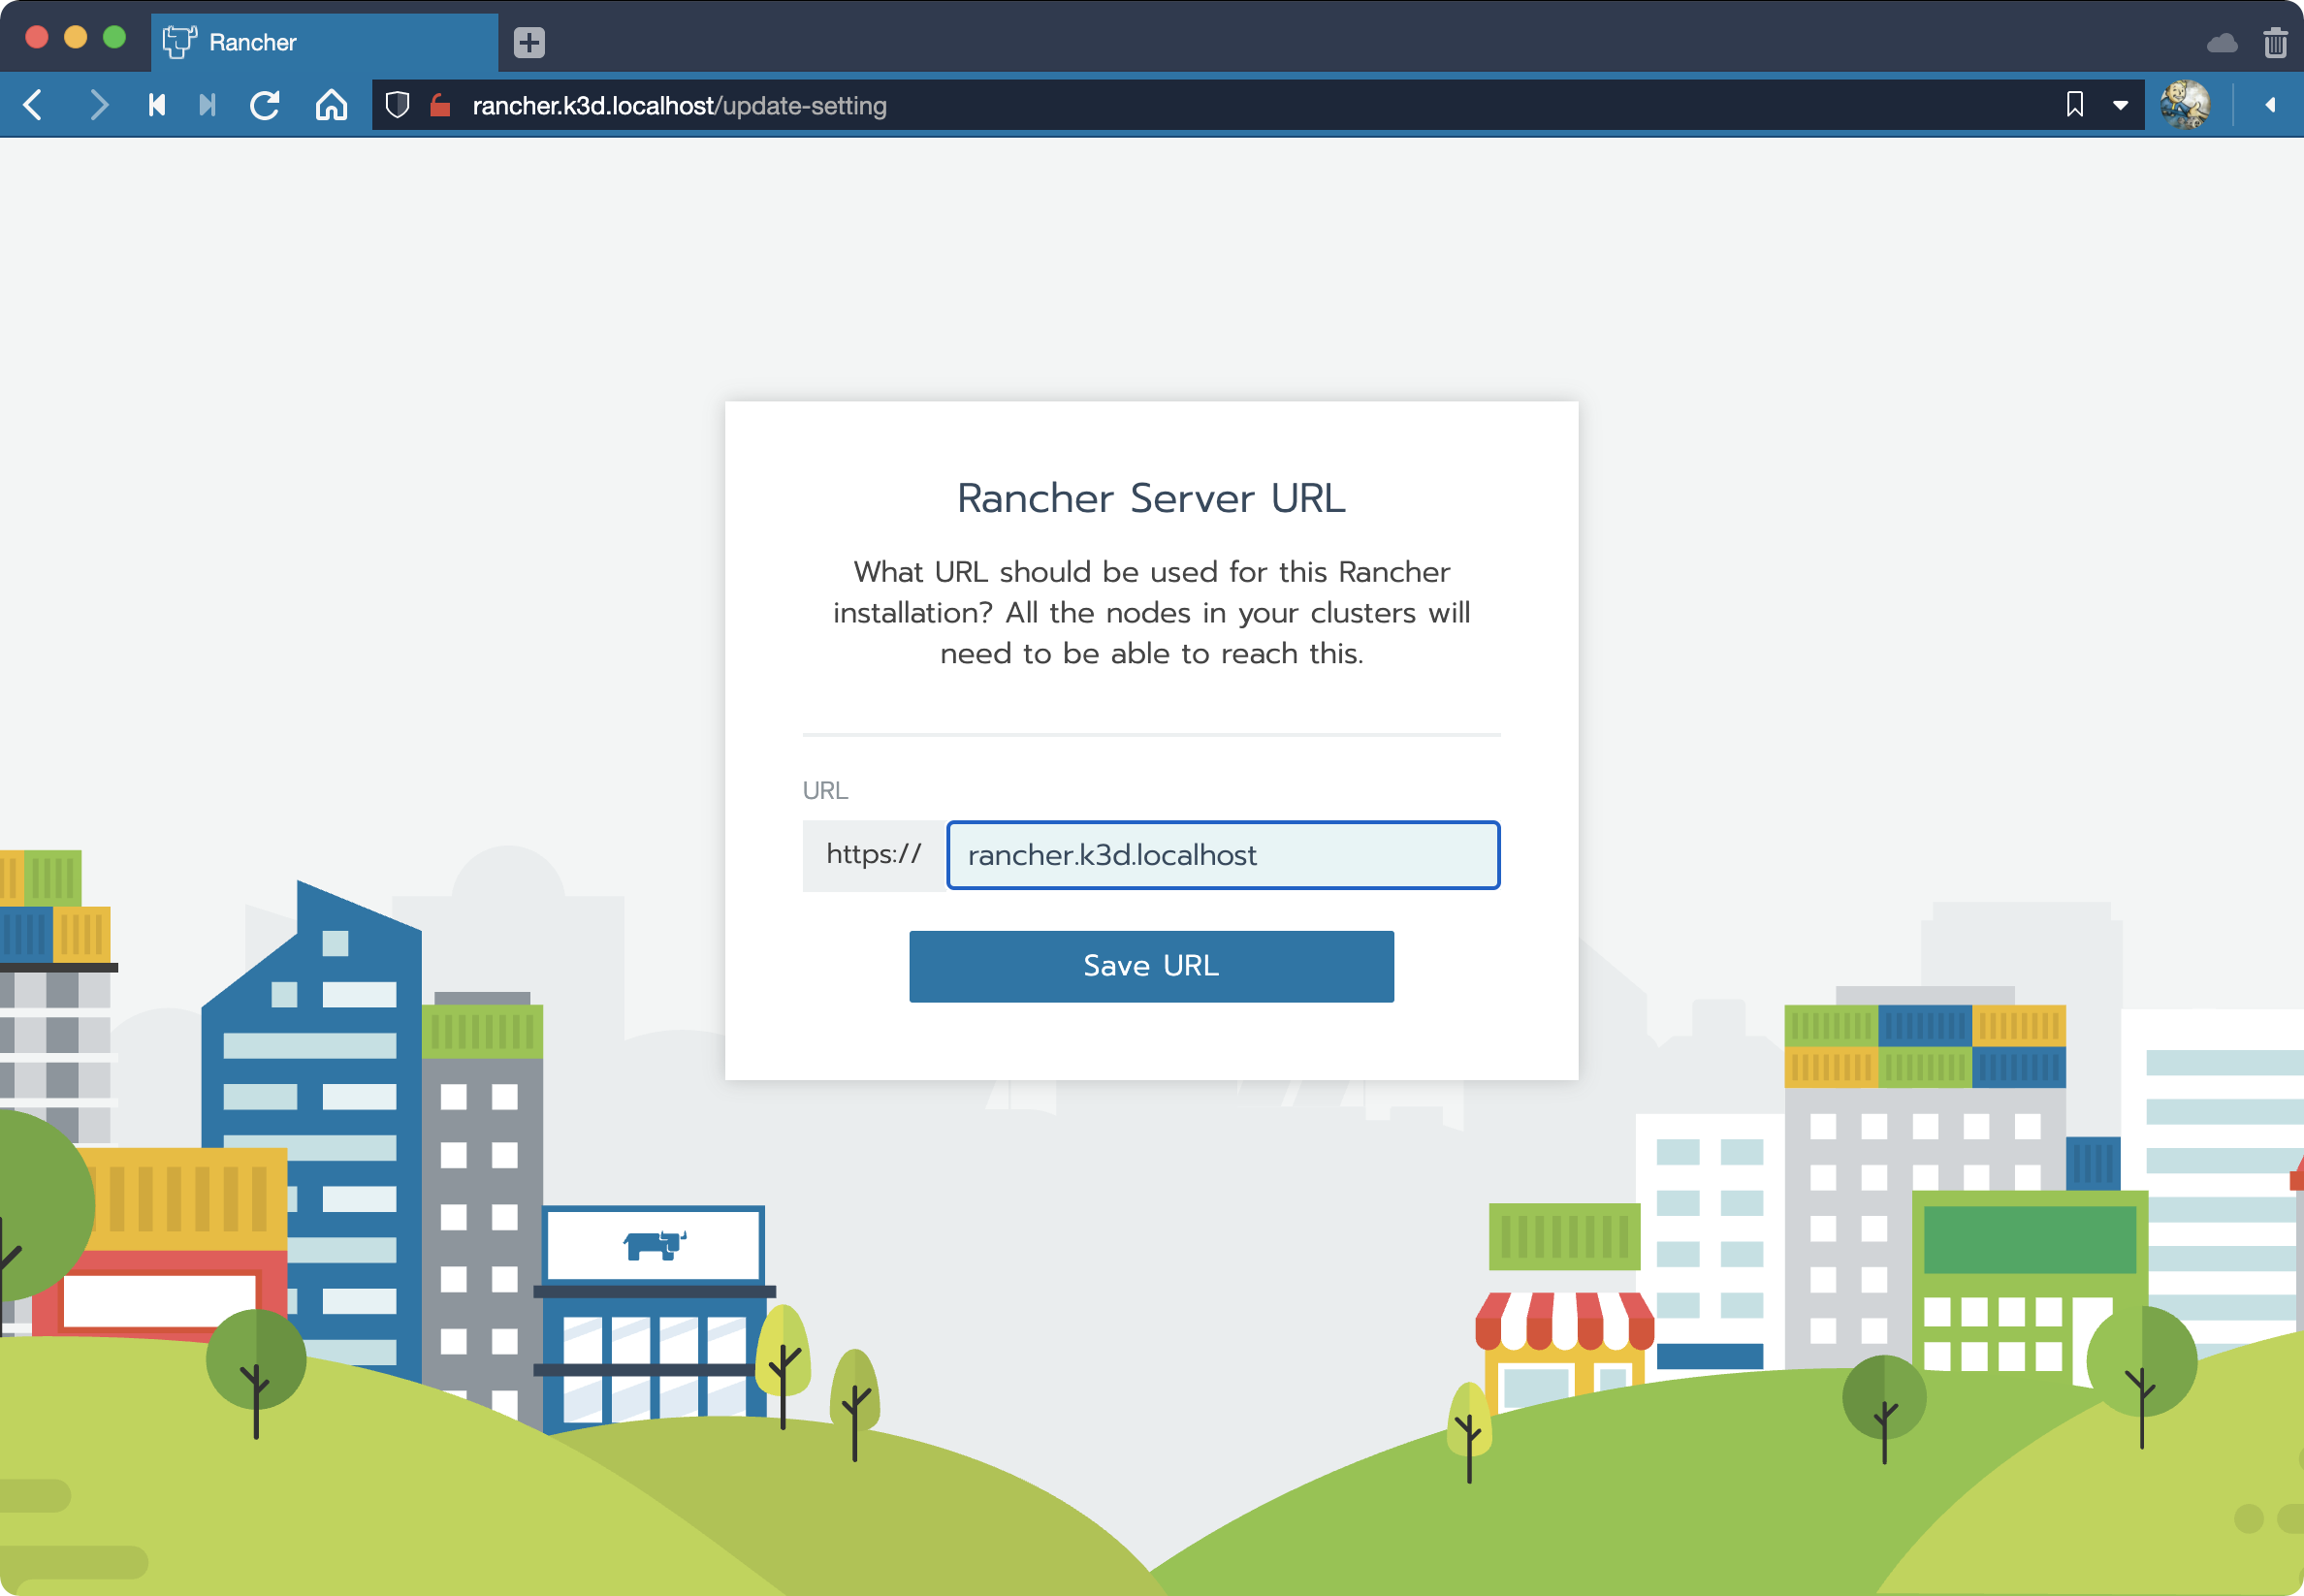
Create a password, keep I want to create or manage multiple clusters selected, disable collection of anonymous data, agree to the terms then click Continue. And the next page allows you to save the Rancher Server URL already in use.
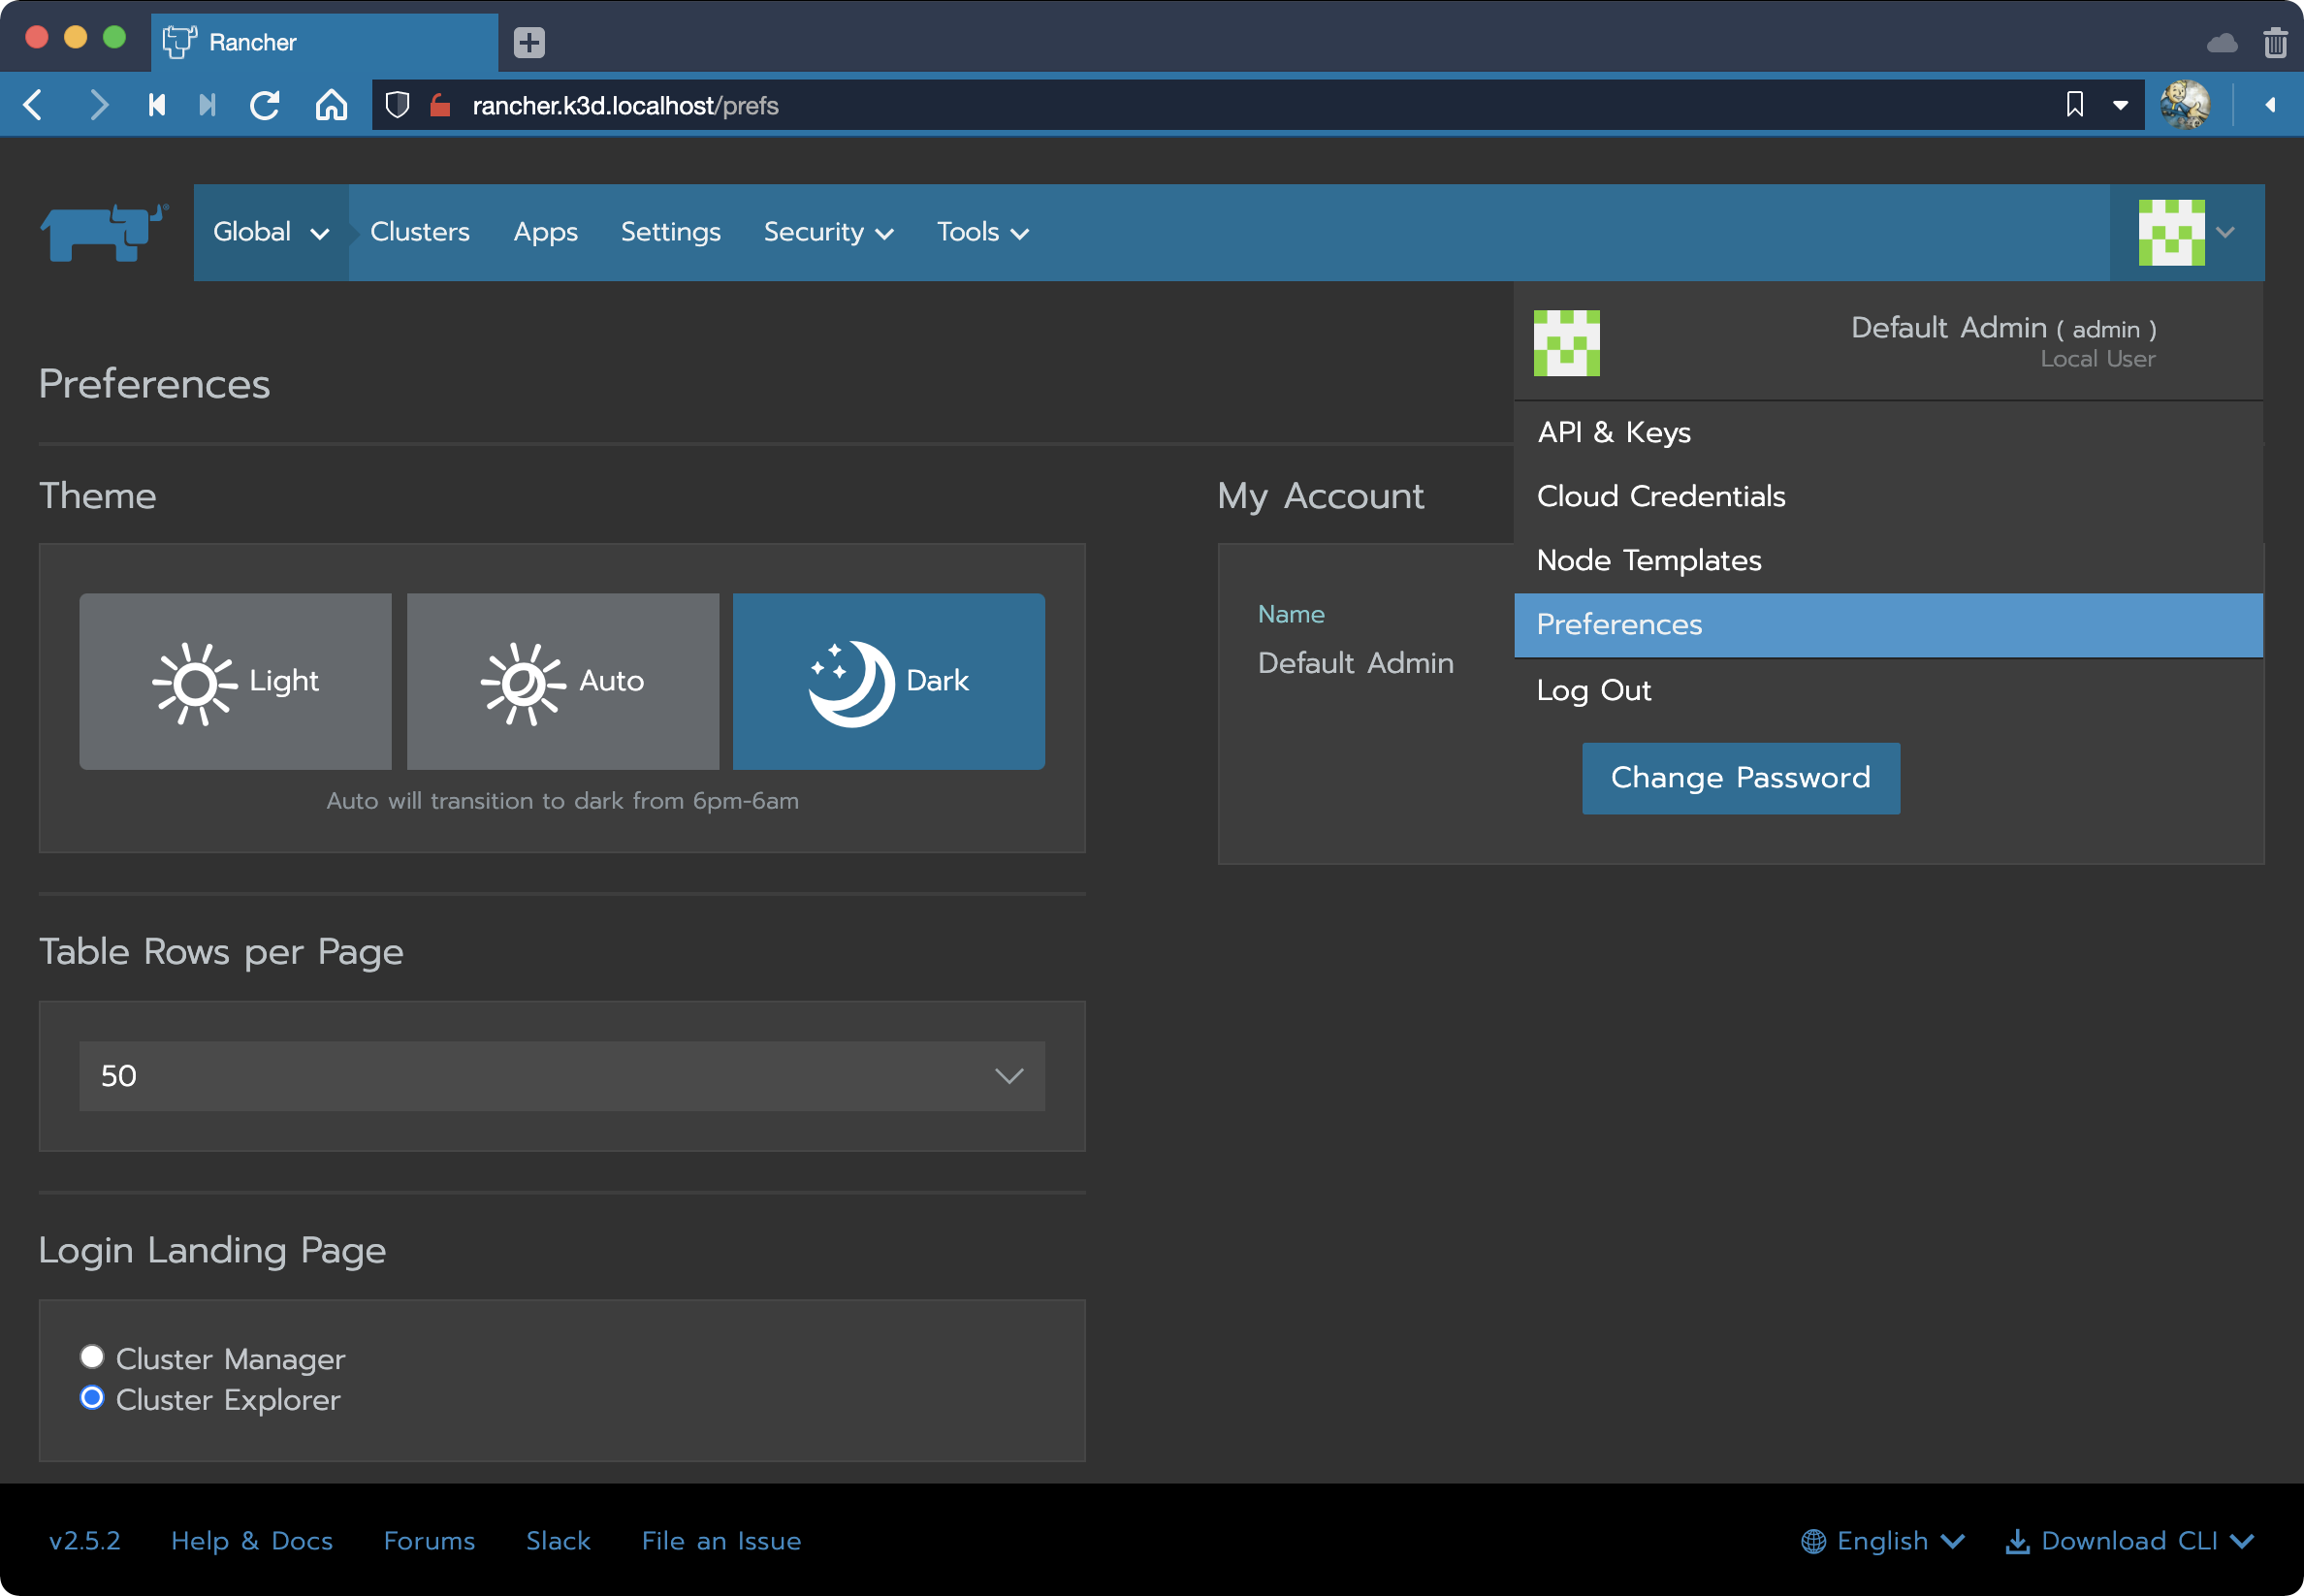
After that you should be looking at release notes and Cluster Manager. Now that you’re in access Preferences and switch to the dark theme to reduce eye strain and set the Landing Page to Cluster Explorer as shown here:
Browse to rancher.k3d.localhost to view the Cluster Explorer dashboard:
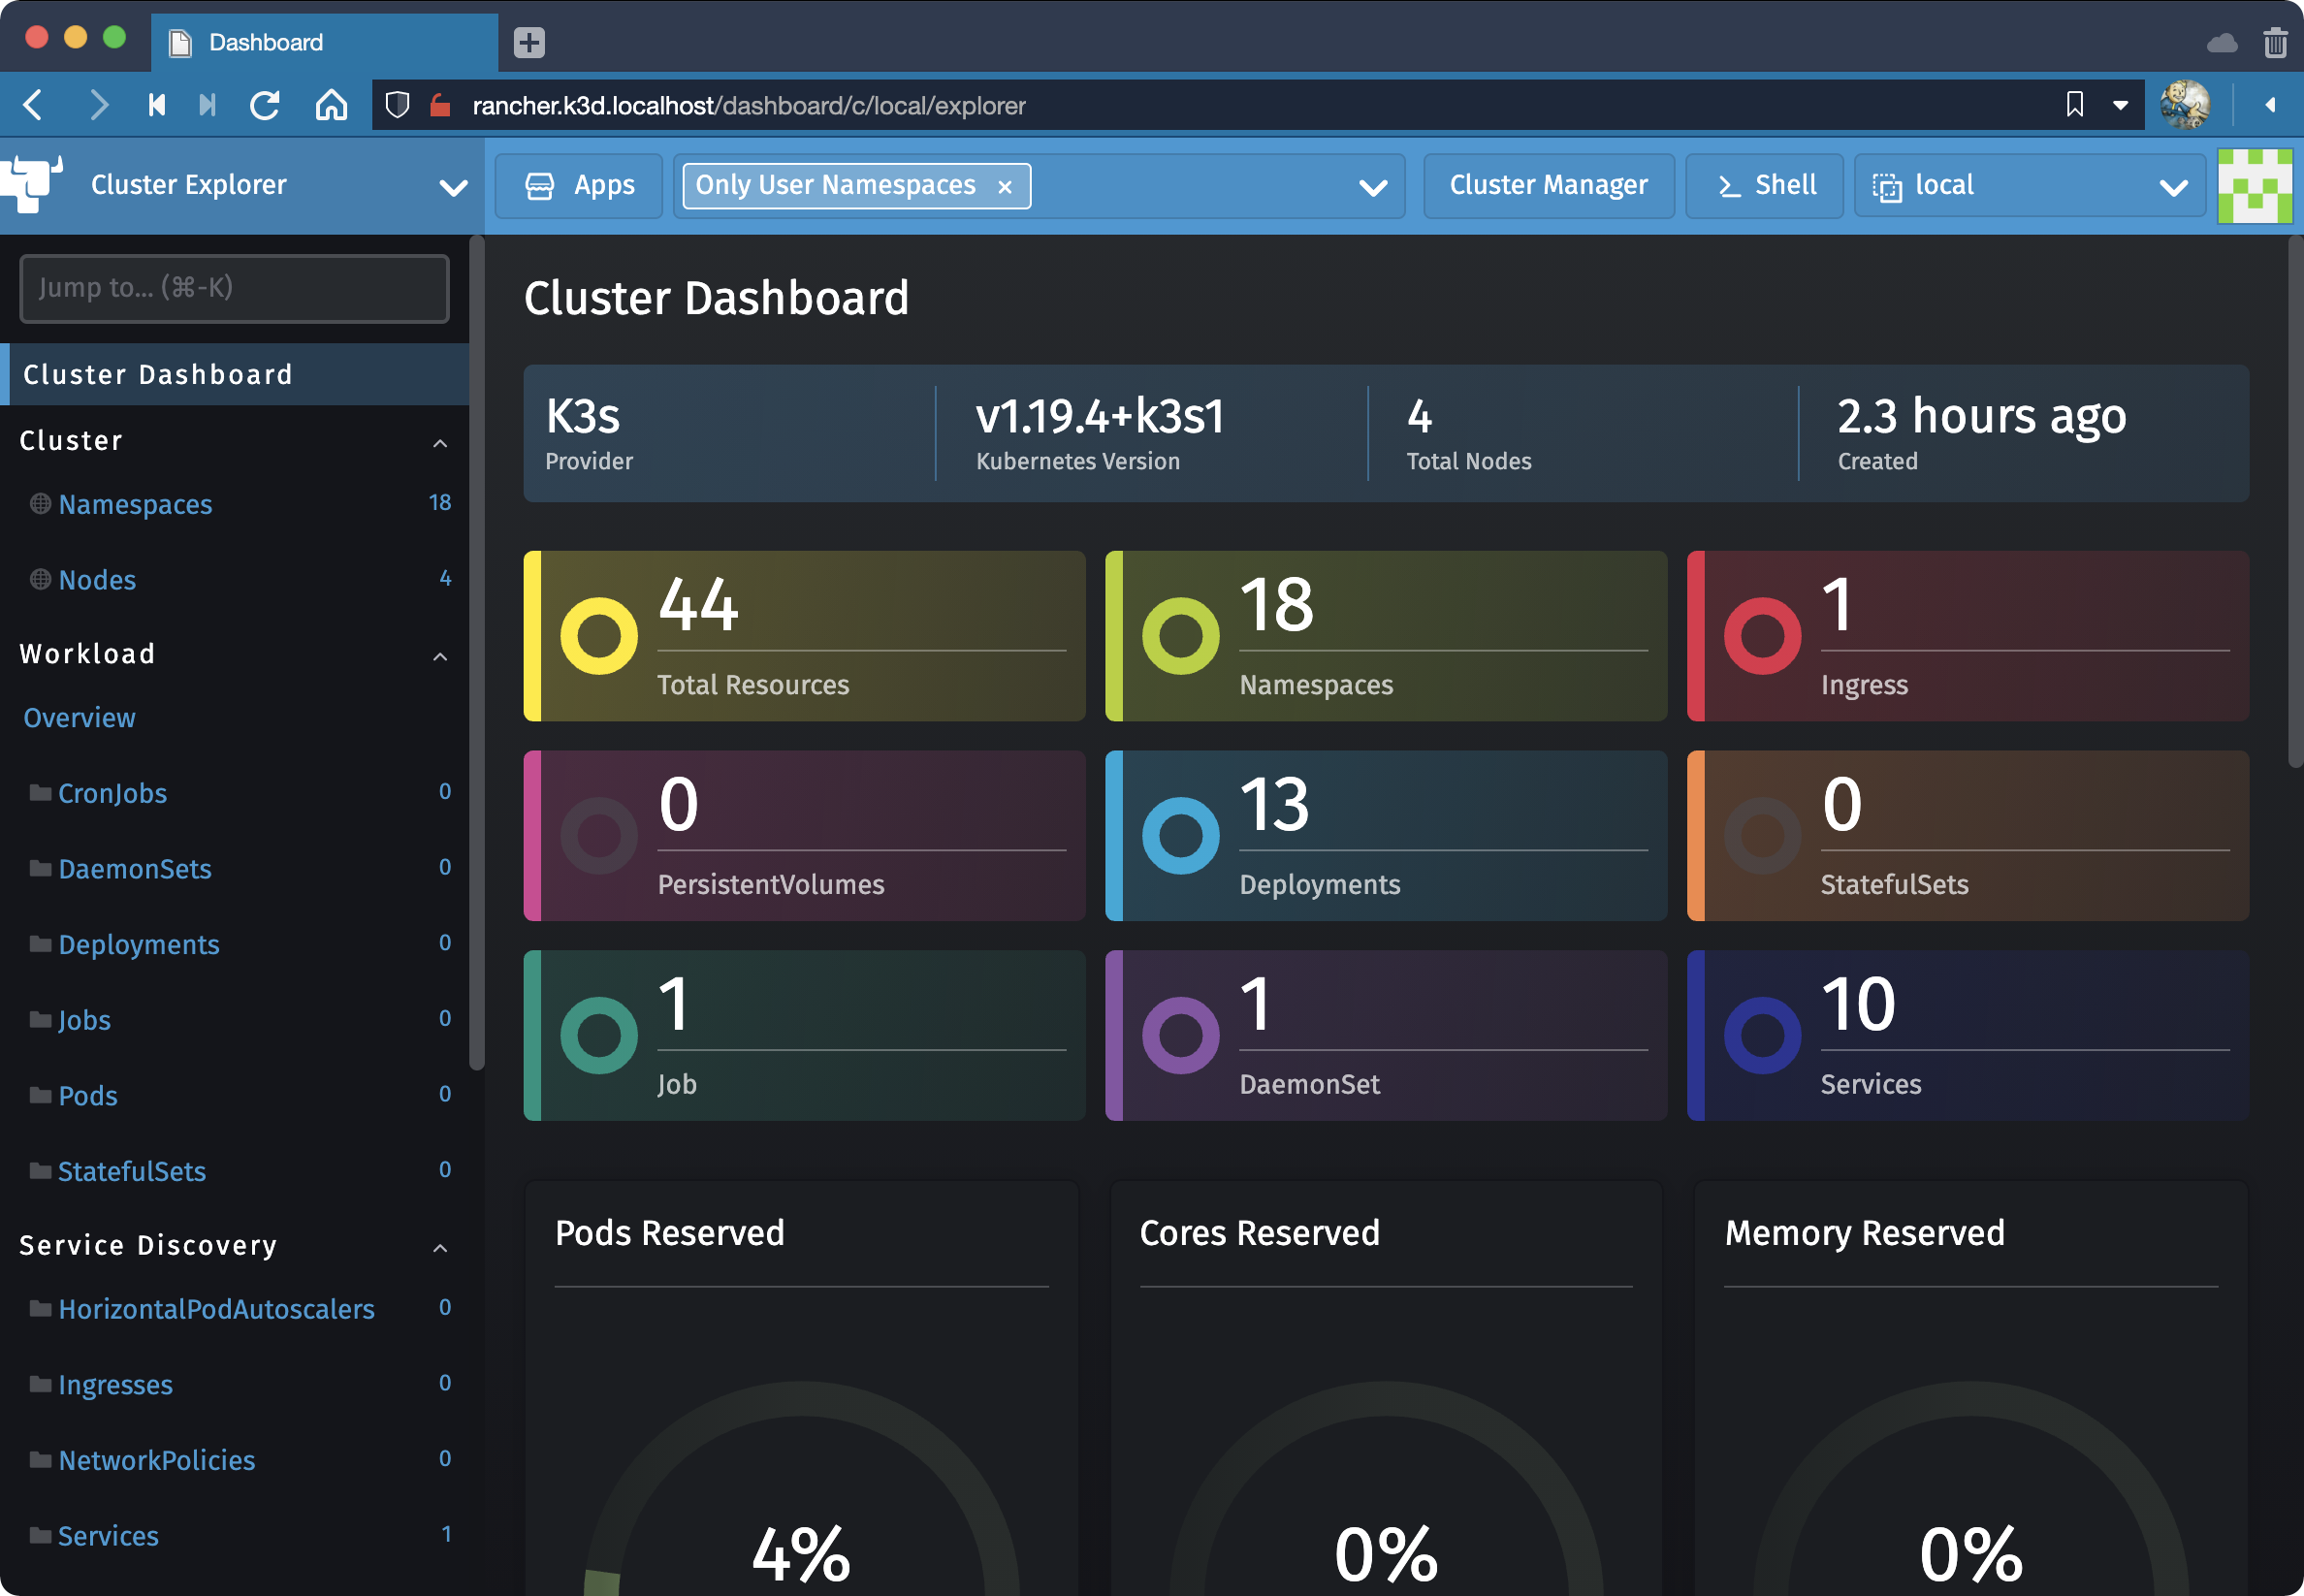
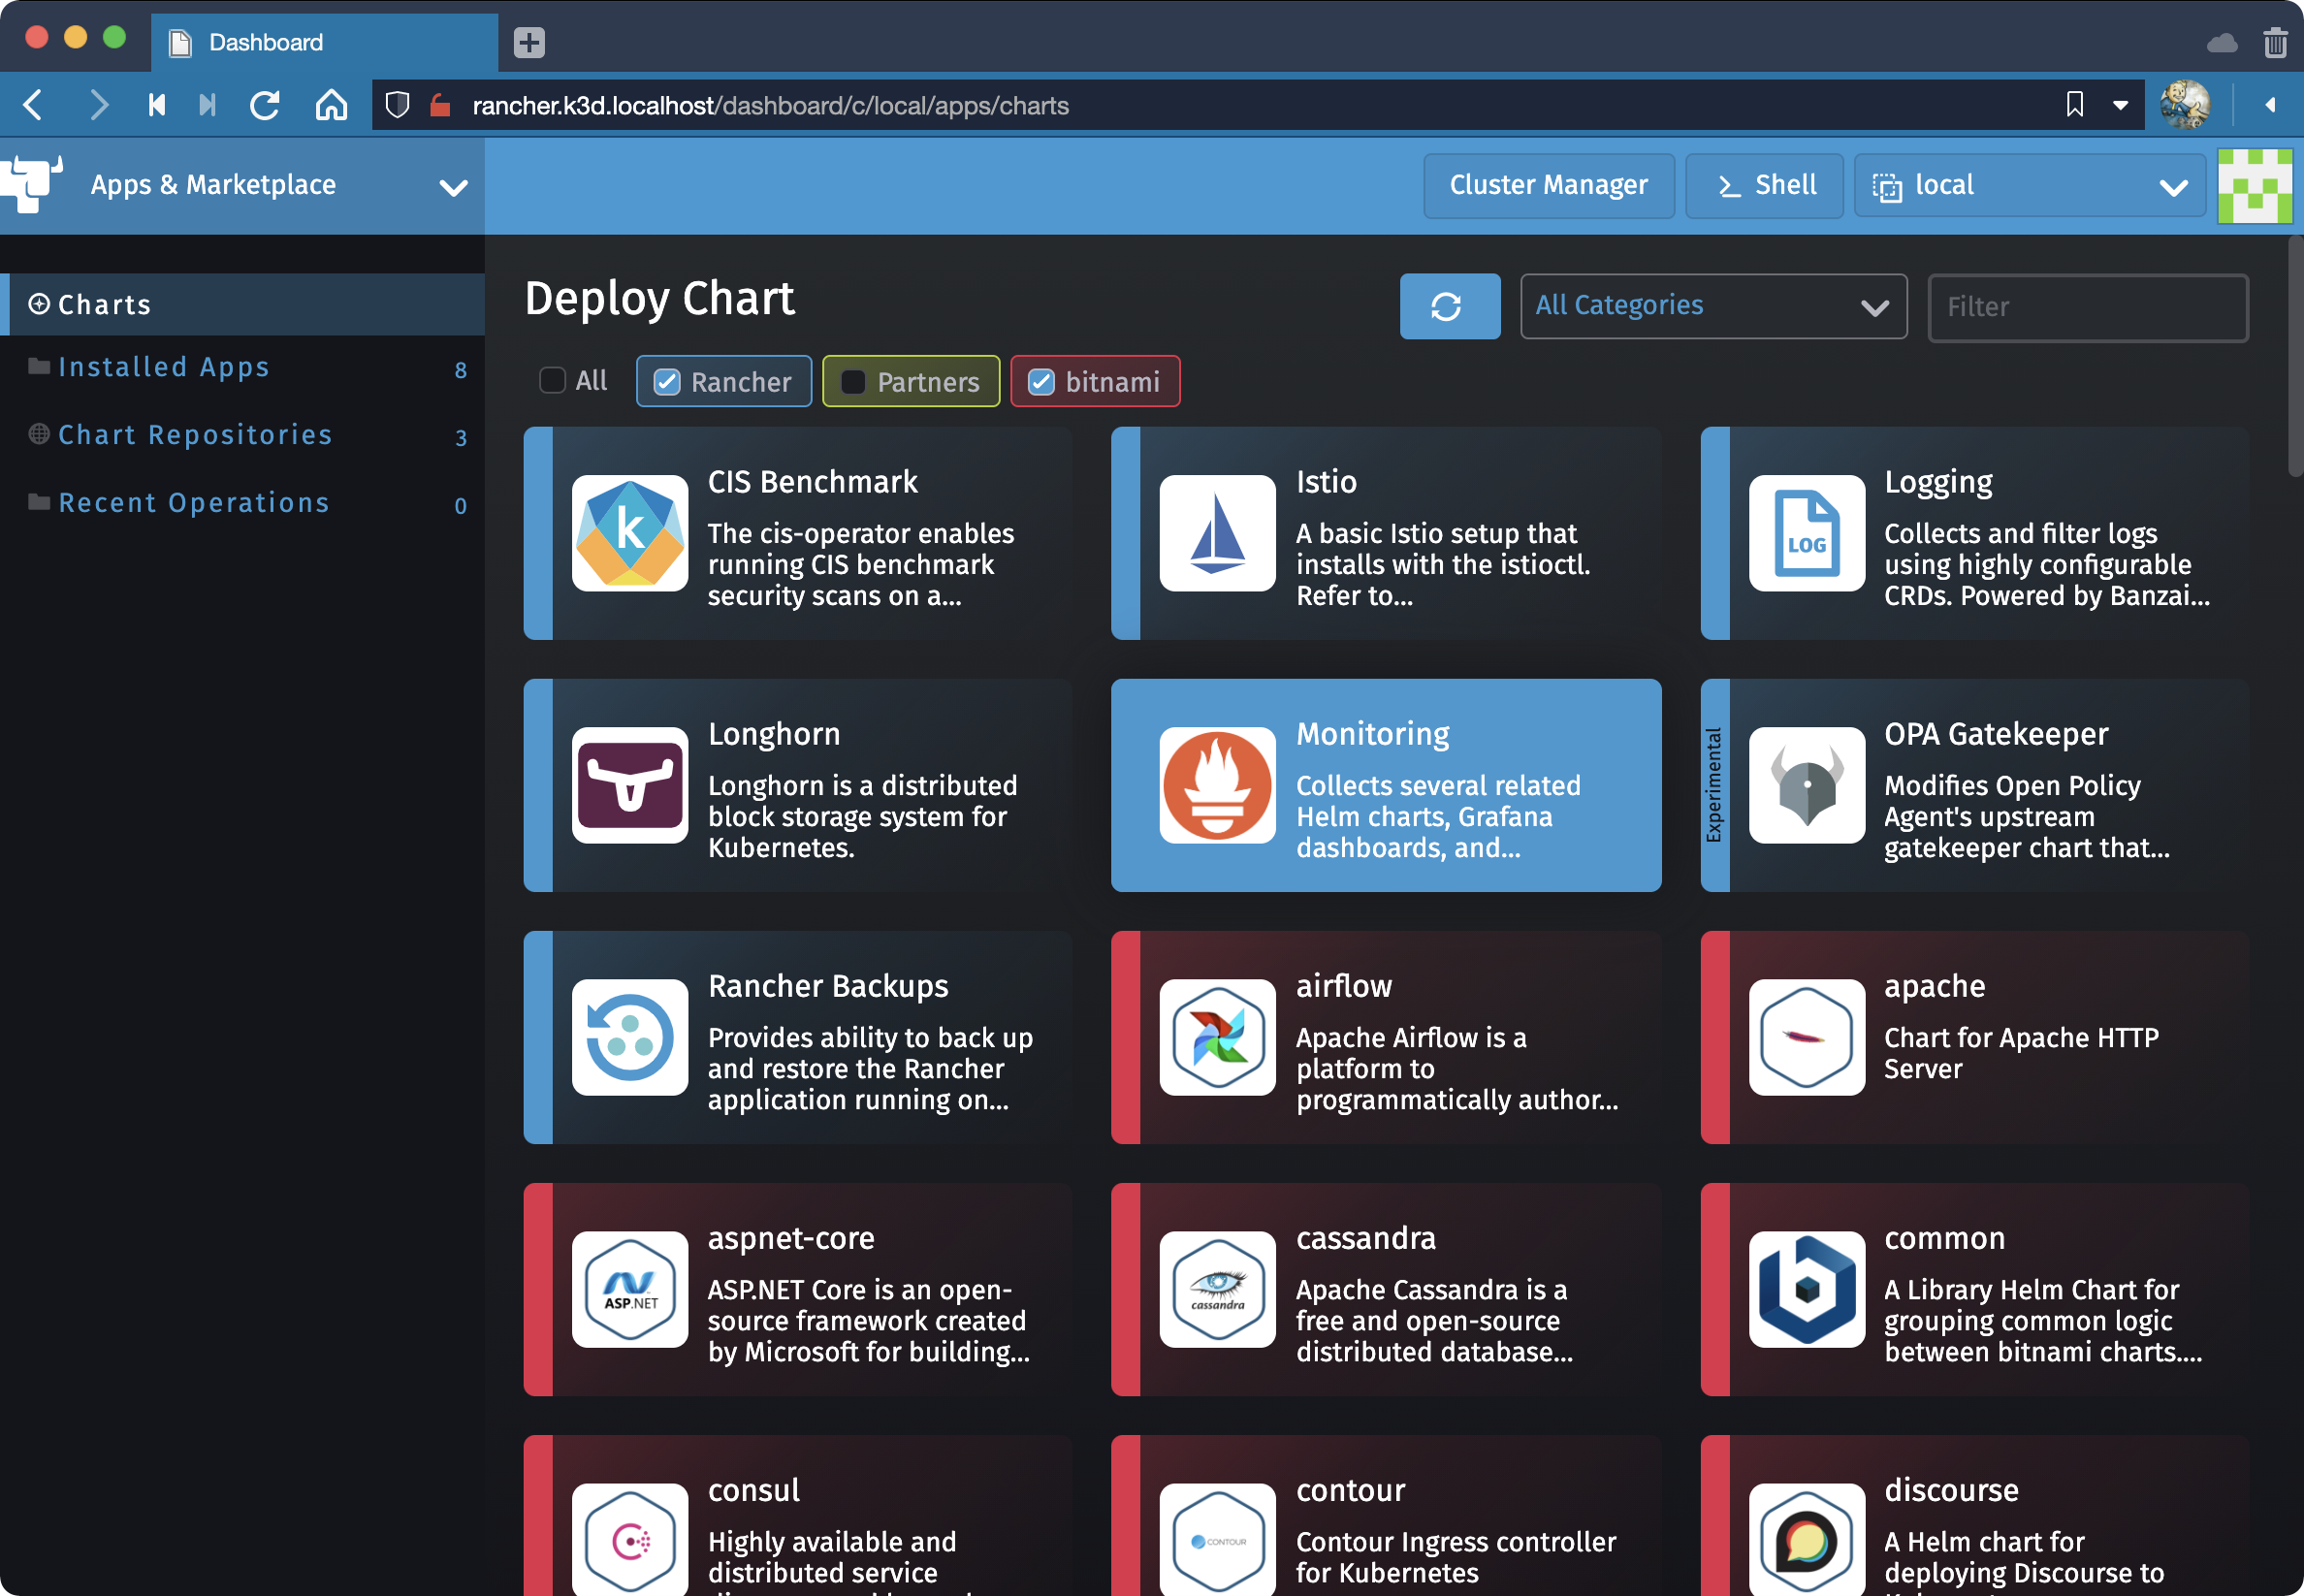
This is a new dashboard added in Rancher 2.5. It is intended to augment but not replace the Cluster Manager. Included is a new Marketplace for apps which can be installed using any Helm chart repo:
What’s Next
Now that you’ve got Rancher started locally check out the Rancher Blog for intersting ideas on what you can do with it. Here are two posts to help spark your imagination:
- Maximize Monitoring in Rancher 2.5 with Prometheus
- Rancher 2.5 Embraces GitOps at Scale with Rancher Continuous Delivery
To view all articles on Rancher based on a specific version access the tag on their website. For exmaple, here’s everything tagged Rancher 2.5:
https://rancher.com/tags/rancher-2.5
As new versions are released, supstitute them in the URL above to learn more about how to manage your new cloud running on macOS. The remainder of this guide will focus on some housekeeping items so you can manage your local clusters.
Cluster Lifecycle
Stopping and restarting our cluster is simple:
k3d cluster stop k3s-rancher && \
k3d cluster start k3s-rancher
Cleaning Up
When you’re finished you can delete your cluster with:
k3d cluster delete k3s-rancher
You should see output like:
Expand to view sample output
INFO[0000] Deleting cluster 'multiserver'
INFO[0000] Deleted k3d-multiserver-serverlb
INFO[0011] Deleted k3d-multiserver-server-2
INFO[0020] Deleted k3d-multiserver-server-1
INFO[0030] Deleted k3d-multiserver-server-0
INFO[0030] Deleting cluster network 'e8ec1a43ed98827736a9149511963a3ed01a8edcdd4fbb0ea1d4
628e654ea32d'
INFO[0030] Deleting image volume 'k3d-multiserver-images'
INFO[0030] Removing cluster details from default kubeconfig...
INFO[0030] Removing standalone kubeconfig file (if there is one)...
INFO[0030] Successfully deleted cluster multiserver!
You can confirm by running docker ps to see the server nodes in your k3s cluster are no longer running.
Troubleshooting
If you close your terminal and reopen it, you may notice your Context change. To set the Context back to Rancher run:
export KUBECONFIG=$(k3d kubeconfig write k3s-rancher)
If that doesn’t do it review Handling Kubeconfigs in the K3D user manual. And for general usage of Contexts see Kubectl: Switch Context on ShellHacks.
If you see the following alert when setting up Rancher:
The .local Top-Level Domain is reserved by RFC6762 for Multicast DNS. Using this as your Registration URL is strongly discouraged and may cause DNS resolution issues as well as problems with addons like secrets and networked storage drivers. Please choose a different hostname or IP
Choose another domain. But don't do what Medium Engineering did and use a rented gTLD. Consider sticking with the localhost TLD, test use your own domain.
If you’re waiting for a deployment to roll out receive the error:
error: deployment “foobarbazbat” exceeded its progress deadline
Experiment with kubectl rollout commands and learn How Rolling and Rollback Deployments work. Or just keep waiting. The rollout may eventually finish.