
Reaction Commerce is a full-stack, self-hosted commerce platform you can run for as little as $10 on your own VPS. Think of Reaction Commerce as what WooCommerce might’ve become had it not been dependent on PHP/WordPress and instead was rewritten using modern coding languages and development techniques.
Using self-hosted commerce is like having your own personal Shopify, WIX or BigCommerce right at your fingertips. Only there’s no monthly costs to worry about just to use it. And there’s no vendor lock-in which would otherwise make it too difficult or risky to switch between platforms when the need arises.
With commerce goliaths like Amazon doubling quarterly profits in 2020 while, at the same time snubbing their own FBA customers, it’s high time you took a hard look at your e-commerce and take control of your own commerce destiny. In this post I will show you how to set-up your own self-hosted Reaction Commerce stack on a VPS with as little as 2GB of RAM or about $10/month.
Requirements
To try out Reaction Commerce on your local machine install and run Reaction Development Platform. The development platform can also be deployed to a live environment online. This tutorial will focus on running online.
In order to complete this tutorial you will need the following:
- A domain name for your online shop. $12/year with Amazon Route 53.
- An account with Digital Ocean. Use my link for free credits.
- (Optional) An email address at your domain. I use ProtonMail Plus.
Update Domain Nameservers
Before you deploy your storefront configure your domain to delegate its name servers to use Digital Ocean name servers instead of its own. If you’re using Route 53, this is as simple as:
- Navigate to the Route 53 Dashboard and click Registered domains.
- Select the domain name you want to use for your shop or register a domain.
- Within the registered domain, edit the Name servers for the domain.
ns-656.awsdns-18.net
ns-1844.awsdns-38.co.uk
ns-1183.awsdns-19.org
ns-50.awsdns-06.com
ns1.digitalocean.com
ns2.digitalocean.com
ns3.digitalocean.com
The original name servers listed for your domain are also kept in the NS record in Route 53 DNS settings so you can restore them later if you like. If you’re using a different domain provider please review their help documentation for instructions on how to update your name servers to the After servers provided.
With your Domain Servers set to Digital Ocean you’re ready to move on.
Add Domain to Digital Ocean
Next you will add your domain to Digital Ocean. To do so log into your Digital Ocean account, click Networking in the sidebar and fill out the form with your domain name and choose Add Domain as shown here:
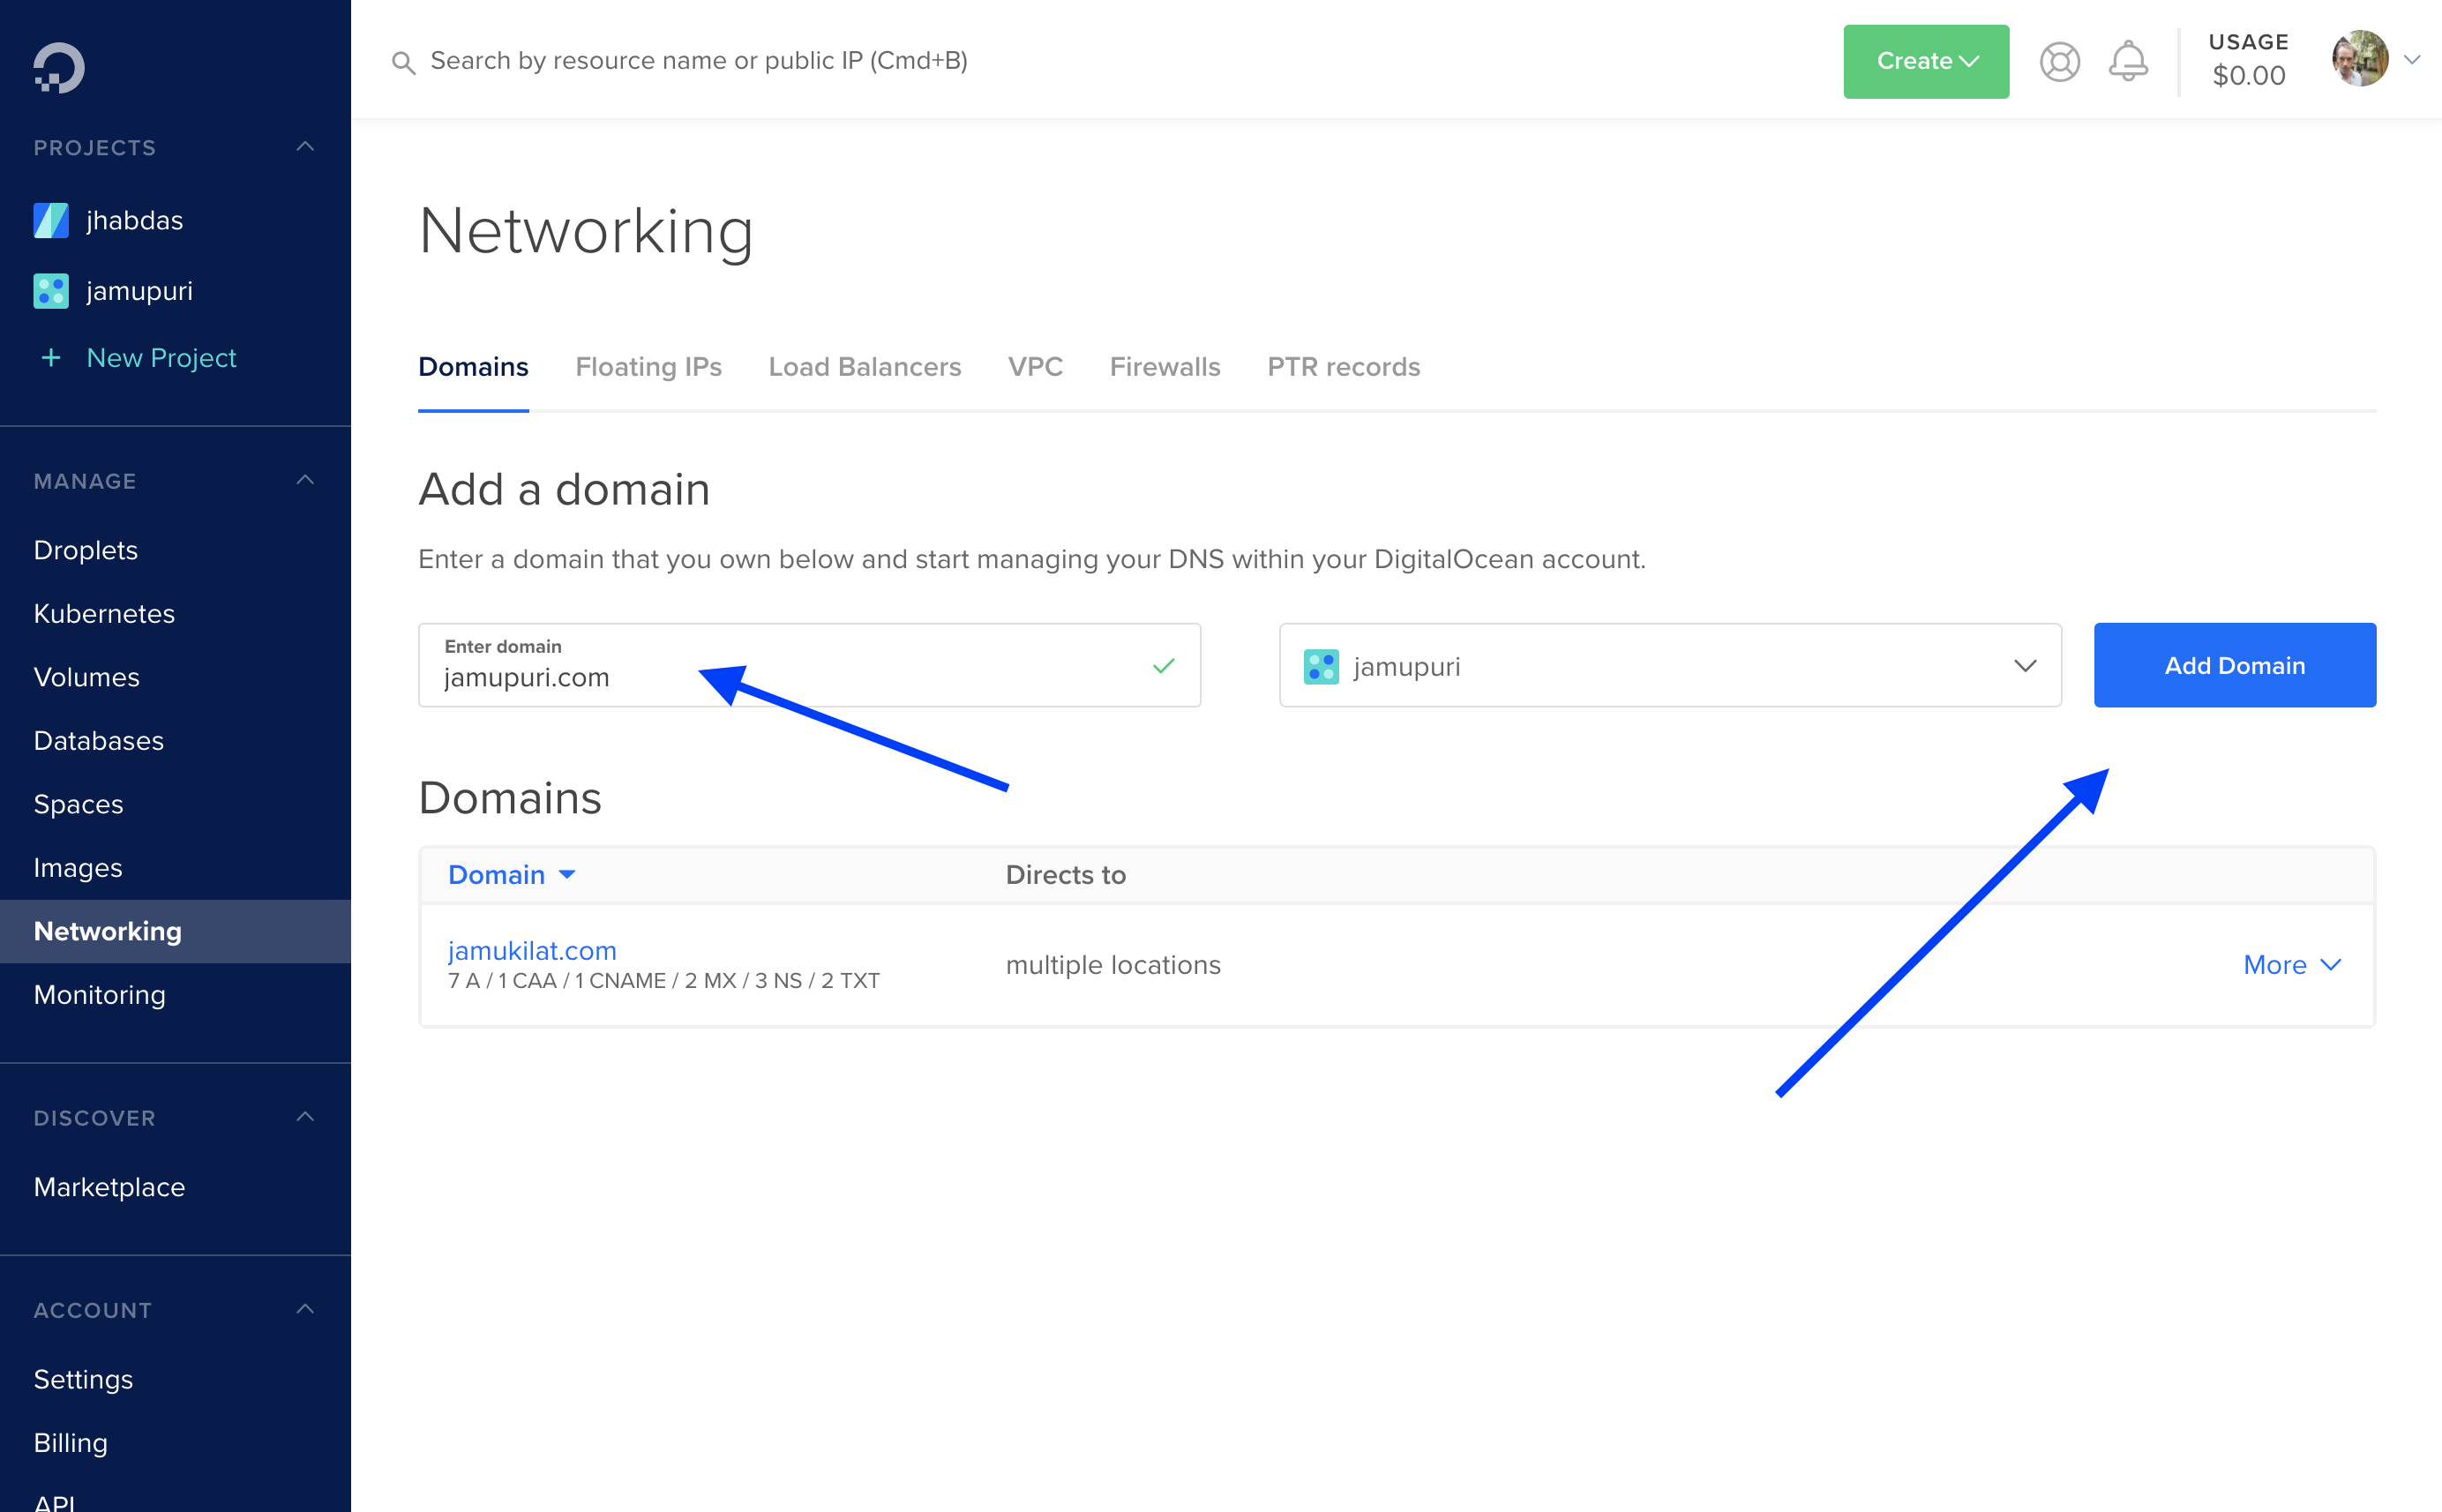
The next screen Digital Ocean shows you will tell you you need to now update your domain registrar’s nameservers to point to Digital Ocean. If you already completed the Update Domain Nameservers step, no further action is necessary.
You’ve now completed adding your domain to Digital Ocean and are ready to create a Droplet for your Reaction Commerce site.
Create Reaction Commerce Droplet
In this step you will provision a VPS, or Droplet, for your Reaction Commerce site. To do so click Droplets in the Digital Ocean dashboard, click the Create button and choose Droplets from the drop-down menu.
On the next page you’ll be presented with a number of options. Use the template below to complete the options:
Plan - Basic
Price - $10/mo. with at least 2GB RAM
Block storage - Skip
Location - Any
VPC Network - No VPC
Additional options - Check IPv6 and Monitoring
Authentication - Choose SSH key(s) to use or create a new one
Number of droplets - 1
Hostname - Leave as default
Tags - Add tag `reaction-commerce`
Project - Choose a project or skip
Add backups - Skip (you can do this later if you like)
Finally Choose Create Droplet to provision a VPS server running Ubuntu. In about 15 seconds your new Ubuntu server will be ready and you can proceed to the next step.
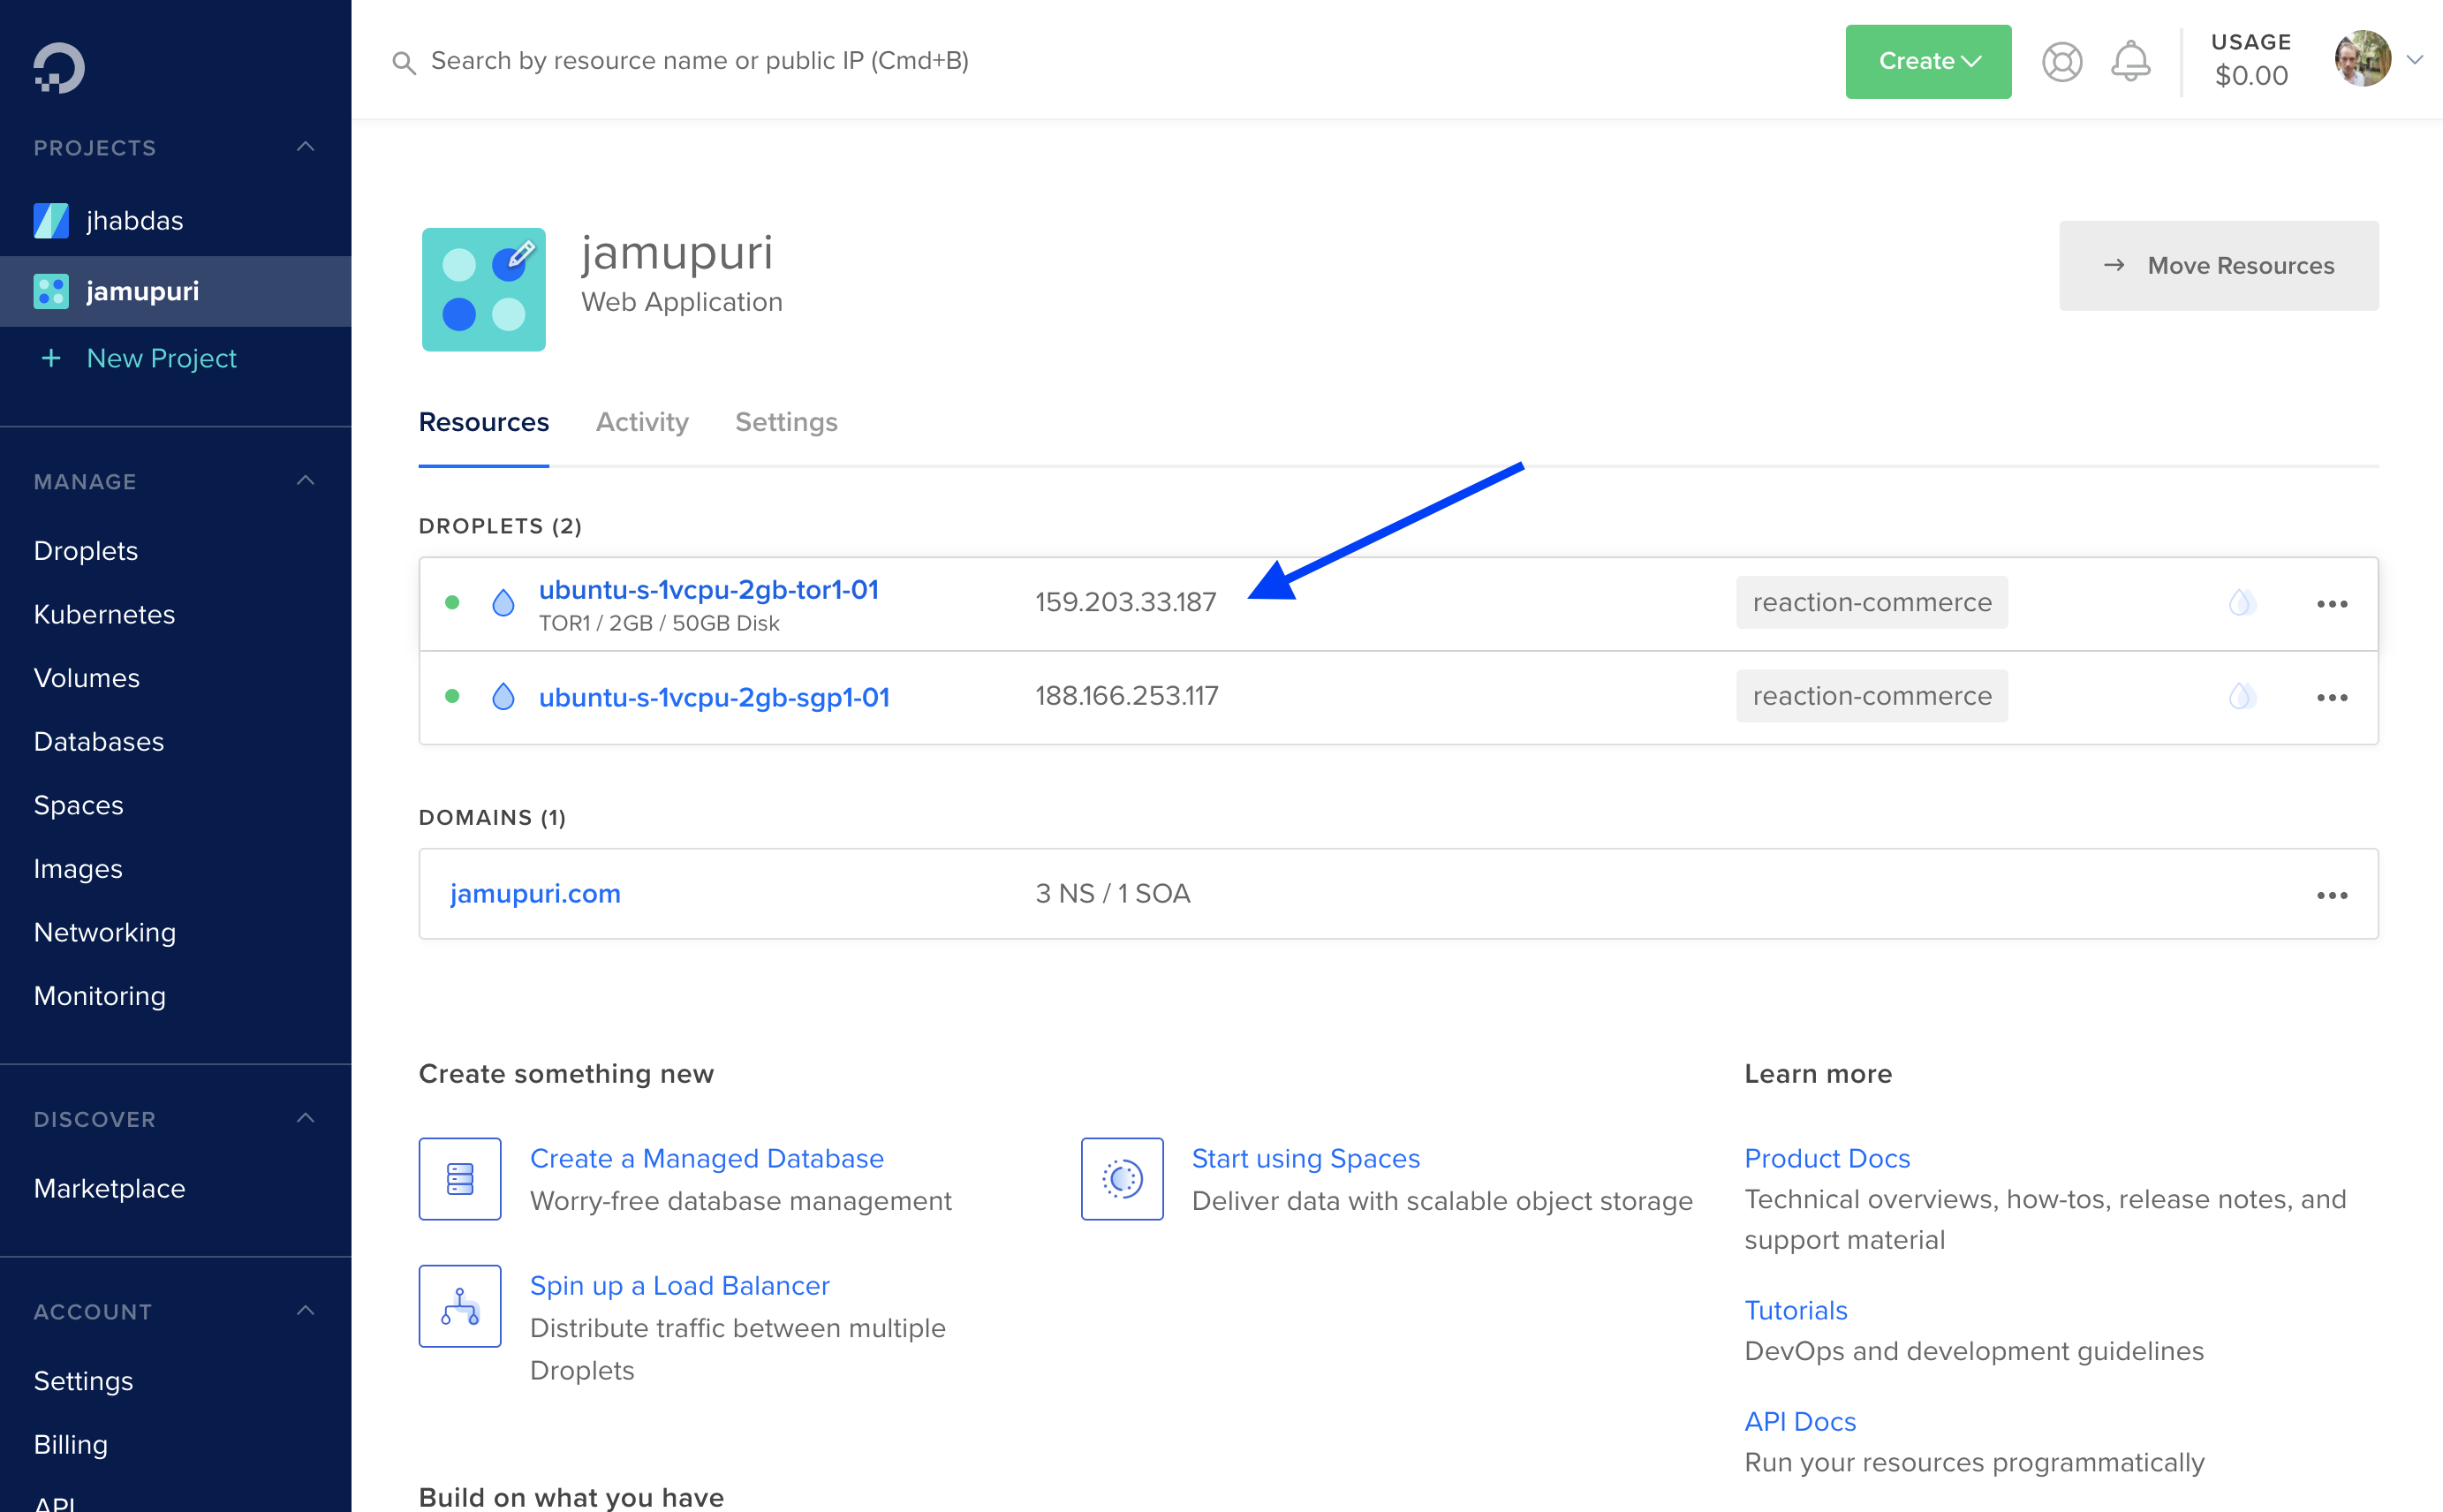
Configure DNS Settings
On the Digital Ocean dashboard, click Networking and then choose the domain you added earlier and create the following new DNS records, substituting example.com for your own domain:
traefik.example.com
identity.example.com
hydra.example.com
admin.example.com
storefront.example.com
api.example.com
traefik.example.com
identity.example.com
hydra.example.com
admin.example.com
storefront.example.com
api.example.com
example.com
Choose the droplet you created in the last step for each and Digital Ocean will enter in the IPv4 (A records) and IPv6 (AAAA records) automatically. When creating the CAA record choose the following settings:
- Hostname: @
- Authority granted for: letsencrypt.org
- Tag: issuewild
- Flags: 0 (default)
- TTL: 3600 (default)
Once you’ve finished creating the DNS records you’re ready to deploy Reaction Commerce to your Droplet.
Deploy Reaction Commerce to Droplet
Now for the fun part. In this section you’re going to run a script to deploy Reaction Commerce to your droplet. The entire deployment is automated but there’s a little set-up work needed before you can run it.
Rather than detailing the steps here I’m going to defer to the steps listed in the README of the following official GitHub repository:
github.com/reactioncommerce/proxy-traefik.
Go ahead and deploy Reaction Commerce following those steps. The deployment will take 15-20 minutes. When it finishes you’ll see a PLAY RECAP like:
PLAY RECAP ************************************************************************************************
reaction.server            : ok=53   changed=50   unreachable=0    failed=0    skipped=0    rescued=0    ignored=0
If everything looks ok, SSH into your reaction server:
ssh reaction@reaction.server
Then run lazydocker to check the Docker logs. Check logs for the reaction_api_1 and traefik containers. You should see output like:
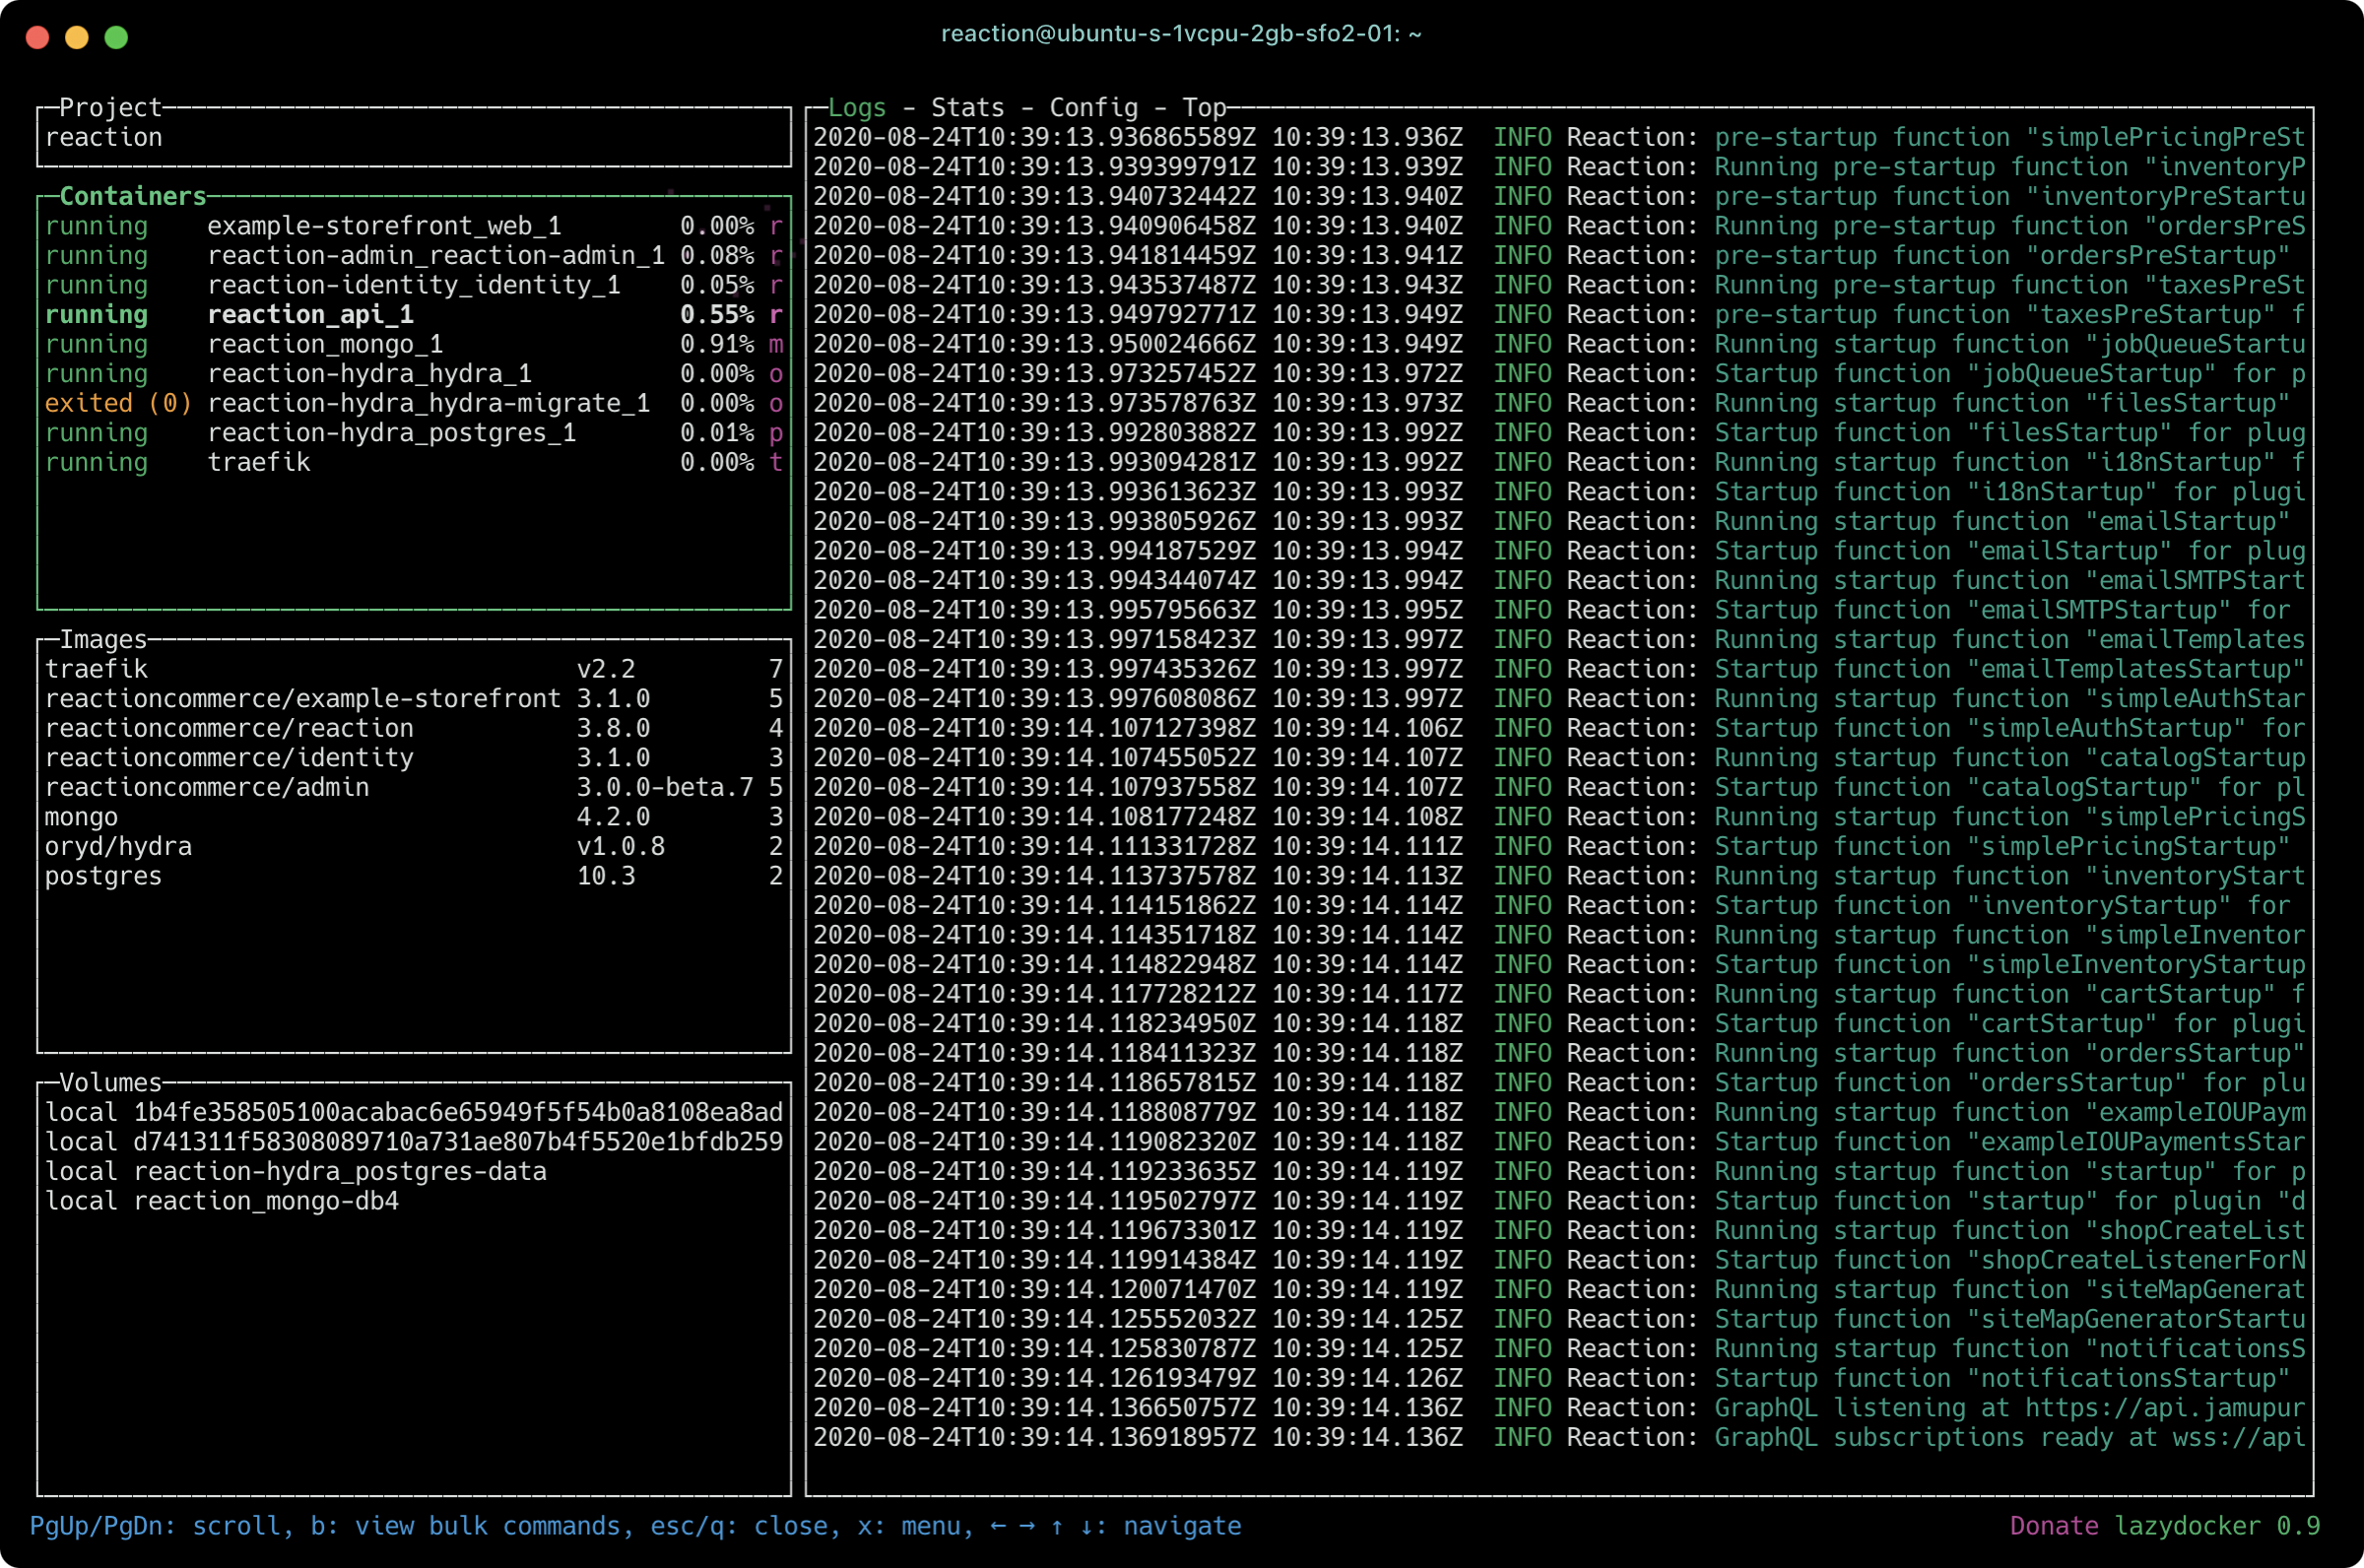

Be on the lookout for any ERROR log-level events or anything else that’s looks obviously wrong. One issue to watch out for is an error obtaining the SSL certificate. That can happen if your domain nameserver reassignment to Digital Ocean hasn’t completed before the Ansible playbook finished and the Reaction Commerce services fire up. If that happens, Let’s Encrypt will make Traefik wait a while before it can get a valid certificate. Use the time to verify you’ve properly updated domain nameservers and configured DNS settings.
Next work on hardening the installation.
Harden the Installation
Once your deployment is finished you should be able to access your Reaction Commerce admin via admin.example.com. Go ahead and access it and register a user. The first user registered will become the primary admin user so keep that a secret and protect your passwords using something like
BitWarden.
Next, to prevent remote MongoDB client connections such as MongoDB Compass while still allowing services to communicate behind the Traefik proxy do:
- Run ssh reaction@reaction.server to SSH into your Digital Ocean droplet.
- cd to
/home/reaction/reaction-development-platform/reaction/. - Open
docker-compose.ymlfor editing. - Locate mongo and change ports to expose and “27017:27017” to “27017”.
- Save changes, exit the editor then run dcre to restart containers.
Then install and use Compass to try connecting to your database hosted at https://api.example.com on port 27017 with or without authentication. The result should be that Compass can no longer connect.
docker-compose.yml value modified back and dcre again to access Mongo remotely and easily create and restore back-ups to Amazon S3.
(Recommended) Secure MongoDB by enabling authentication. Once you do make sure your services can still talk to the API. If you choose to skip this step for now, do not store any sensitive information in your DB unless you accept the risk.
Once your database is secured
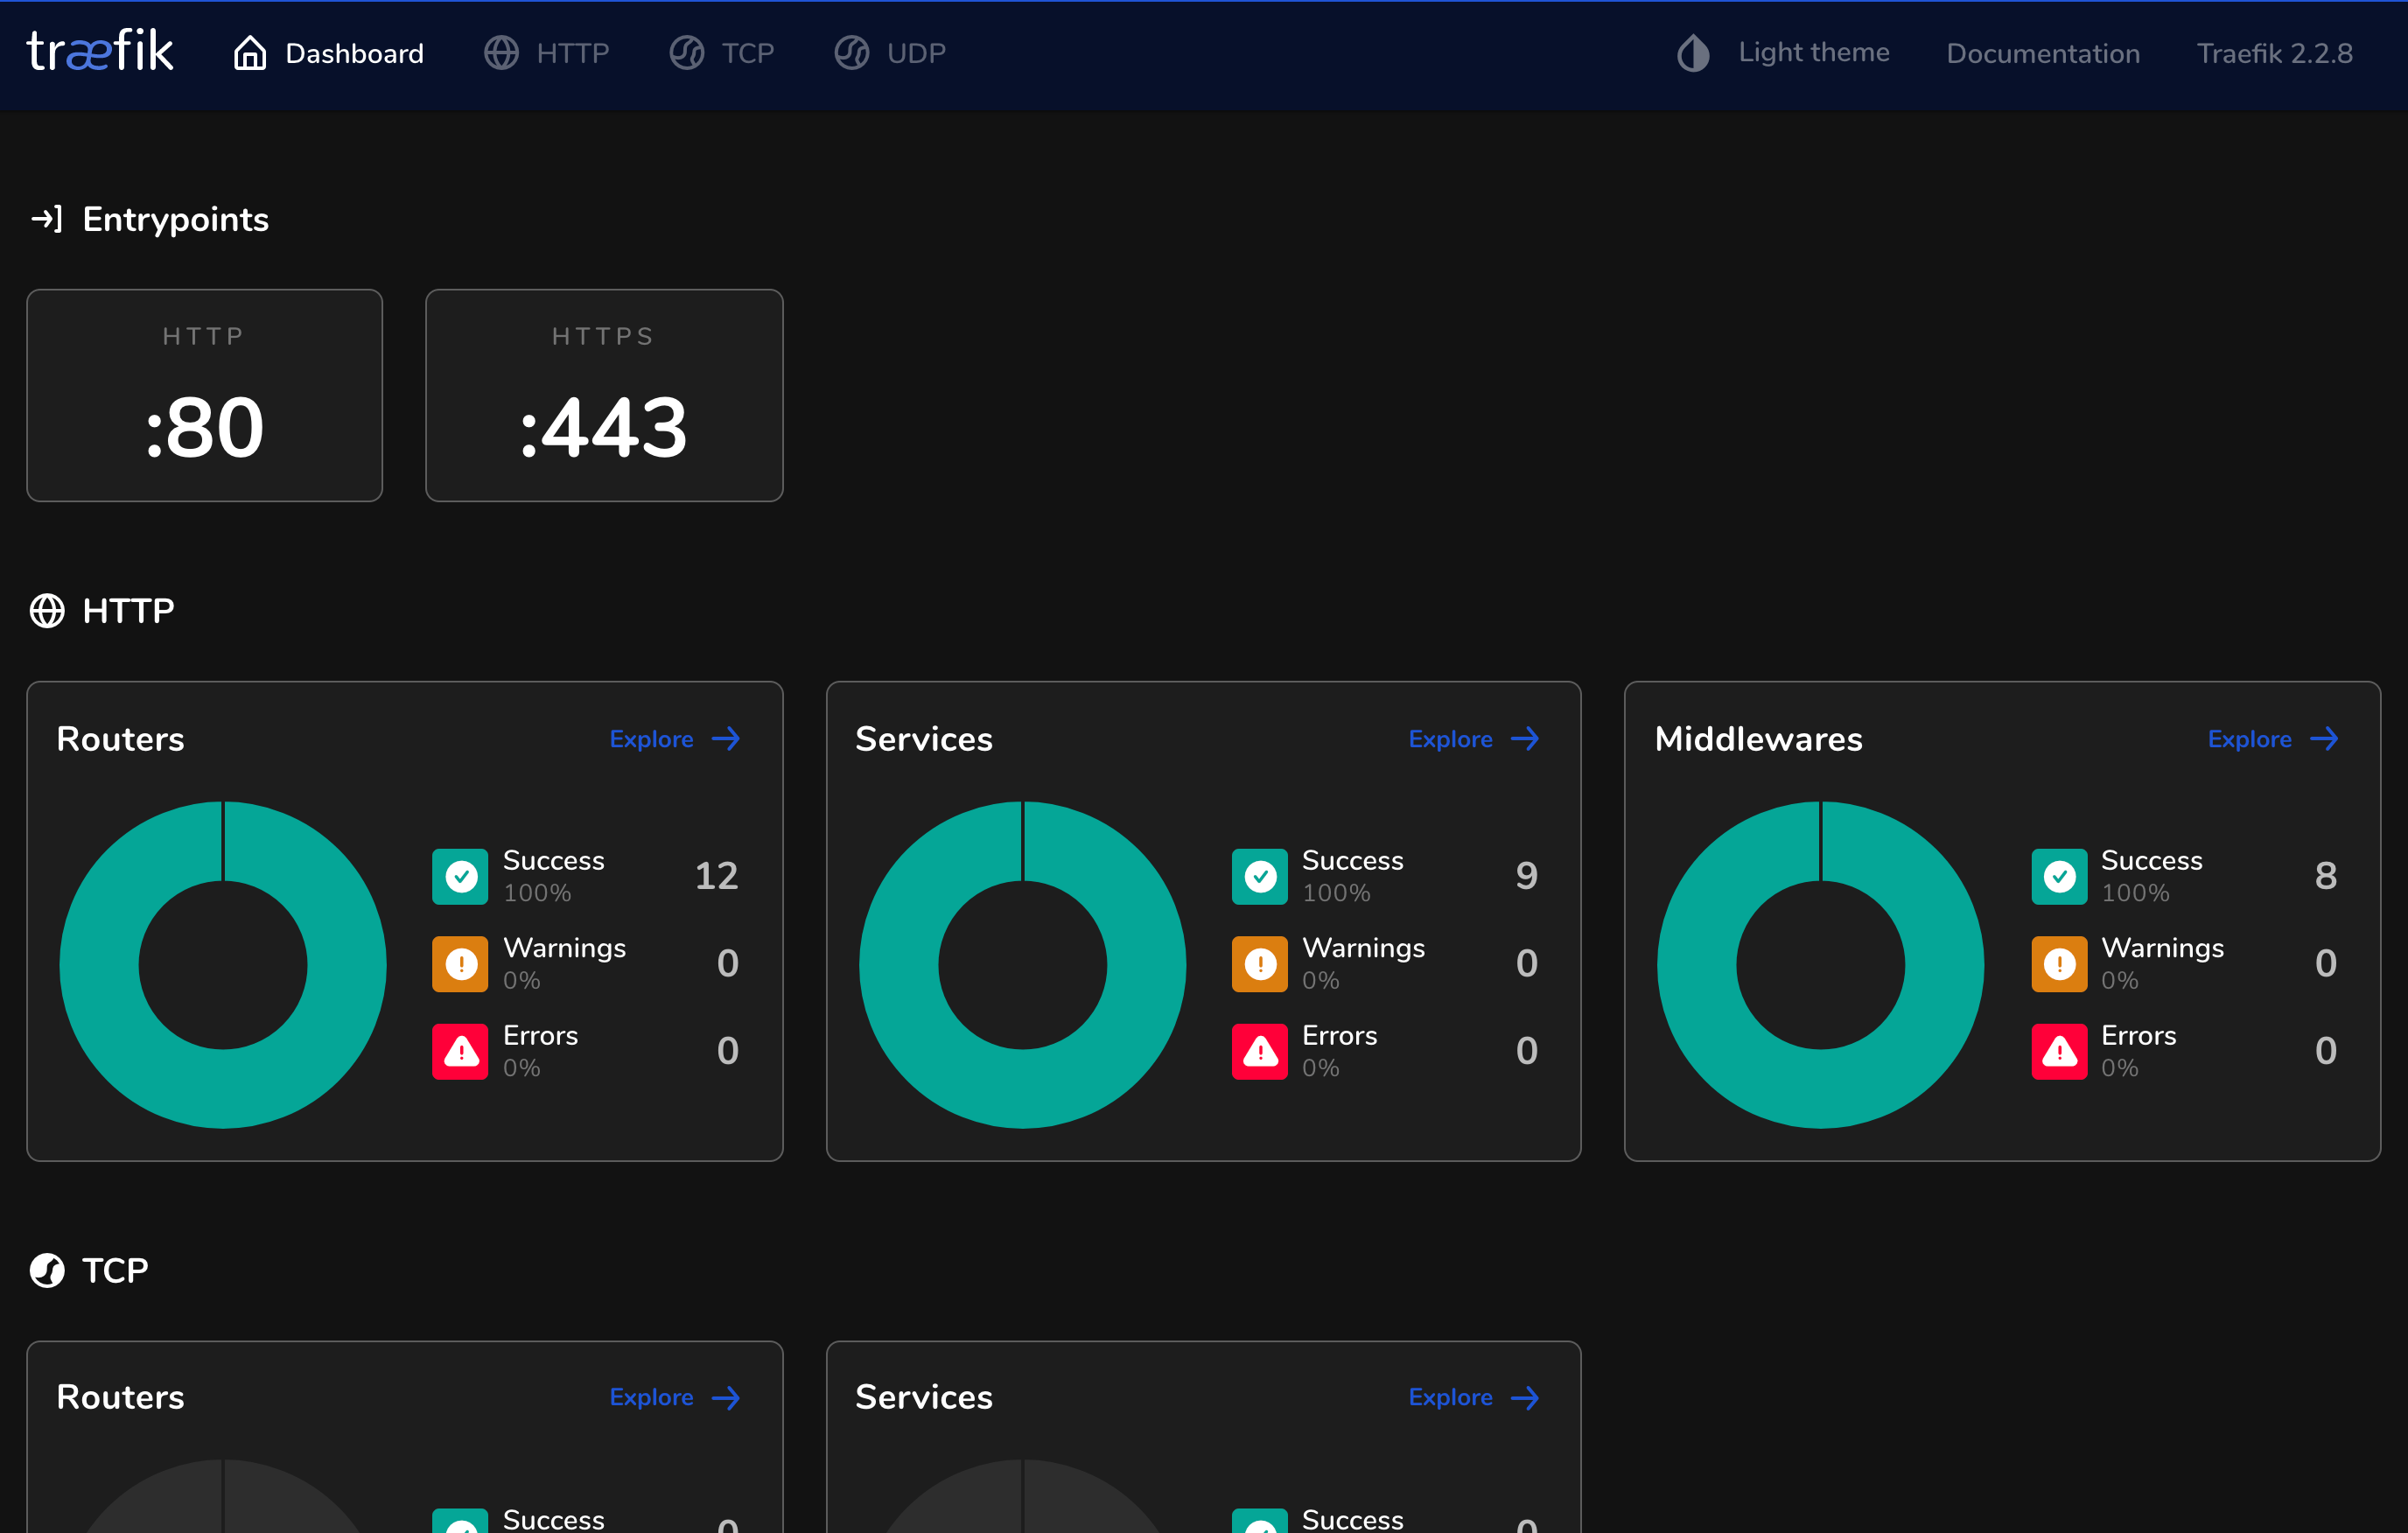
configure basic auth put the Traefik dashboard (pictured below) behind a user name and password. To do so SSH into the droplet, edit and uncomment the following lines in proxy/traefik/docker-compose.yml:
# - "traefik.http.middlewares.traefik-auth.basicauth.users=USER:PASSWORD"
# - "traefik.http.routers.traefik-secure.middlewares=traefik-auth"
$ is also required. Here’s an example using httpasswd to generate a hashed :PASSWORD for the config file: htpasswd -nBC 11 "" | sed -r 's/\$/\$\$/g'.
Run dcre from the proxy/traefik directory to restart the service. The next time you visit traefik.example.com you’ll be prompted with a basic auth challenge.
Now is also a good time to review the .env files in each of the subdirectories of the reaction-development-platform directory on the server, configure ufw on the host machine and perform other basic security checks.
Create a Database Backup
Learn right away how to create and restore database backups. Reaction Commerce ships with a nice CLI tool called Mongo S3 Backup to make managing backups a breeze. I’ve recently upgraded it to use AWS CLI v2 and published an image on Docker Hub for use on your local machine or remotely on your VPS server:
hub.docker.com/repository/docker/comfusion/mongo-s3-backupHere’s an example of how you’d use it to list existing S3 backups:
MONGO_HOST=127.0.0.1:27017 && docker run --rm -it \
  -e AWS_ACCESS_KEY_ID=$AWS_ACCESS_KEY_ID \
  -e AWS_SECRET_ACCESS_KEY=$AWS_SECRET_ACCESS_KEY \
  -e MONGO_HOST=$MONGO_HOST
  -e S3_BUCKET=mongo-s3-backup-jamupuri --network="host" comfusion/mongo-s3-backup list
Before running be sure echo $AWS_ACCESS_KEY_ID and echo $AWS_SECRET_ACCESS_KEY both output values as required by the script. How you choose to update IAM to gain access to AWS S3 resources will depend on your individual use case. Once you’ve made a few backups the list command shown above will start to fill out:
----------------------------------------
|              ListObjects             |
+-------------------------+------------+
|           Key           |   Size     |
+-------------------------+------------+
|  20200824_123224.tar.gz |  6856      |
|  20200825_080001.tar.gz |  7869      |
|  20200825_080231.tar.gz |  17929     |
+-------------------------+------------+
Get in the habit of creating backups and learning how to restore from them. Doing so will save you a lot of headaches as you familiarize yourself with the system and help protect you while your applying API migrations to the DB later on.
Check for API Migrations
As you start updating your services you’ll eventually encounter the need to perform an API migration. You’ll know you need to run an API migration based off of errors in your Docker logs. And when you need to do them head here to view the README so you can gain an understanding of how they work:
Follow the instructions in the README in the above repo to create a reaction-development-platform/api-migrations folder locally. Then check out the tag corresponding to your API version and update. In your local development environment you can quickly check for migrations by running the following command in a terminal emulator from the api-migrations dir:
MONGO_URL=mongodb://localhost:27017/reaction npx migrator migrate
You should see output like:
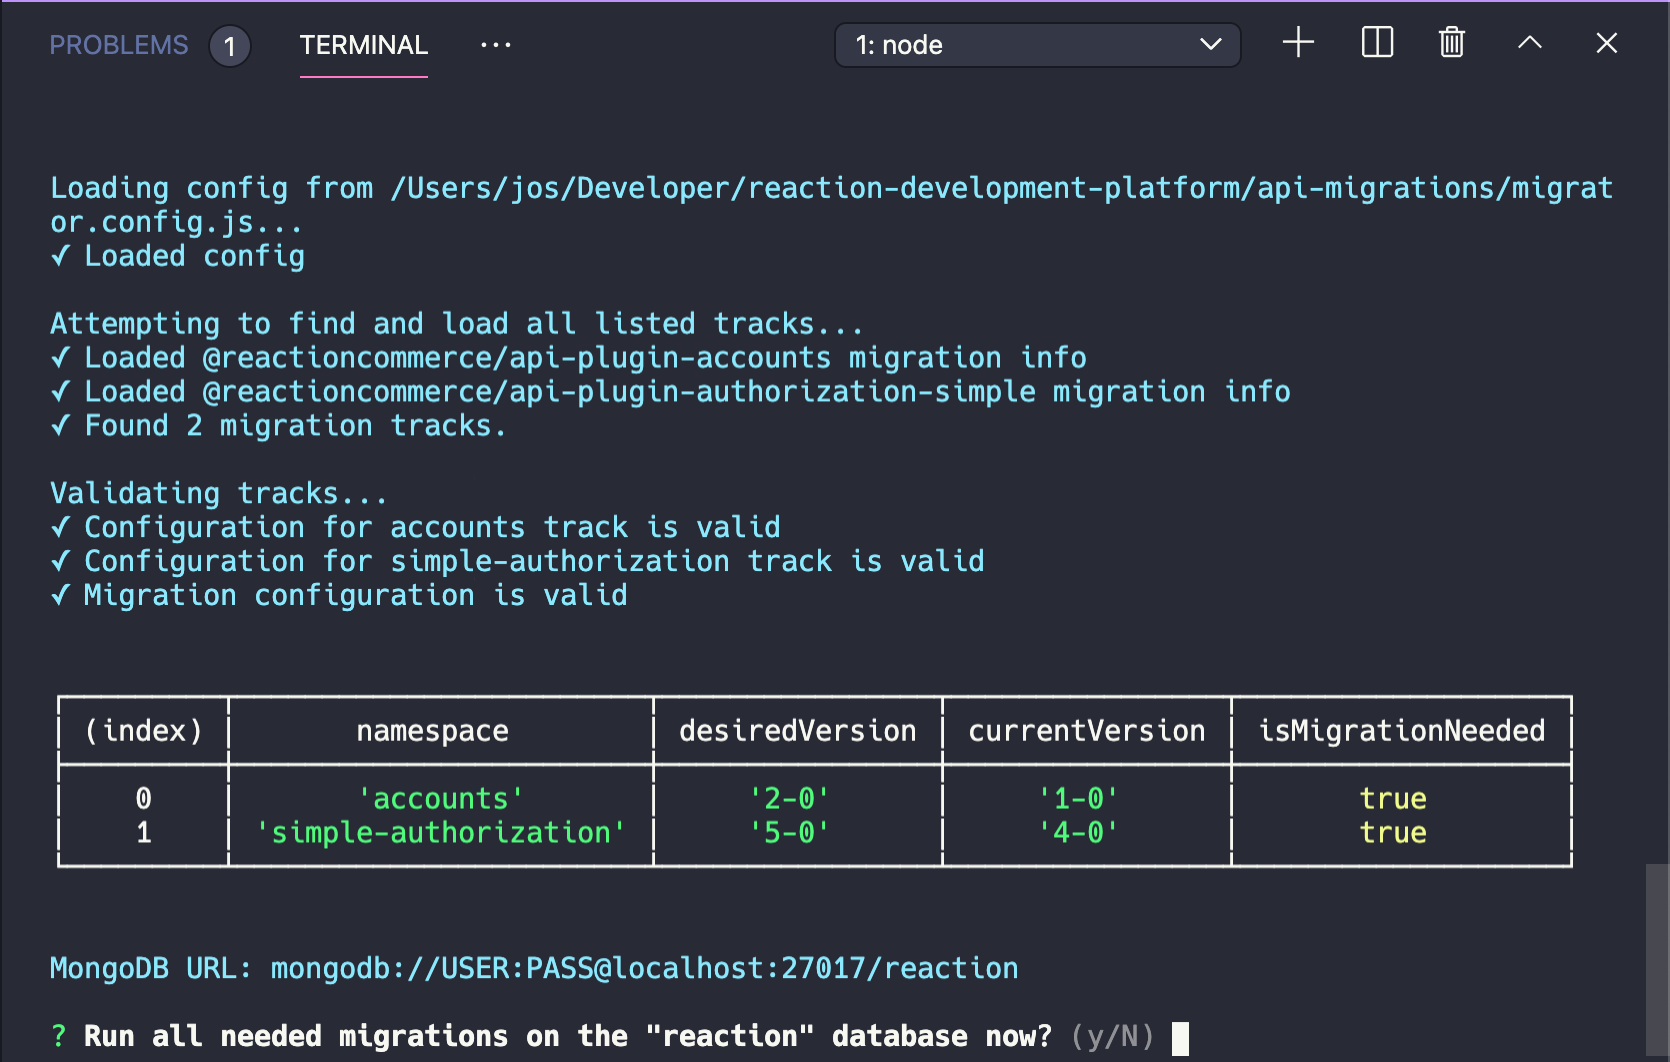
Don’t forget to create a database backup before applying migrations in case you need to restore your data to a previous state.
Configure Transactional Emails
No installation is complete without the ability to send transactional emails. Out of the box Reaction Commerce is not ready to send emails on its own. To add email support, follow the instructions to
add email support on the Reaction Commerce website. After you add your MAIL_URL run dcre in the reaction directory to restart the services and watch the logs.
If you’re looking for an email provider, there are a number of services including Mailgun, SendGrid and others. Do your research as the costs for some of these services can add up quickly.
Here are some considerations to keep in mind while choosing:
-
Mailgun used to have a great free plan with generous amount of emails. Unfortunately the free plan was replaced with a flex plan with a set amount of free emails, and you have to start paying for service after 3 months.
-
SendGrid currently offers 100 free emails per month (forever) after the trial period runs out which is great for SMBs and personal applications.
Not satisfied? Check out what Discourse is doing for transactional email.
Review Documentation
From here you will want to start reviewing the Reaction Commerce Documentation and trying out different things to familiarize yourself with the system. Don’t be afraid to make mistakes as that’s the only way you’ll learn. Focus on learning what’s possible and note that there was a sizable refactor to GraphQL with the Reaction Commerce 3.0 release which means you’re going to find some rough edges here and there in the product and the documentation.
Summary
In this post you I showed you how to set-up your own full-stack, self-hosted commerce solution using Reaction Commerce. While Reaction Commerce may not be as straight-forward as WooCommerce to get up and running, it’s a lot faster and a lot more scalable thanks to a modern technology stack so know your trade-offs before you get started. And the best way to do that is to take it for a test drive as I’ve show you in this post.
Best of luck on your commerce adventure!