
Shortly after the buzz of MS purchasing GitHub I started self-hosting a {{ external “https://gitea.io/" “Gitea” />}} stack using a Docker Compose file I threw together just for the occasion. The hosting I chose at the time was a $5 Vultr VPS with the following specs:
- CPU: 1 vCore
- RAM: 1024 MB
- Storage: 25 GB SSD
- Bandwidth: 1000 GB
I chose Vultr partly because they’ve been shown to be faster than DigitalOcean and Lightsail. But really I just needed a testbed to prove things out to finally feel confident enough to abandon GitHub.
But Vultr isn’t cutting it anymore. Their $5/month VPS option, while arguably a great deal, isn’t delivering enough storage. Sure I could add block storage at $0.50 per GB or even consider switching to Linode. But I don’t see the point of either when Amazon offers a 40 GB SSD option at $5 an instance with double the bandwidth offered by Vultr and half the cost of the Linode equivalent plan.
As luck would have it, last night I ran out of disk space on Vultr. What better a time to make the switch over to Amazon Lightsail? And if you’re looking to self-host Gitea on Lightsail, here’s how you can too.
Create an Instance
To run anything on Lightsail you first need to create an instance. For the purposes of this tutorial let’s assume the following about your instance:
- Region: Any
- Image: Linux/Unix
- Blueprint: OS Only (Debian)
- Plan: $3.50/month
Once you choose a blueprint you’ll have the ability to select, create, or upload the RSA key pair you would like to use to SSH into your Lightsail instance. If you leave the default settings Amazon will generate a key pair for you.
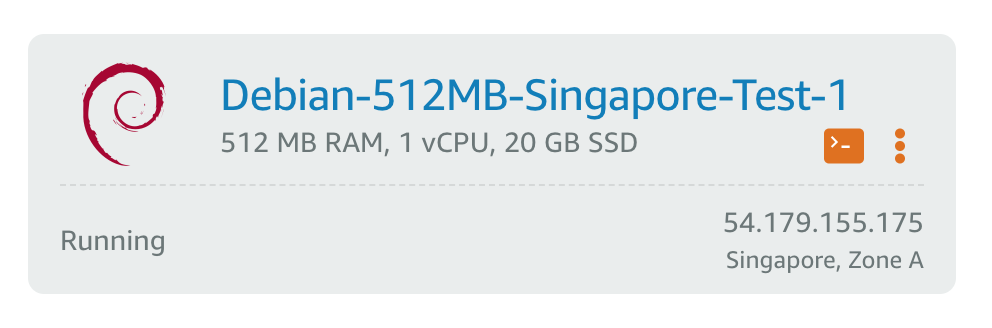
When you’re finished, name your instance and choose Create instance. From there you’ll be navigated to the Instances page to see your new Lightsail instance:
Once the instance changes from Pending to Running it’s ready for use.
While you’re waiting choose the vertical ellipsis icon ⋮ on the instance card to reveal a context menu, select Manage and scan down for the Accounts Page link. Follow the link and download your SSH key pair if you don’t have it already.
With the instance started and any AWS-generated SSH key pair downloaded you’ll be able to connect to the Debian remote from your machine to install Gitea. But first you need to be able to connect to the instance via SSH.
Connect to Instance
To connect to your new Lightsail instance over SSH you’ll need an SSH client such as dropbear, openssh or Cmder (Windows) installed on your machine.
Initiate the connection from a Terminal using ssh like so:
$ ssh admin@54.179.155.175

The authenticity of host '54.179.155.175 (54.179.155.175)' can't be established.
ECDSA key fingerprint is SHA256:gaFZjGJkN97iDCl8w4UVCIaLqFrr1UU/XSlHkhnuhxI.
Are you sure you want to continue connecting (yes/no)?
Type yes and press Enter to update known_hosts and attempt connection.
If you see a Permission denied (publickey) you need to configure the key pair downloaded in Create an Instance. Otherwise, skip ahead to Install Gitea.
Configure SSH Keys
To configure your key pair rename the key downloaded to lightsail_rsa, move it to your local SSH directory and update file permissions using chmod 600 like so:
mkdir ~/.ssh && \
cp ~/Downloads/LightsailDefaultKey-ap-southeast-1.pem ~/.ssh/lightsail_rsa && \
chmod 600 ~/.ssh/lightsail_rsa
Alias the host as aws-ls-debian by appending a mapping to /etc/hosts file, replacing 54.179.155.175 with the IP obtained in Created an Instance:
echo '54.179.155.175 aws-ls-debian' | sudo tee -a /etc/hosts
And configure ssh to use the lightsail_rsa key and admin user automatically:
touch ~/.ssh/configure && \
entry=`echo "\nHost lightsail aws-ls-debian\n    IdentityFile ~/.ssh/lightsail_rsa\n    User admin"` && \
echo $entry | tee -a ~/.ssh/config
Providing you password-less access to your instance using ssh aws-ls-debian.
Host github github.com
    HostName github.com
    IdentityFile ~/.ssh/id_rsa
    User github

Host lightsail aws-ls-debian
    IdentityFile ~/.ssh/lightsail_rsa
    User admin
Go ahead and try it now. When you’re able to connect you may continue.
Install Gitea
Once connected to your Debian instance on Lightsail you can install Gitea. The official documentation provides a variety of installation methods. We’ll be using the Docker method with a docker-compose.yml to simplify installation:
Expand to view contents
version: "2.1"
services:
  gitea:
    image: gitea/gitea:1.6
    depends_on:
      db:
        condition: service_healthy
    environment:
      - USER_UID=1000
      - USER_GID=1000
    restart: always
    networks:
      - web
      - default
    volumes:
      - /opt/gitea:/data
    expose:
      - "3000"
    ports:
      - "2222:22"
    labels:
      - "traefik.docker.network=web"
      - "traefik.enable=true"
      - "traefik.frontend.rule=Host:git.example.com"
      - "traefik.port=3000"
      - "traefik.protocol=http"

  db:
    image: postgres:9.6
    restart: always
    environment:
      - POSTGRES_USER=gitea
      - POSTGRES_PASSWORD=gitea
      - POSTGRES_DB=gitea
    volumes:
      - /opt/postgres:/var/lib/postgresql/data
    healthcheck:
      test: "exit 0"

networks:
  web:
    external: true
Debian does not ship with Docker so you’ll need to install it first.
Install Docker and Compose
Official Docker installation instructions for Debian are available on Docker Docs and the convenience script is by far the fastest installation method:
curl -fsSL https://get.docker.com -o get-docker.sh && \
sh get-docker.sh && \
sudo gpasswd -a admin docker
When the script is finished run command docker -v to confirm installation and use groups to verify docker appears in the list. If you do not see docker in the list of groups exit and ssh back into the instance and check again.
Once you’ve got Docker installed go ahead and Install Docker Compose. Don’t forget to chmod +x the binary after installation. Without it Compose won’t have enough permission to bring up the Gitea stack on your Debian instance.
With Docker and Compose installed it’s time to bring up your Gitea stack.
Bring Up Your Gitea Stack
Using Compose to bring up Gitea can seem magical for first-time users. If you want to demystify how it works please spend some time reading through Docker Compose on Docker Docs and looking over Sample apps with Compose. A general understanding of Docker and Compose, and familiarity with the Docker Docs, will go a long way should you hit any stumbling blocks during the installation.
Start by copying the contents of docker-compose.yml to the instance:
url=https://codeberg.org/vhs/high-tea/raw/branch/master/docker-compose.yml && \
curl $url -o ~/docker-compose.yml
Validate the file with docker-compose config then open it for editing, change the version of gitea to latest and set the
documented postgres version:
services:
  gitea:
    image: gitea/gitea:latest # will install latest tagged release
    # ...

  db:
    image: postgres:9.6 # see docs.gitea.io for postgres version
    # ...
Optionally, update the postgres environment variables as well.
Next, attempt to bring up the stack with docker-compose up -d. If the docker network named web doesn’t exist yet Compose will throw the following error:
docker network create web and try again.
The error is expected. Run docker network create web as advised to create the external network, then bring up the stack again using docker-compose up -d.
You’ll see a flurry of activity as layers are pulled and services started:
Creating network "admin_default" with the default driver
Pulling db (postgres:9.6)...
9.6: Pulling from library/postgres
27833a3ba0a5: Pull complete
a5a0479e602b: Pull complete
Pulling gitea (gitea/gitea:latest)...
latest: Pulling from gitea/gitea
8e402f1a9c57: Pull complete
fa6a1305d196: Pull complete
Creating admin_db_1 ... done
Creating admin_gitea_1 ... done
Once gitea and postgres services are done you’ll be returned to the prompt. Confirm the containers are running with docker ps. You should see output like:
CONTAINER ID        IMAGE               COMMAND                  CREATED              STATUS                   PORTS                            NAMES
6226db03e891        gitea/gitea:1.6     "/usr/bin/entrypoint…"   About a minute ago   Up About a minute        3000/tcp, 0.0.0.0:2222->22/tcp   admin_gitea_1
ac7628804914        postgres:9.6        "docker-entrypoint.s…"   2 minutes ago        Up 2 minutes (healthy)   5432/tcp
If you do you’ve successfully brought up your Gitea stack. If not, go back and review earlier steps to make sure you didn’t miss anything. Service containers must be up and running before you can finalize your installation.
Finalize Gitea Installation
Now that you’ve gotten you the stack running it’s time to finalize your Gitea installation from a web browser. For security reasons the provided Compose file does not expose Gitea over HTTP to your Lightsail instance. The following steps explain how to loosen the security restrictions and finalize the install:
-
Navigate to Lightsail Instances to Manage the Firewall rules for the instance you created earlier. Add a
Customrule to accept TCP traffic on port2222and anotherCustomrule to accept TCP traffic on3000. -
Modify
docker-compose.ymlto forward traffic on port3000from the host (Lightsail instance) to port3000for the gitea service:docker-compose.yml services: gitea: # ... ports: - "2222:22" # HOST:CONTAINER - "3000:3000" # </== add this line hereSave the file then run docker-compose down followed by docker compose up -d to recreate the network and restart your services:
admin@ip-172-26-5-153:~$ docker-compose down
Stopping admin_gitea_1 ... done
Stopping admin_db_1    ... done
Removing admin_gitea_1 ... done
Removing admin_db_1    ... done
Removing network admin_default
Network web is external, skipping
admin@ip-172-26-5-153:~$ docker-compose up -d
Creating network "admin_default" with the default driver
Creating admin_db_1 ... done
Creating admin_gitea_1 ... done
Confirm the port forward 0.0.0.0:3000->3000/tcp is in place with docker ps.
-
Finally, navigate to aws-ls-debian:3000/install in a web browser and complete the installation with the following installation settings:
- Database Type: PostgreSQL
- Host: db
- Username: gitea
- Password: gitea
- Database Name: gitea
- SSH Server Domain: aws-ls-debian
- SSH Server Port: 2222
- Gitea Base URL: http://aws-ls-debian:3000/
- Administrator Username: [your username]
- Password: [your password]
- Confirm Password: [your password]
- Email Address: [your email address]
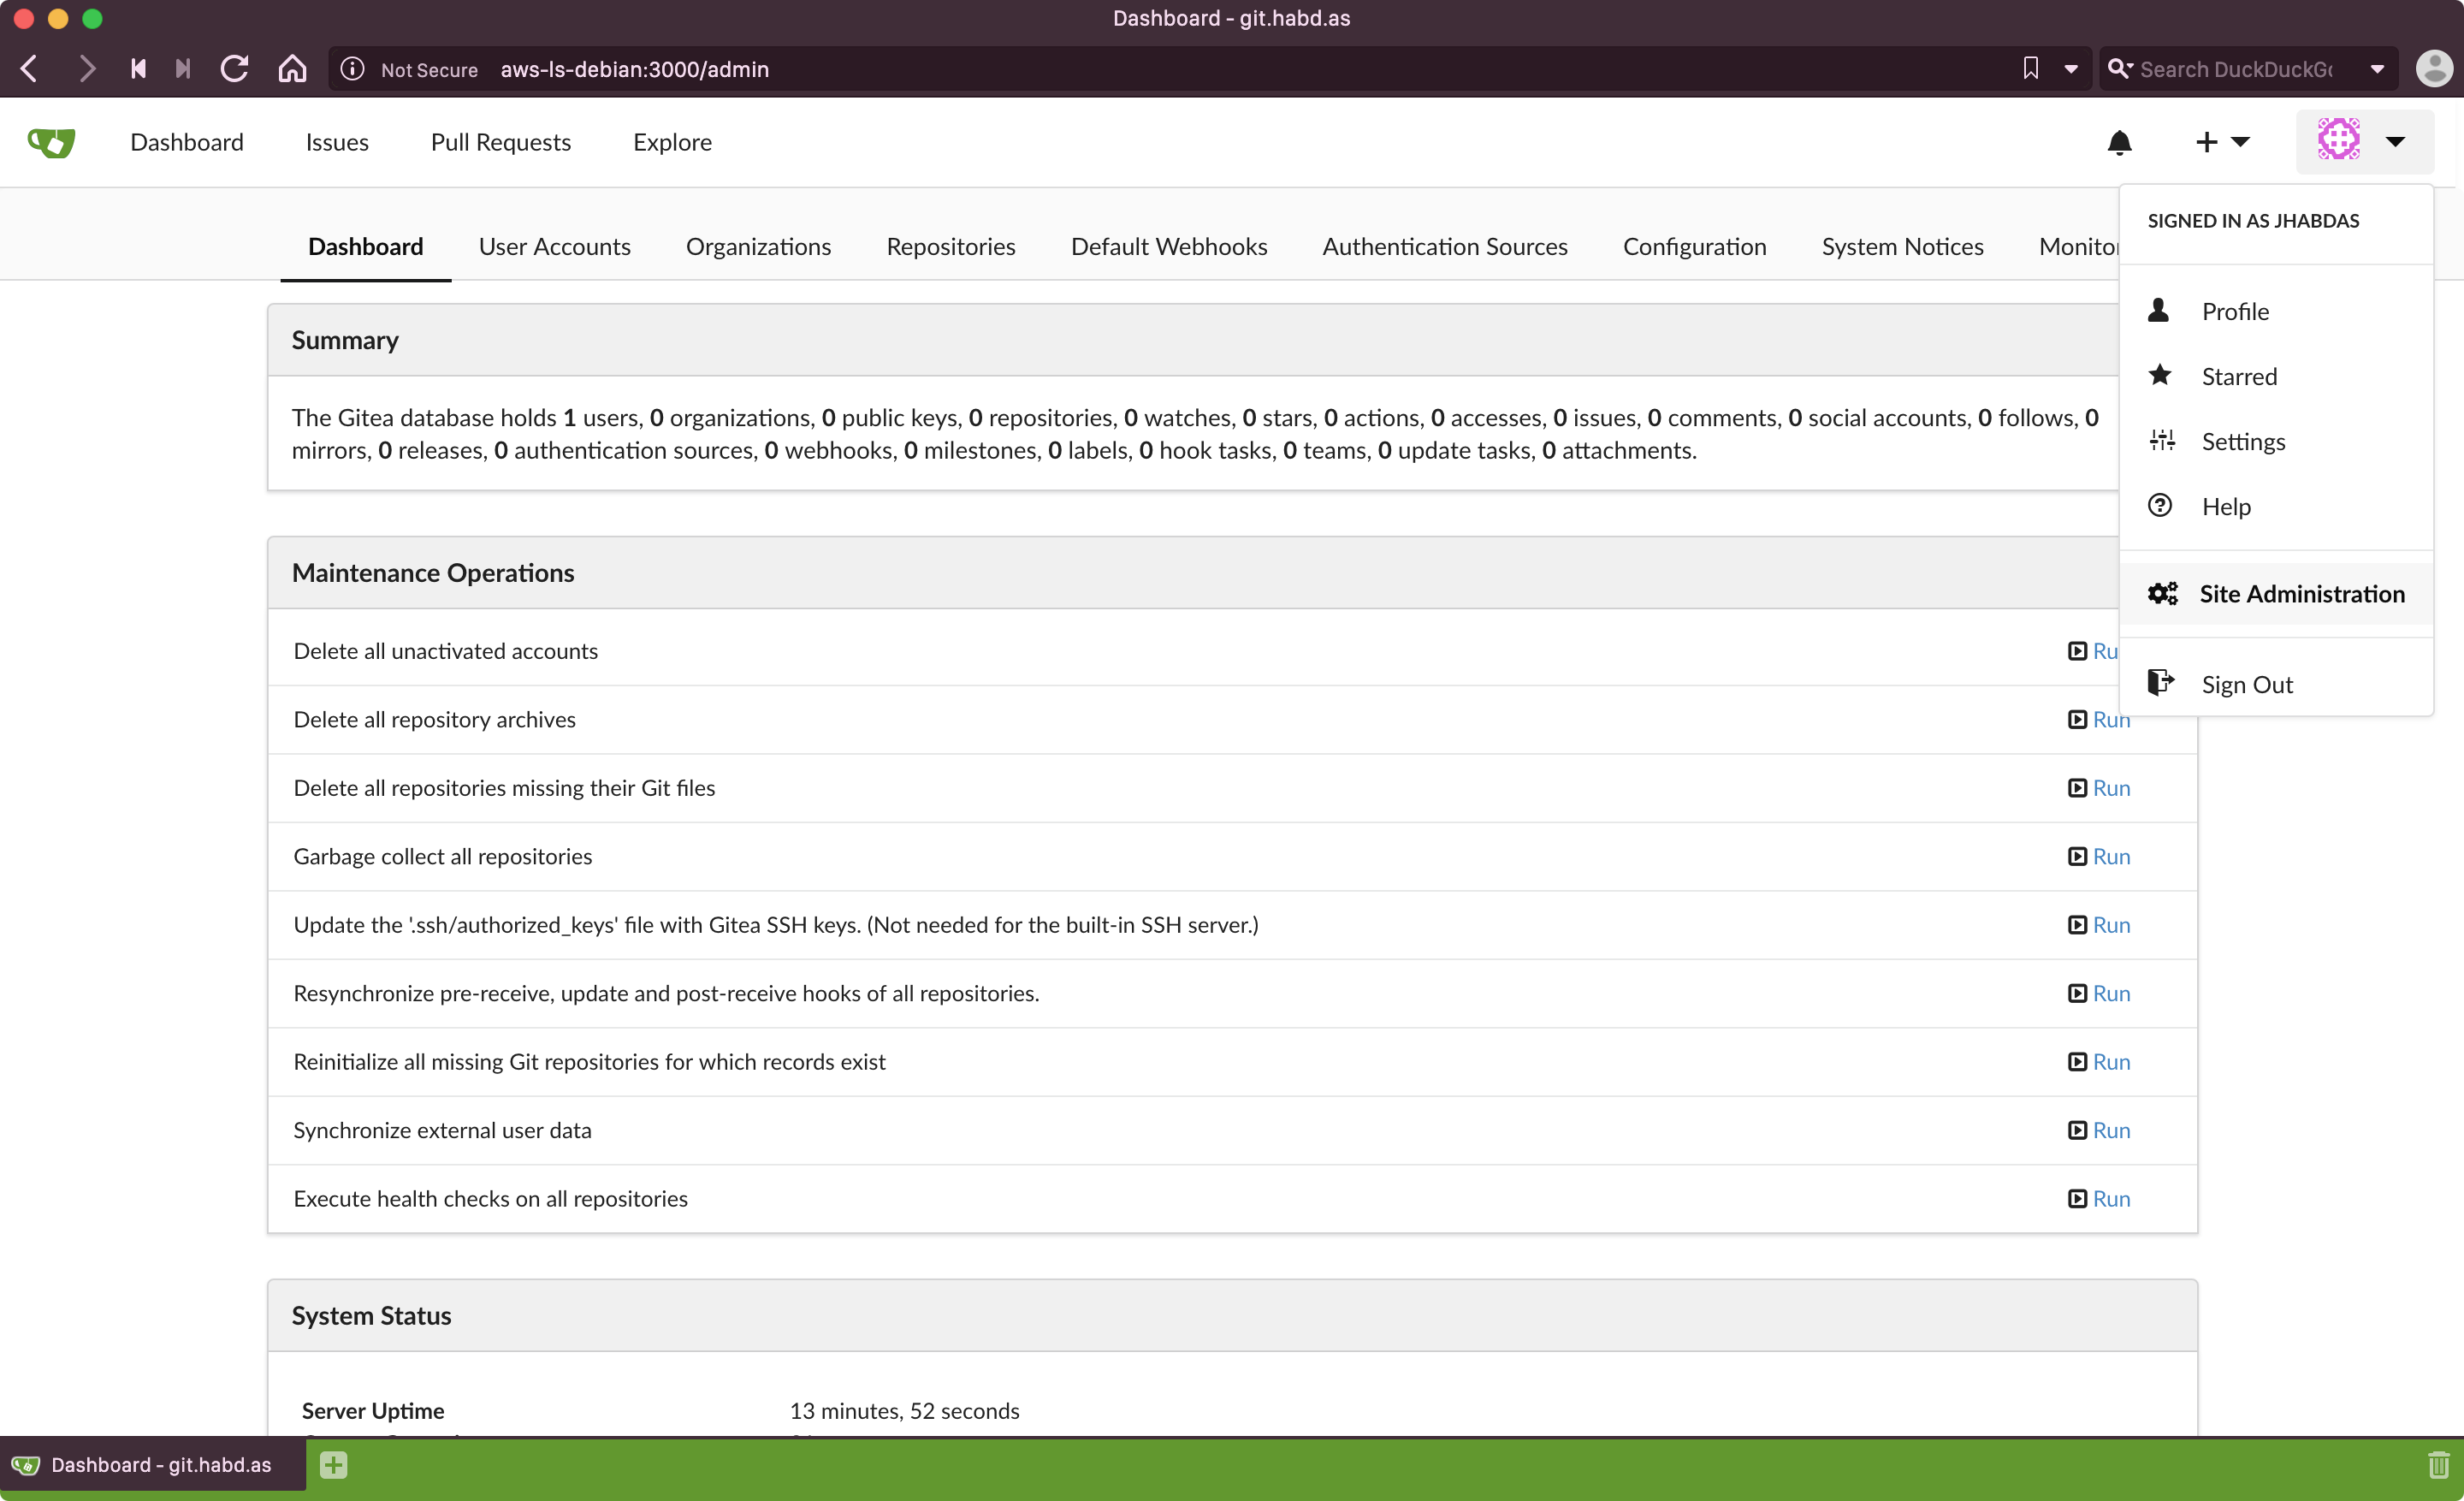
Upon completion you’ll be logged in as Administrator on your new Gitea site:
Accessing via Git
To interact with your Gitea server via git from the command line
generate a public key and upload it using the Gitea web interface, add an alias to /etc/hosts as you did in Configure SSH Keys and update ~/.ssh/config like:
Host github github.com
    HostName github.com
    IdentityFile ~/.ssh/id_rsa
    User github

Host lightsail aws-ls-debian
    IdentityFile ~/.ssh/lightsail_rsa
    User admin

Host gitea gitea
    Port 2222
    IdentityFile ~/.ssh/gitea_rsa
    User poweruser
Set Port to the value specified for SSH Server Port during Gitea installation, the same value specified in docker-compose.yml and one of the same ports unblocked from the Lightsail instance Firewall while finalizing installation.
Customizing Gitea
Despite its rather spartan documentation Gitea is extremely customizable. Want to use a dark theme? No problem. Email registration? Sure, why not. What about Single Sign-On with GitHub? Yep, you can do that too…
Learn more about Customizing Gitea and check out Gitea compared to other Git hosting options to get a feel for what’s possible. And because the core of Gitea is open source the sky is the limit.
Summary
In this tutorial your learned how to self-host Gitea using Amazon Lightsail. From creating and managing Lightsail instances to installing and running Docker you now have what it takes to manage your own source code in the Amazon cloud. When I started using Gitea over 9 months ago I had no idea how much I would come to appreciate it as GitHub continues to grow more and more clamped down.
Have fun out there!