In this post I’m going to show you a neat little hack to get a bare metal load balancer called MetalLB working in K3s under Docker Desktop for Mac. Before you get started please follow the steps to set-up K3s using k3d with Rancher if this is your first time using Kubernetes. If you already have a K3D cluster running, we’ll be creating a new one for experimentation.
This hack allows Mac users running Kubernetes locally via Docker have it provide EXTERNAL-IP addresses from a pool of addresses so multiple K8s services can be run on the same port, namely 80 (http) and 443 (https), at the same time. Effectively this is a workaround for docker/for-mac/issues/155. Without this hack LoadBalancer IP addresses will show as <pending> or <none> in kubectl.
Let’s see how it works.
Create Cluster
Stop any running processes bound to 0.0.0.0:6550/tcp, 80 and 443; and create a new cluster called k3s-metalllb with the following command:
k3d cluster create k3s-metalllb \
  --image rancher/k3s:latest \
  --api-port 6550 \
  --port 80:80@loadbalancer \
  --port 443:443@loadbalancer \
  --servers 1 --agents 3 \
  --k3s-server-arg --disable=servicelb
The kubectl context will update automatically as demonstrated in my getting started guide. Verify all nodes are STATUS of Ready using kubectl get nodes.
You should see output like:
Expand to view sample output
NAME                       STATUS   ROLES    AGE   VERSION
k3d-k3s-metallb-agent-0    Ready    <none>   15s   v1.19.4+k3s1
k3d-k3s-metallb-server-0   Ready    master   21s   v1.19.4+k3s1
k3d-k3s-metallb-agent-1    Ready    <none>   15s   v1.19.4+k3s1
k3d-k3s-metallb-agent-2    Ready    <none>   14s   v1.19.4+k3s1
Install TunTap Shim
TunTap provides kernel extentions for macOS that allow it to create virtual network interfaces. Install it with Homebrew via Cask:
brew tap caskroom/cask
brew cask install tuntap
The installation will error the first time you try it. Follow the instructions provided in the Brew logs to complete the installaiton. You’ll need to configure a trust setting in System Preferences before the installation can complete.
Once the brew install completes successfully, clone the following repo and inspect its contents:
git clone https://github.com/AlmirKadric-Published/docker-tuntap-osx.git && \
cd docker-tuntap-osx && ls -l sbin
You should see output like:
Expand to view sample output
Cloning into 'docker-tuntap-osx'...
remote: Enumerating objects: 5, done.
remote: Counting objects: 100% (5/5), done.
remote: Compressing objects: 100% (5/5), done.
remote: Total 96 (delta 0), reused 1 (delta 0), pack-reused 91
Unpacking objects: 100% (96/96), 22.65 KiB | 483.00 KiB/s, done.
total 32
-rwxr-xr-x  1 jos  staff  1306 Dec  6 13:11 docker.hyperkit.tuntap.sh
-rwxr-xr-x  1 jos  staff  2116 Dec  6 13:11 docker_tap_install.sh
-rwxr-xr-x  1 jos  staff  1109 Dec  6 13:11 docker_tap_uninstall.sh
-rwxr-xr-x  1 jos  staff   455 Dec  6 13:11 docker_tap_up.sh
As shown in the sample output the sbin directory contains a few Bash scripts needed to cajole Docker into using TunTap. Review the files for completeness and make any adjustments desired to docker_tap_up.sh before continuing.
When you’re ready, stop Docker Desktop.
Then run ./sbin/docker_tap_install.sh to install the shim.
You should see output like:
Installation complete
Restarting Docker
Process restarting, ready to go
After Docker restarts run ifconfig | grep tap. You should see output like:
tap1: flags=8843<UP,BROADCAST,RUNNING,SIMPLEX,MULTICAST> mtu 1500
If a tap1 network interface appears you can now bring it up.
Configure Interface
From the docker-tuntap-osx directory run the “up” to initialize the tap network interface:
./sbin/sbin/docker_tap_up.sh
Enter your password then run ifconfig | grep -A 5 tap.
You should see output like:
tap1: flags=8843<UP,BROADCAST,RUNNING,SIMPLEX,MULTICAST> mtu 1500
        ether 2a:45:72:77:d7:56
        inet 10.0.75.1 netmask 0xfffffffc broadcast 10.0.75.3
        media: autoselect
        status: active
        open (pid 2631)
Verify the network interface has a status of active.
Next update your routing tables based on your Docker config. To do that first get the Subnet “CIDR block” value from the cluster’s docker network:
docker network inspect k3d-k3s-metallb | jq '.[0].IPAM.Config[0]'
Be sure you inspect the correct Docker network. You shoud see output like:
{
  "Subnet": "192.168.112.0/20",
  "Gateway": "192.168.112.1"
}
Then add a new route to the routing table:
sudo route -v add -net 192.168.112.1 -netmask 255.255.240.0 10.0.75.2
Tip: Calculate the subnet mask (netmask) using an online calculator.
Enter your password. You should see output like:
Expand to view sample output
u: inet 192.168.112.1; u: inet 10.0.75.2; u: inet 255.255.240.0; RTM_ADD: Add Route: len 132, pid: 0, seq 1
, errno 0, flags:<UP,GATEWAY,STATIC>
locks:  inits:
sockaddrs: <DST,GATEWAY,NETMASK>
 192.168.112.1 10.0.75.2 255.255.240.0
add net 192.168.112.1: gateway 10.0.75.2
And from there you should be good to go!
Install MetalLB
With the networking stuff out of the way we’re ready to install MetalLB to our bare metal cluster. The official installation instructions contain the steps. Follow the steps to install by manifest, copied here for convenience:
kubectl apply -f https://raw.githubusercontent.com/metallb/metallb/v0.9.5/manifests/namespace.yaml
kubectl apply -f https://raw.githubusercontent.com/metallb/metallb/v0.9.5/manifests/metallb.yaml
# On first install only
kubectl create secret generic -n metallb-system memberlist --from-literal=secretkey="$(openssl rand -base64 128)"
Then run some sanity checks to make sure installation succeeded:
kubectl -n metallb-system rollout status deploy/controller && \
kubectl get all -n metallb-system
You should see output like:
Expand to view sample output
deployment "controller" successfully rolled out
NAME                              READY   STATUS    RESTARTS   AGE
pod/speaker-9xzfx                 1/1     Running   0          2m3s
pod/speaker-7ft9t                 1/1     Running   0          2m3s
pod/controller-65db86ddc6-rkcpp   1/1     Running   0          2m3s
pod/speaker-6swfz                 1/1     Running   0          2m3s
pod/speaker-d2tm7                 1/1     Running   0          2m3s

NAME                     DESIRED   CURRENT   READY   UP-TO-DATE   AVAILABLE   NODE SELECTOR            AGE
daemonset.apps/speaker   4         4         4       4            4           kubernetes.io/os=linux   2m3s

NAME                         READY   UP-TO-DATE   AVAILABLE   AGE
deployment.apps/controller   1/1     1            1           2m3s

NAME                                    DESIRED   CURRENT   READY   AGE
replicaset.apps/controller-65db86ddc6   1         1         1       2m3s
If everything looks good, continue.
Validate
Now we’re going to install Rancher and patch it with a LoadBalancer to see if we get an EXTERNAL-IP address assigned from the pool.
Start by installing cert-manager as described in the previous tutorial. For the sake of time, here’s a quick installation by manifest of cert-manager v1.1.0:
kubectl apply -f https://github.com/jetstack/cert-manager/releases/download/v1.1.0/cert-manager.yaml && \
kubectl -n cert-manager rollout status deploy/cert-manager
Then install Racher using Helm and wait for the rollout to complete:
helm repo add rancher-stable https://releases.rancher.com/server-charts/stable && \
helm repo update && \
kubectl create namespace cattle-system && \
helm install rancher rancher-latest/rancher \
  --namespace cattle-system \
  --set hostname=rancher.k3d.localhost && \
kubectl -n cattle-system rollout status deploy/rancher
In 3-4 minutes, once all 3 replicas are available, run kubectl get svc -n cattle-system and observe TYPE is ClusterIP and not LoadBalancer:
NAME      TYPE        CLUSTER-IP     EXTERNAL-IP   PORT(S)          AGE
rancher   ClusterIP   10.43.220.86   <none>        80/TCP,443/TCP   3m33s
Now patch the service so it’s using a LoadBalancer instead:
kubectl -n cattle-system patch svc rancher -p '{"spec": {"ports": [{"port": 443,"targetPort": 443,"name":
 "https"},{"port": 80,"targetPort": 80,"name": "http"}],"type": "LoadBalancer"}}'
You should see a service/rancher patched message.
Run kubectl get svc -n cattle-system again. You should see output like:
NAME              TYPE           CLUSTER-IP     EXTERNAL-IP   PORT(S)                      AGE
rancher-webhook   ClusterIP      10.43.47.242   <none>        443/TCP                      3m4s
rancher           LoadBalancer   10.43.220.86   <pending>     443:31788/TCP,80:30555/TCP   7m19s
Notice the rancher service is now using a LoadBalancer and the EXTERNAL-IP is <pending> assignment. If everything was configured properly, that would return an IP address from the pool of available addresses.
As it turns out, however, we haven’t defined our pool of IP addresses yet. Let’s go ahead and do that now by drafting a ConfigMap file:
cat > metallb-config.yaml <<EOT
apiVersion: v1
kind: ConfigMap
metadata:
  namespace: metallb-system
  name: config
data:
  config: |
    address-pools:
    - name: default
      protocol: layer2
      addresses:
      - 192.168.112.150-192.168.112.200
EOT
Specify an address range of your own. Make sure the addresses chosen are within the subnet as determined while configuring the network interface for TunTap.
Once satisfied with your changes, create the actual ConfigMap:
kubectl create -f metallb-config.yaml
You should see a configmap/config created message. If you do, run kubectl get svc -n cattle-system one more time and inspect the output:
NAME              TYPE           CLUSTER-IP     EXTERNAL-IP       PORT(S)                      AGE
rancher-webhook   ClusterIP      10.43.47.242   <none>            443/TCP                      26m
rancher           LoadBalancer   10.43.220.86   192.168.112.151   443:31788/TCP,80:30555/TCP   31m
You should see an IP address in the EXTERNAL-IP column now. The address will be one of those you made available to the pool and also one which falls within the netmask of the routing rule added earlier.
Browse to the EXTERNAL-IP address assigned by MetalLB:
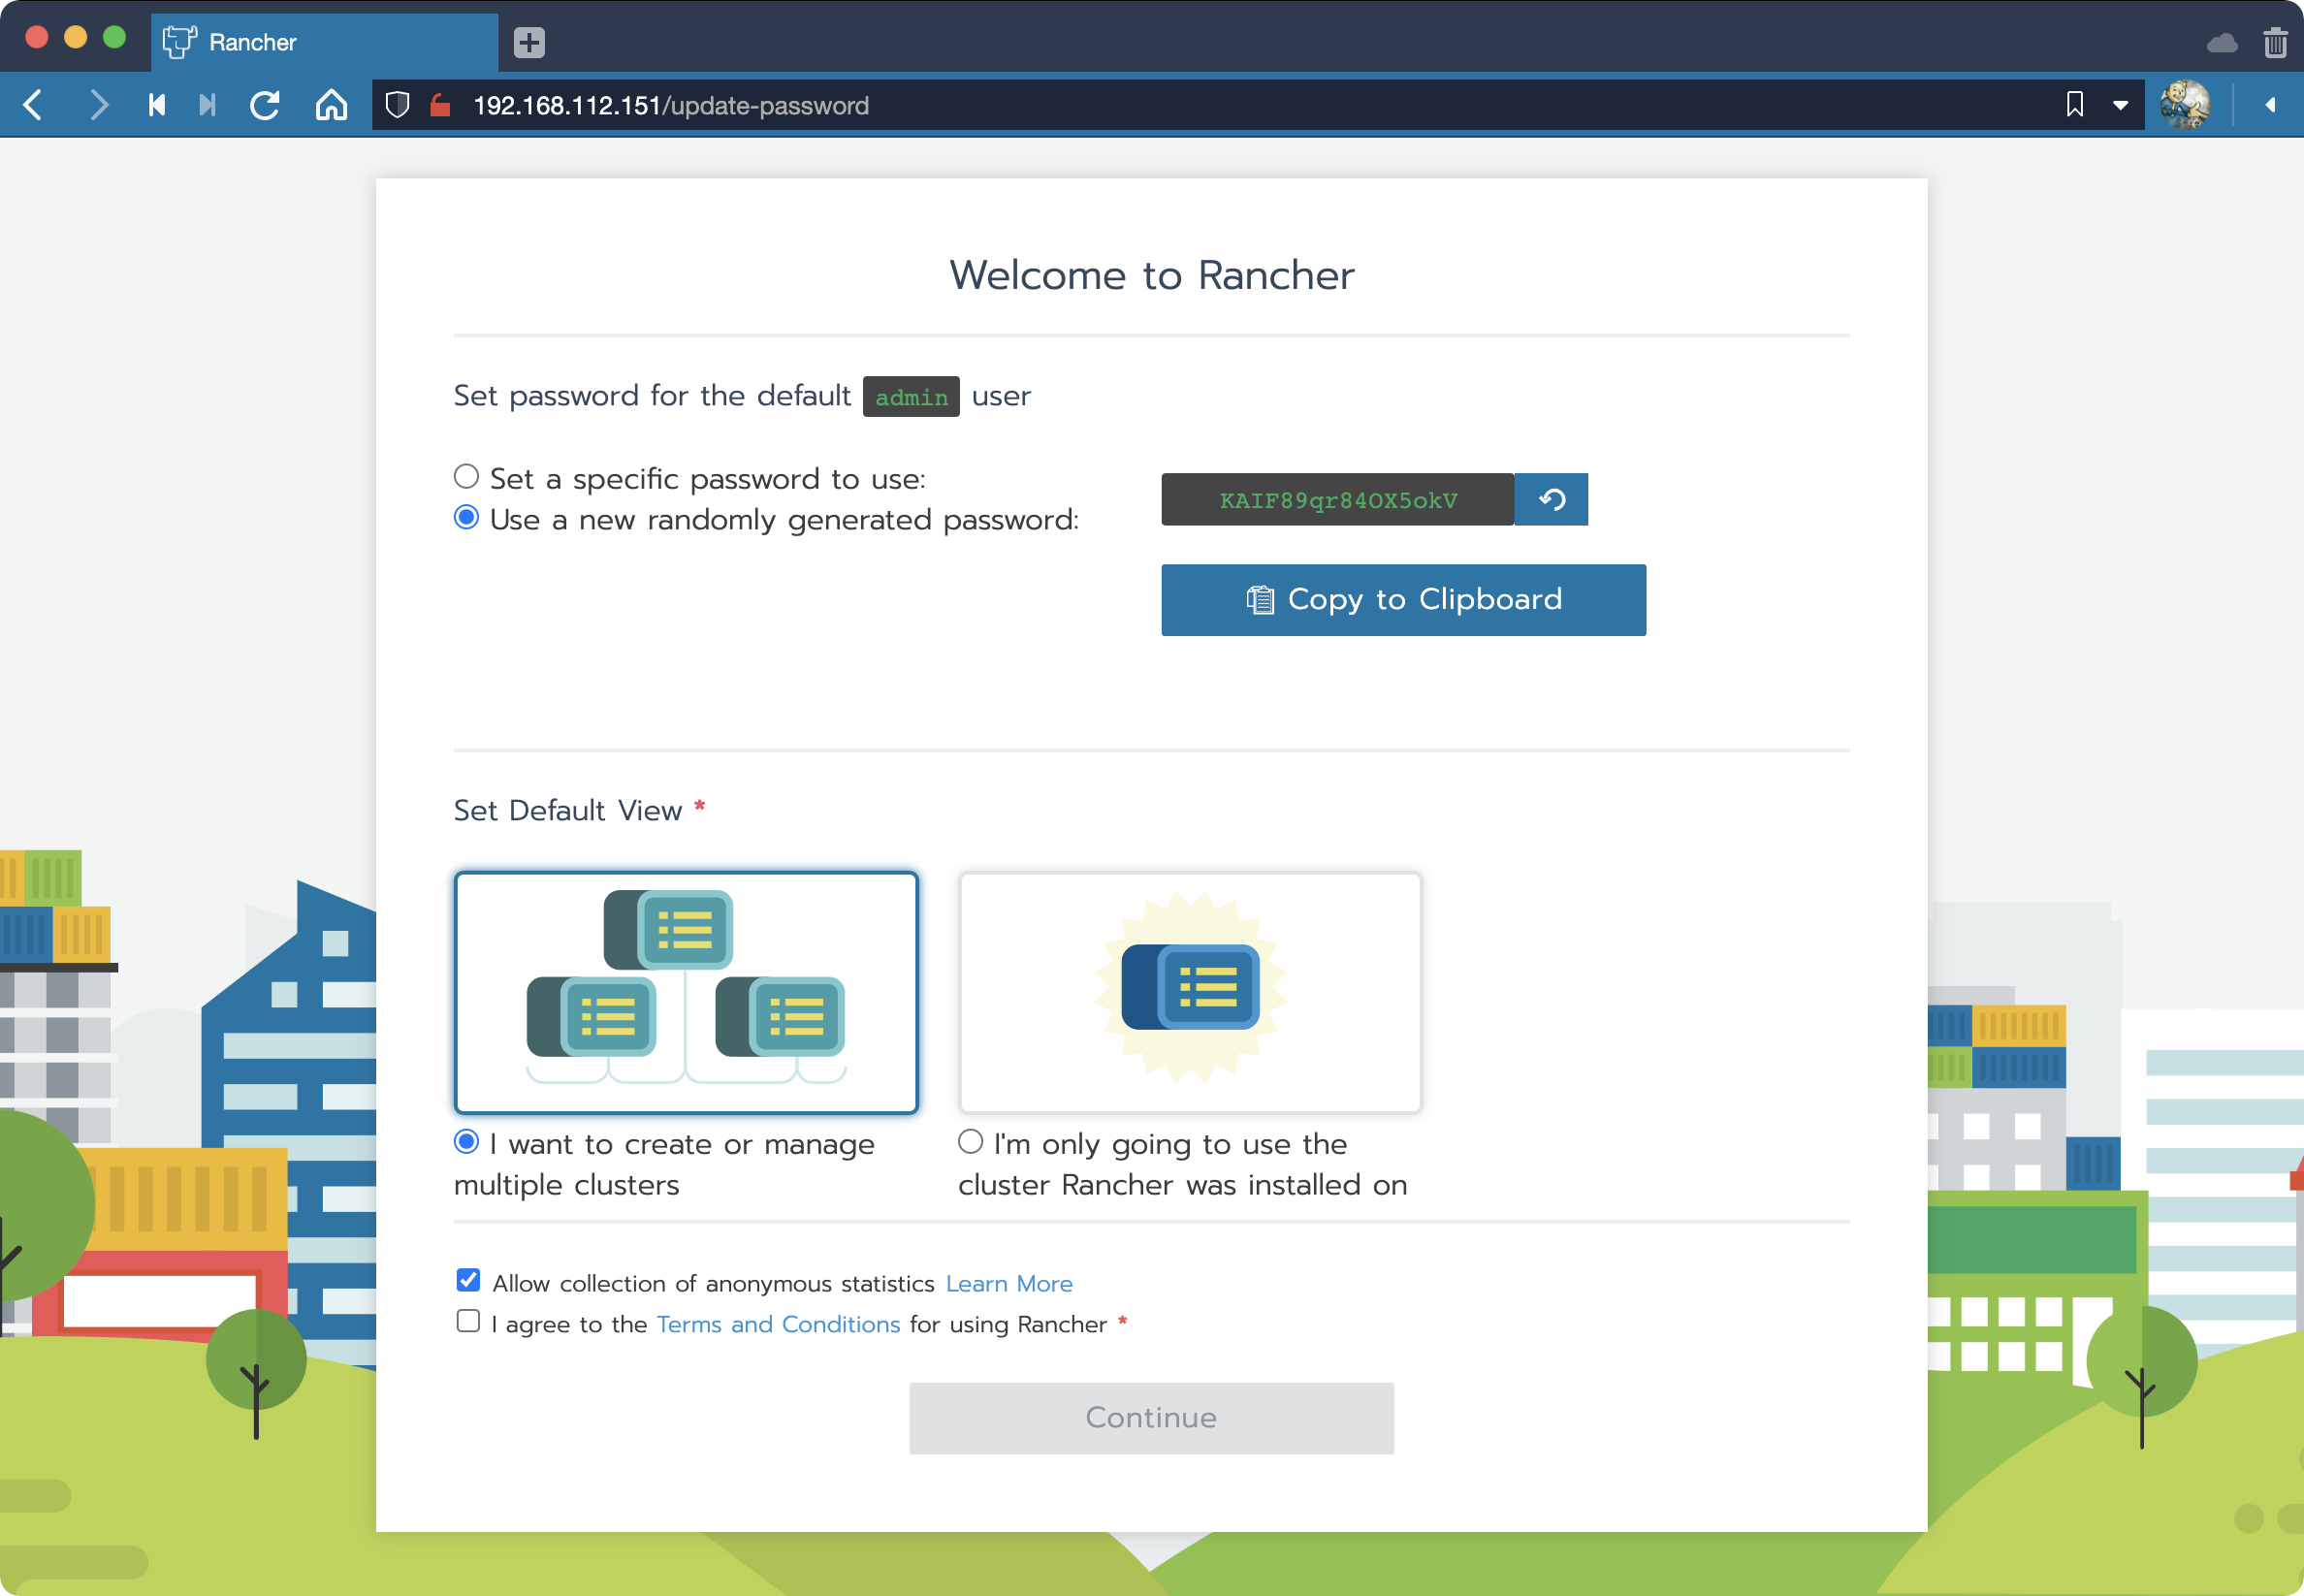
If you followed along carefully, you shoud now be looking at the Rancher Welcome page and have finished validating your work. Congratulations!
Finally, edit your /etc/hosts file and add an entry for Rancher if you like. What worked for me was 192.168.112.151 rancher.local despite the original hostname setting used when installing. Not ideal for reasons I’ve mentioned before. But then again this was all a hack.
Conclusion
In this tutorial I walked you through how to set-up a bare metal load balancer using K3s and MetalLB on macOS to assign IP addresses from a pool of available addresses after hacking our way past docker/for-mac/issues/155 for the purpose of allowing us to expose multiple services on the same port in K3s with Docker. If you have any suggestions on how to improve upon this solution, please drop in the GH issue linked above so all may benefit.
Credit
Big hat tip to Cody De Arkland who wrote the article titled KIND and Load Balancing with MetalLB on Mac which helped me finally get to the finish line after fumbling around with this for more than a day. Note there’s also this article for K3s but I was never able to follow it through to completion.