
Recently, while creating a physical back-up of my Mac, I ended up corrupting the Micro SD card I was using to perform the back-up operation. This translated into a one line cautionary alert inside the related blog post:
Turns out removing an SD card during a 100+ GB 77,000 file transfer from a Mac to an SD card isn’t the best idea – despite what a five year-old might tell you.
After several hours of toiling with Disk Utility, diskutil and dd on macOS the furthest I got was to experience the same issues as another individual who posted on Apple Exchange 3 years ago - their question unresolved, until now.
In this post I will explain how to use USB bootable media on a MacBook to dual-boot into a Linux operating system to unbrick a corrupted SD card.
Before getting started
In order to boot your macOS into another operating system you need to actually have another operating system to boot into. In my case I had a spare 32 GB USB stick I use for privacy online called Tails (Debian) so I used that.
There are, of course, other options for dual-booting a Mac from USB. And I don’t necessarily recommend even trying to install Tails to a USB stick without a Windows machine as installing Tails from Mac is a kludge. But if you can get your hands on a live OS like Tails it’s fairly trivial to fix an SD card even when diskutil on macOS is throwing Error: -69877: Couldn’t open device.
Regardless of which dual-boot operating system you choose consider choosing a Linux distribution such as Tails to make your secondary OS more useful than a one-time SD card unbricking operation. You’ll thank yourself for it later.
Booting Tails from Startup Manager
The Apple support page Mac startup key combinations covers a number of methods you may use to make your Mac do special things when it reboots. In How to Backup & Restore macOS Mojave I covered just one. In this post we’ll cover another:
If you have a USB stick with Tails or another bootable OS installed you can access the second OS from Startup Manager by holding down Option during system bootup when you restart the Mac with a USB stick containing the OS inserted:
1: Macintosh HD
2: EFI Boot
If you’re using Tails go ahead and choose EFI Boot to bypass booting from Macintosh HD and, instead, boot directly from the live OS on the USB stick.
After selecting the EFI Boot option from Startup Manager the Tails bootloader will run, presenting you with two startup options:
1: Tails
2: Tails (Troubleshooting Mode)
Choose the first option to start Tails normally and wait a moment for it to start – which it will do directly from USB. At this point you will see a GUI with configuration options. Review the options then choose Start Tails to complete the OS start-up sequence and log-in to Tails’ Debian-based GUI:
With the secondary OS now started it’s time to do something useful like using Disks to recover a seemingly bricked SD card.
But first, a word of caution:
The same caution applies to the USB stick, as removing the stick will instantly cause Tails to wipe itself from your Mac’s volatile memory should you need.
Unbricking a Micro SD Card
Depending on who you ask the definition of a “bricked” device may vary. For the purposes of this post a bricked device is one which no longer functions in macOS but may function in other, ahem, more capable operating systems (like Debian).
So let’s get right down to it.
Start Disks
While logged-in to the Tails-Debian GUI, press the Command key on your keyboard to open a search dialog, type the word disks then press Enter to open Disks.
With your micro SD card inserted you should see something like this:
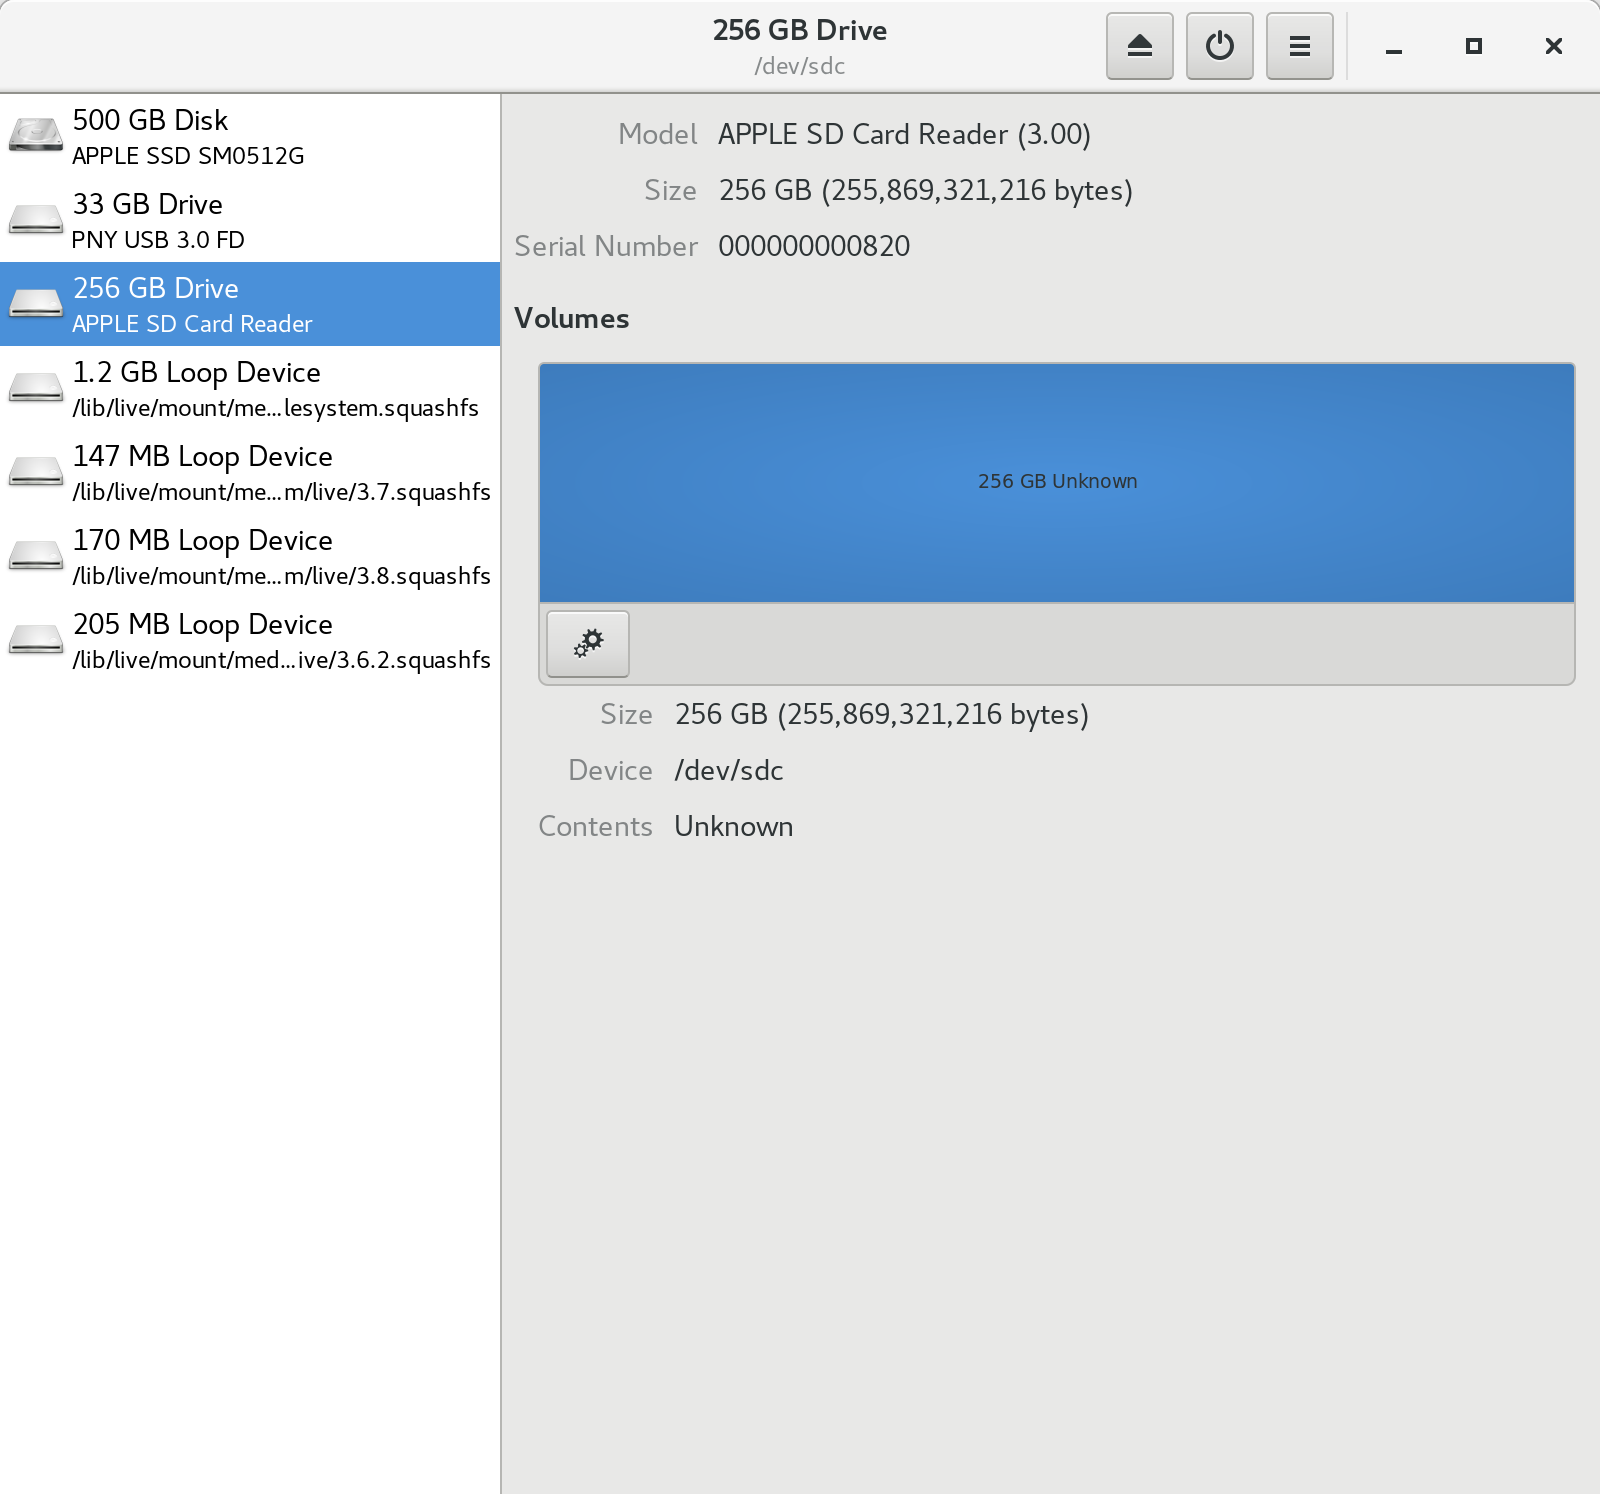
Depending on how jacked your SD card is you may see something else. Regardless we’re here to try and fix it so click the gear icon and choose to format the SD card and ONLY the SD card. If you choose the wrong option and wipe out your Mac’s SSD there is little hope left for you.
Format SD Card
When I did this I tried a few different options not knowing what would work and what wouldn’t. What didn’t work was an NTFS volume. My Mac running macOS 10.14.3 (Mojave) had absolutely no idea what to do with it. In hindsight it seems obvious NTFS wouldn’t work. But I was getting desperate.
What did work was formatting the micro SD card using the following options:
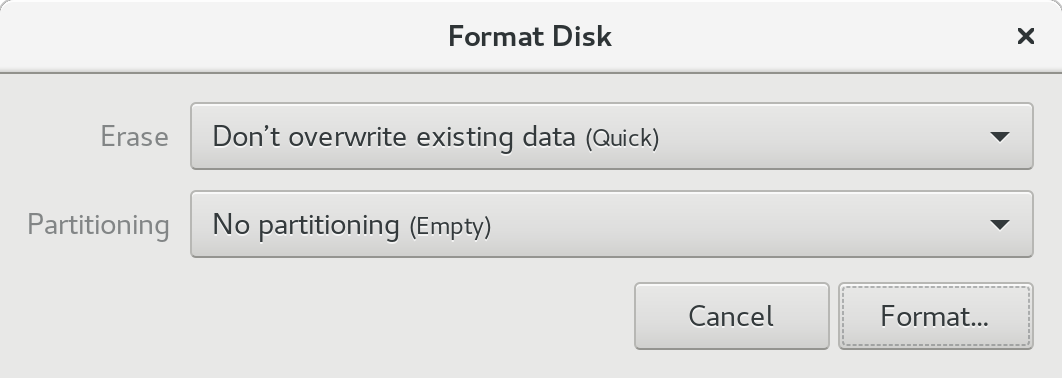
Even on a large micro SD card quick format should take no longer than 2-3 minutes to finish. And when it’s done it’s time to boot back into macOS to complete the unbricking.
Initialize SD Card
After you’ve formatted your micro SD as described, and with the micro SD card still inserted in the card reader (the USB stick doesn’t matter), restart your Mac and let it boot into macOS as you might normally do.
Upon login macOS will scan for hardware changes and, as a result, find the unpartitioned SD card. It should then automatically let you know something’s wonky by opening a dialog with an alert message and three options:
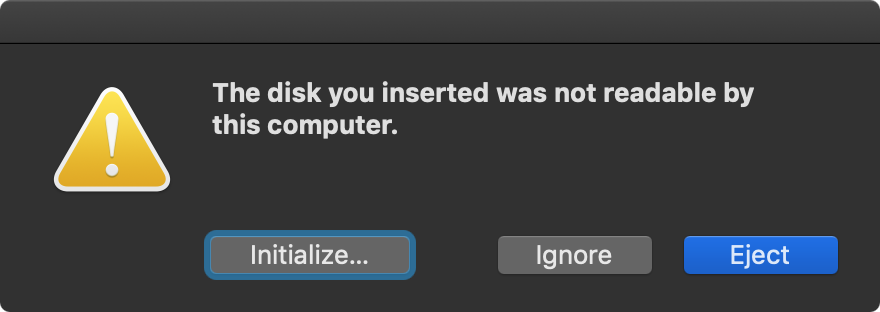
And now the magic moment.
Select Initialize… to start Disk Utility on your Mac and use it to try to Erase the previously unusable (bricked) micro SD card one more time:
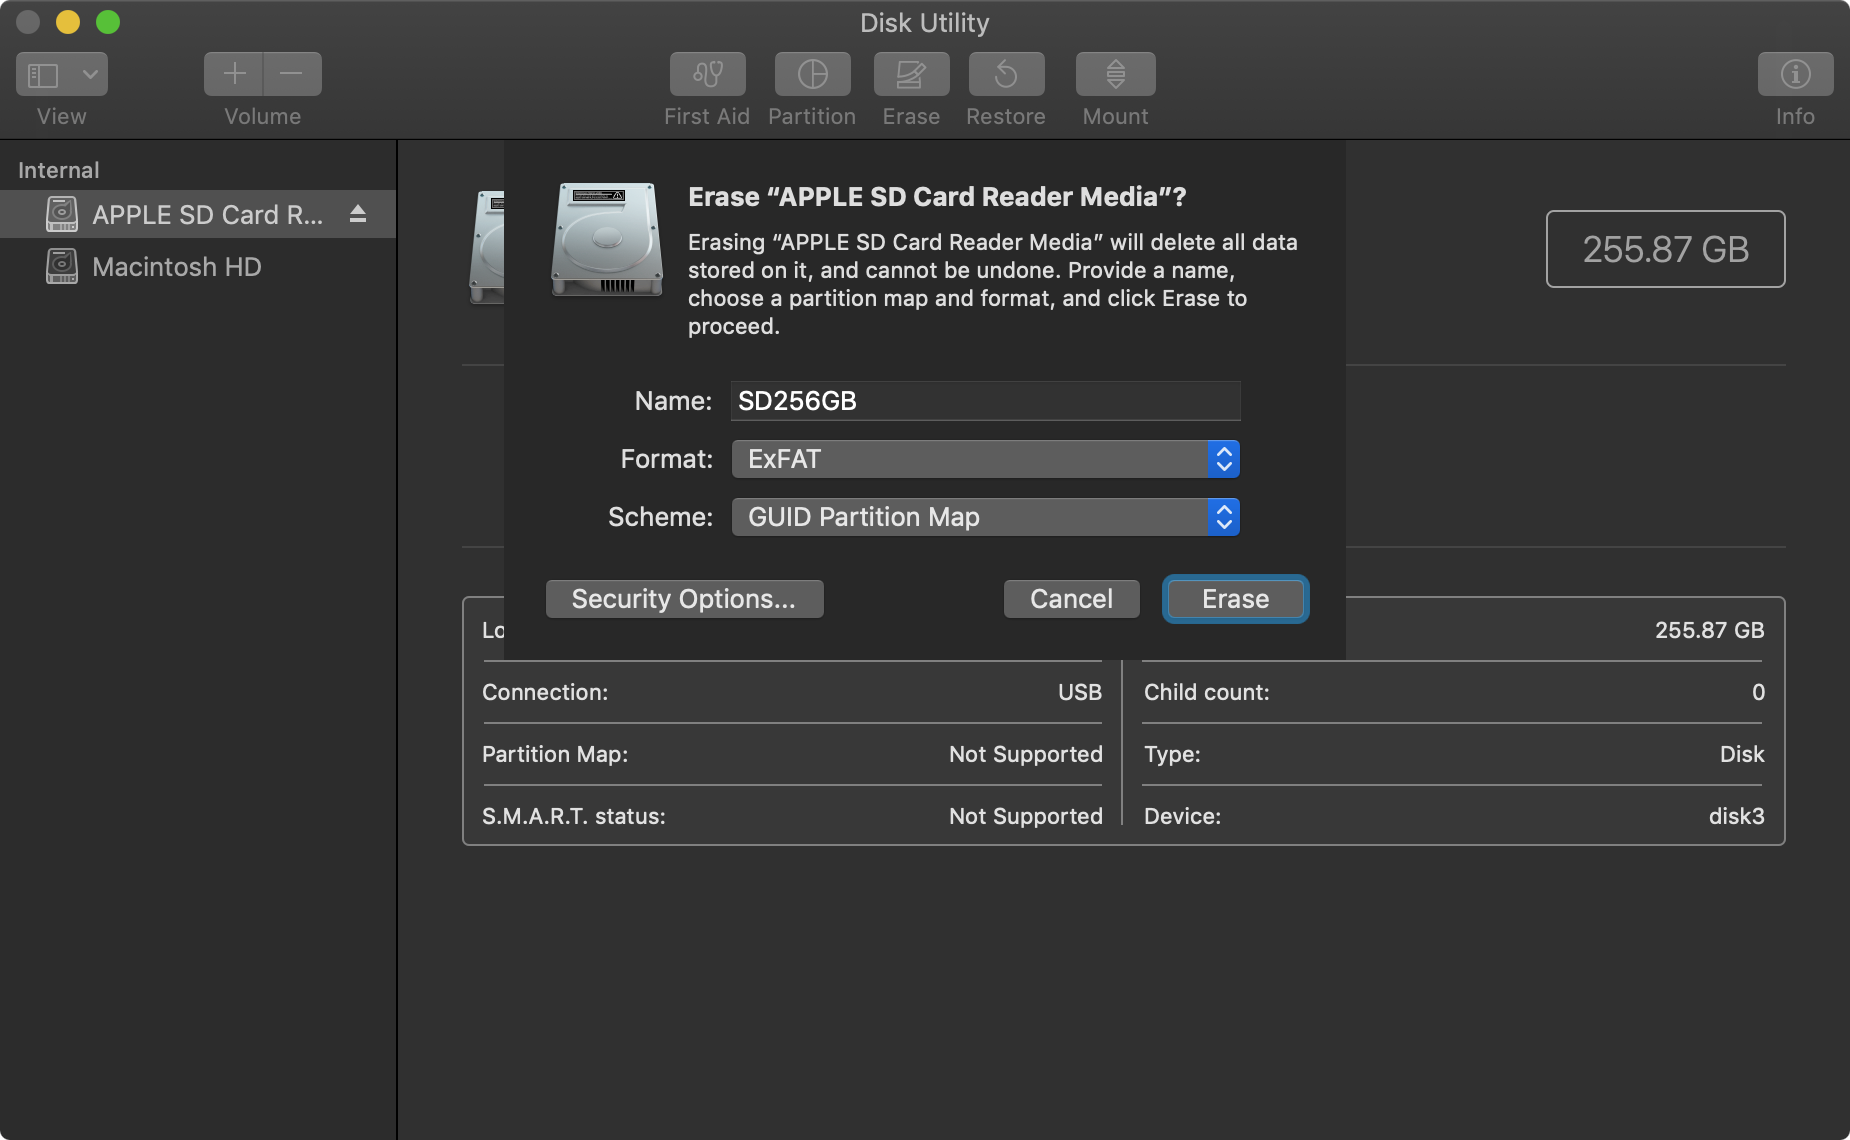
With the erasure fields filled-out choose Erase to recreate the partition table on the SD card, format and erase it:
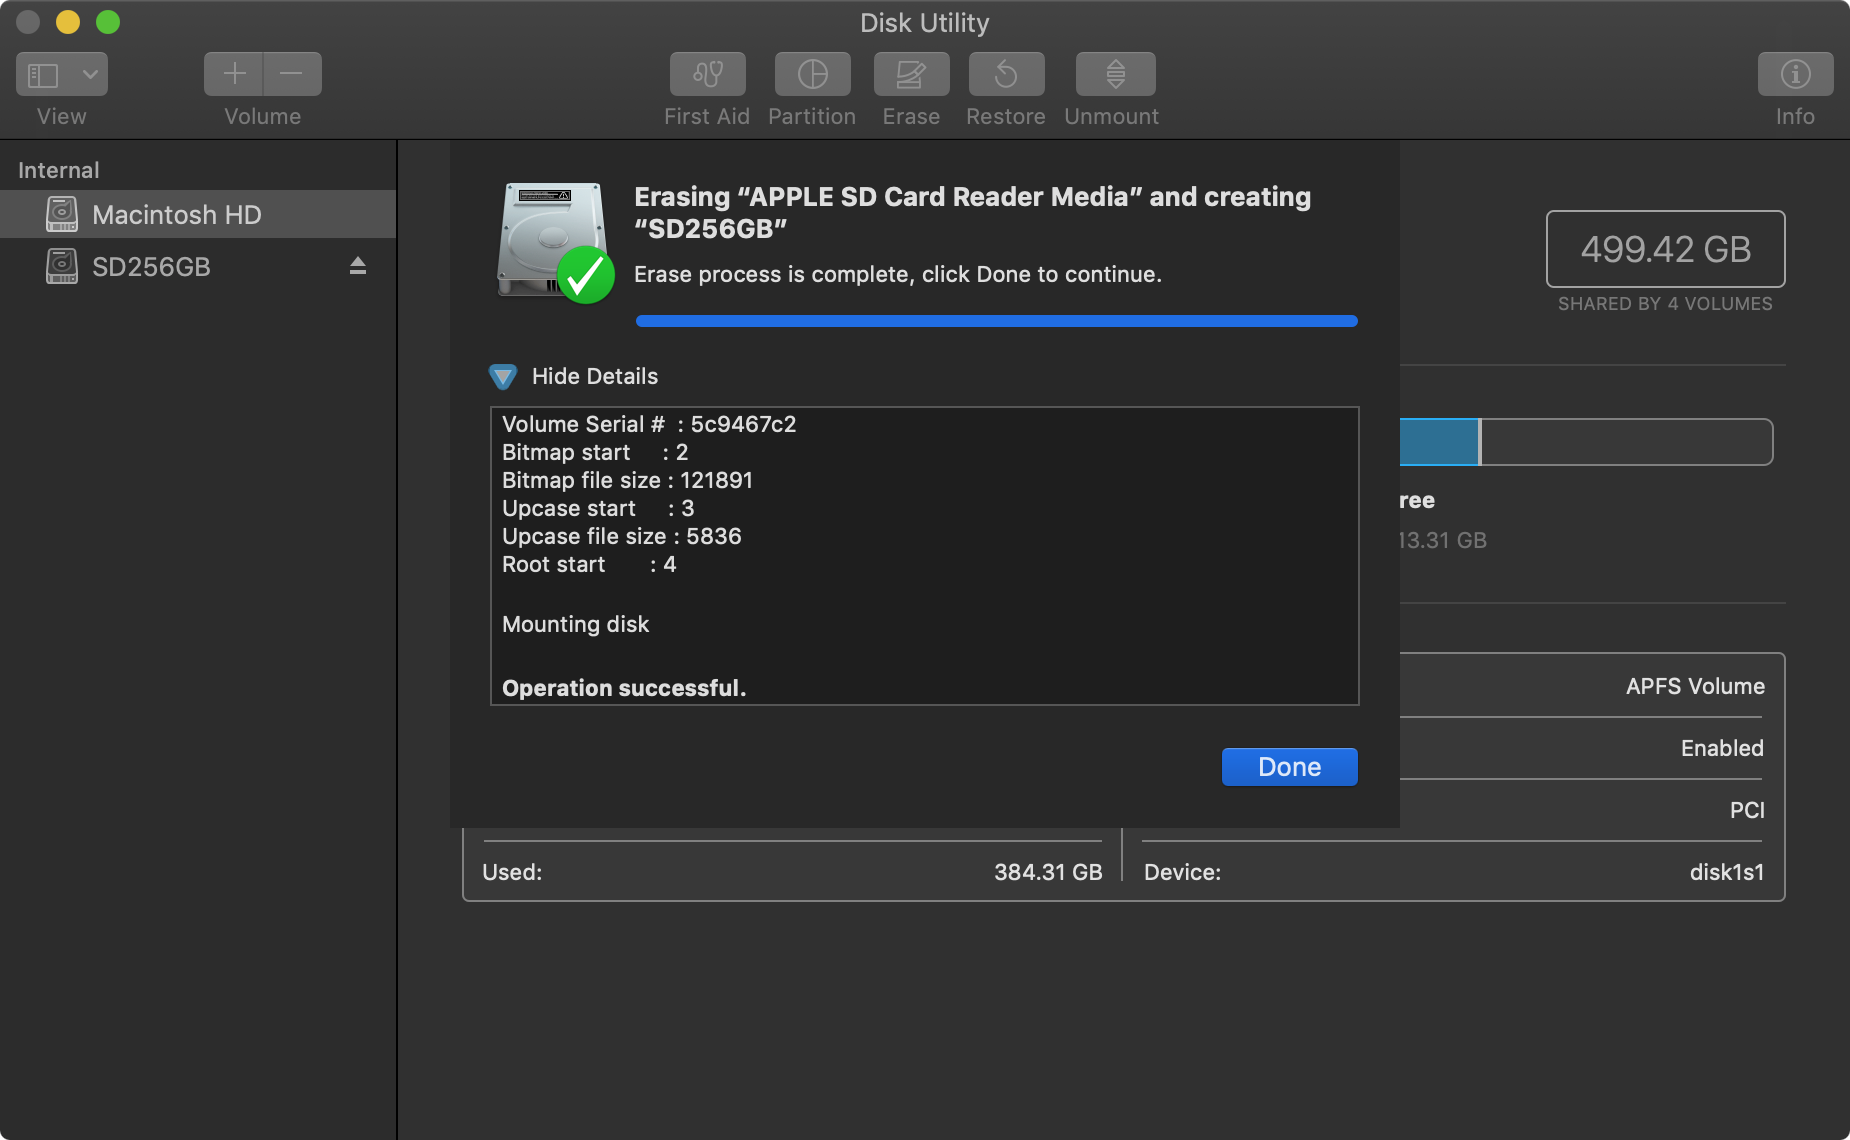
If you see Operation Successful when the format completes you just unbricked a corrupted micro SD card. It’ll work just like new. If it didn’t work, well hey, at least you tried right? You may have lost an SD card due but you learned how to dual-boot a Linux operating system on macOS.
Troubleshooting
I’ve been using Tails on my MacBook Pro for about 3 years. The only issue I’ve ever run into is occasionally needing to reset the System Management Controller (SMC) following the steps on Apple Support. You’ll know when you need to do this because it’ll appear your Mac won’t start. Not to worry though, I’ve done this a number of times on different machines and never experienced problems.
Summary
In this post I explained how a corrupted and, for all intents and purposes, otherwise “bricked” micro SD card may be restored to working condition by dual-booting the Tails (Debian) operating system alongside macOS on a Macintosh.
So the next time you see a warning message in a tech article take heed:
This post would not have been possible without the curious fingers of a five year-old, and man’s unequivocal thirst for knowledge. Kids. Yet another good reason for backing-up your files on macOS Mojave.