
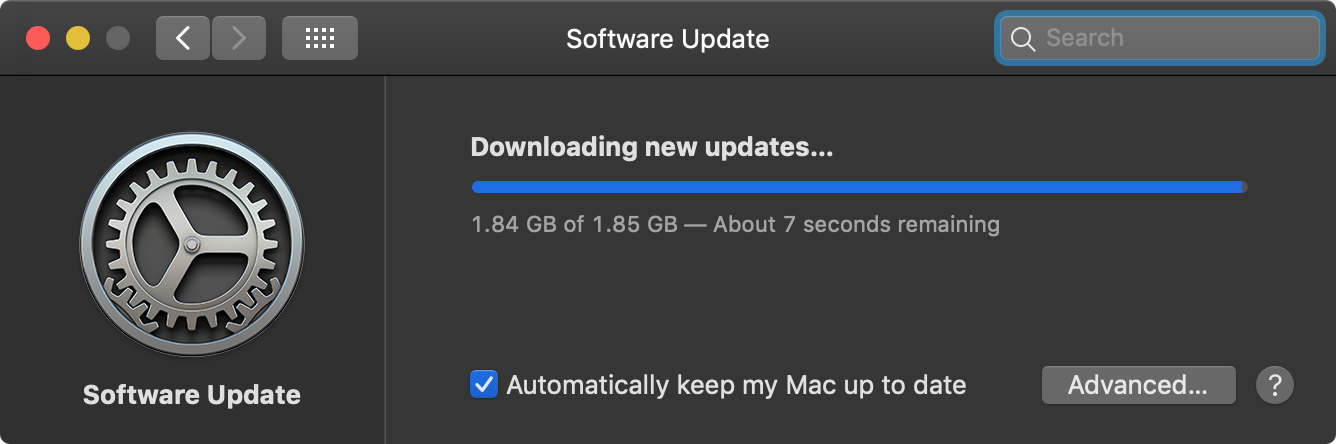
Last month, while download Mojave patches for at least two zero-day exploits a malfunction occurred and I couldn’t upgrade, leaving my machine vulnerable:
During a 10 minute chat with Apple Care it was suggested I back-up and restore Mojave. The resolution wasn’t exactly what I’d hoped for. But not a big deal as I hadn’t created a backup in 3 years and it was about that time.
I wasn’t prepared to restore right away and several days later Little Snitch notified me of a new outbound connection it had never seen before:
AssetCacheLocatorService.xpc
Paranoid about the escalation of privilege exploit (CVE-2019-7286) in Mojave 10.14.2 I checked System Upgrade again and, the 1.78 GB or so of the updates already downloaded and flagged as invalid resumed to completion:
Patience is be a virtue. But I was already planning to wipe the Mac anyway. And here’s how you can too.
Bill of Materials
To complete a backup and restore process you will need the following:
- Apple MacBook Air or MacBook Pro with USB and SD card slots
- 1 or more SanDisk Ultra 256GB MicroSDXC UHS-I Card with Adapter
- 1 Kingston Digital 16GB 100 G3 USB 3.0 DataTraveler (optional)
- A charging cable, external power source and ~6 GB of Internet data
The micro SD card(s) is/are where your back-up files will be stored. They’re waterproof and easy to lose, so make sure you have a safe place to keep them. The USB stick will be used for an optional offline recovery. It’s not essential to have, but it will save you time and also provides leverage during recovery.
Backing Up Your Files
Before backing-up access the Storage Management app to scope things out:
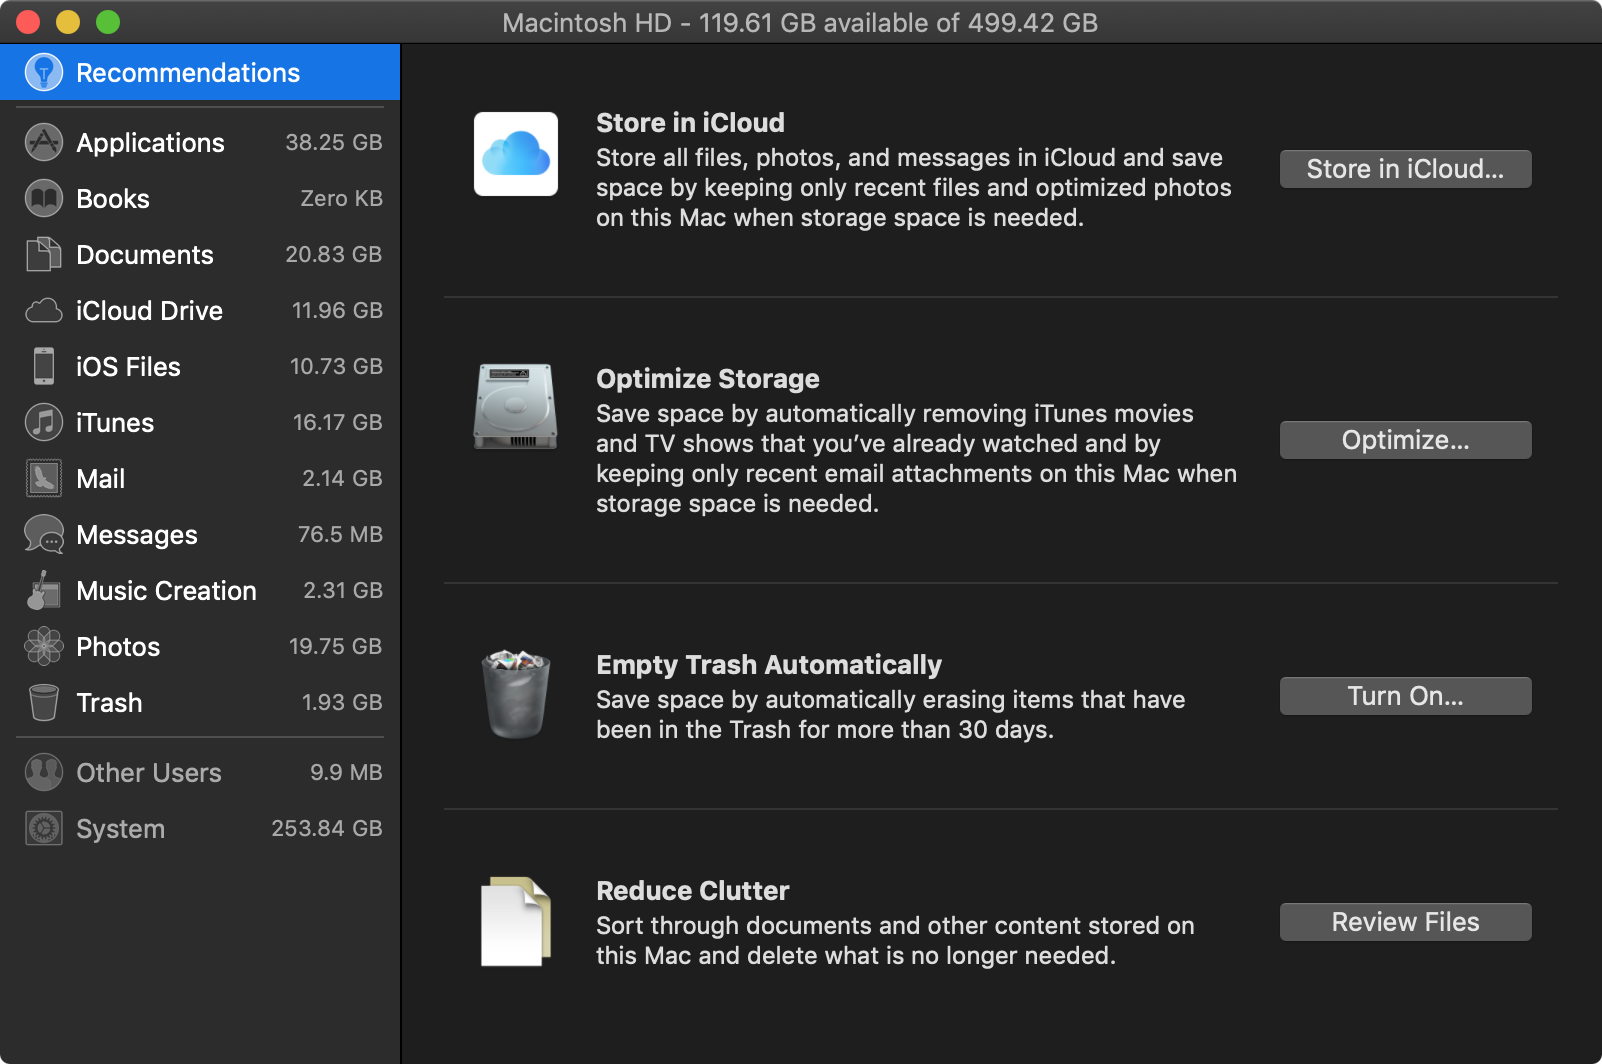
Click Review Files under Recommendations to view large and potentially unused files. Use it along with Finder to delete files you no longer want to keep.
If you have Time Machine enabled (I didn’t), you should be able to recover from mistakes should you make any accidental deletions.
Pay special attention to the following locations on the file system:
ls /Users/"$(whoami)" # Current user data
ls /Users # Shared, Guest and other user account data
And use Finder along with Storage Management to review and copy files from your Mac’s HD directly to the SD card, being sure to include any movies and music in iTunes Media you’d like to keep. I had two movies I wanted to keep on hand:


Transferring these two large movie files to the micro SD card from in the Bill of Materials finished in under 7 minutes.
Once you’ve backed up your movies and other large files, disconnect from the Internet and make back-ups of your cloud drives including iCloud Drive, MEGA (encrypted), Keybase (encrypted), Dropbox, et cetera:
iCloud Drive uses 11.95 GB of storage
Again use Finder to copy files to the SD card. A ~12 GB iCloud Drive with ~20,000 files should transfer to the micro SD card in approximately 20-25 minutes. The more files there are the longer the transfer will take.
After that review Storage Management again and pay special attention to:
- Applications (38.25 GB)
- Documents (124.14 GB)
- Mail (447.2 MB)
- Photos (19.75 GB)
- Other Users (9.9 MB)
And use Finder to back each of them up, one at a time. If you run out of space on your SD card review and delete files or swap in another card to continue.
Once you’ve copied over your documents and another files to the SD card open Terminal and run ls -al ~ to review and backup your dotfiles:
-rw-r--r--     1 vhs  staff      1928 Oct 16 20:36 .bash_history
-rw-r--r--     1 vhs  staff       200 Oct 18 18:12 .bash_profile
-rw-r--r--     1 vhs  staff       224 Oct 18 18:12 .bashrc
drwxr-xr-x     4 vhs  staff       128 Jan 22  2017 .bundle
drwxr-xr-x     7 vhs  staff       224 May 16  2017 .cache
drwxr-xr-x     4 vhs  staff       128 Mar  9 14:38 .cargo
drwxr-xr-x     3 vhs  staff        96 Aug  1  2016 .cocoapods
drwxr-xr-x    12 vhs  staff       384 Jun 21  2017 .composer
drwx------     6 vhs  staff       192 Mar 19 19:13 .docker
drwx------    12 vhs  staff       384 Feb 18 17:58 .dropbox
drwx------     6 vhs  staff       192 Feb  7 11:34 .elinks
drwxr-xr-x     4 vhs  staff       128 Jan 22  2017 .gem
lrwxr-xr-x     1 vhs  staff        45 Jul 31  2016 .gemrc
drwxr-xr-x     2 vhs  staff        64 Mar  9 14:49 .git_template
lrwxr-xr-x     1 vhs  staff        49 Jul 31  2016 .gitconfig
lrwxr-xr-x     1 vhs  staff        49 Jul 31  2016 .gitignore
drwx------    18 vhs  staff       576 Mar 19 19:11 .gnupg
drwxr-xr-x     8 vhs  staff       256 Aug 21  2016 .gradle
Dotfiles contain application and system settings for the user typically hidden from Finder. What you find here will vary greatly between individual system.
If you’re confident on the command line, go ahead and use your favorite shell to cp your dotfiles to /Volumes/SDCARDNAME. Otherwise, use Command+Shift+. to reveal them in Finder and repeat the last command to hide them again.
If necessary, do the same thing for other system users.
With your dotfiles copied to the SD card go ahead just zen out for a while. Spend some time thinking of things you might’ve forgotten due to some non-standard installation or system customization such as a hidden partition.
Then back-up that stuff up too.
Steps to Wipe a Mac
Once you’re confident you’ve covered your bases it’s time to wipe the machine.
Luckily I had a Note drafted and pinned already:
And some recommended reading from friends on Telegram:
But I know at least one thing about computers…
If there’s one thing computers do well, it’s malfunction.
So keep going. You’re not done yet.
Really Backing Up Your Files
Do this only if you know at least one thing about computers.
Contacts
Open the Contacts app and go down the list. For each and every contact that matters, manually enter their data into another contact management system. In my case I moved them all to a Huawei P20 Pro – also backed up to the cloud – during a flight from Malaysia to Bali. This is a great way to thin out the address book and reflect on relationships which truly matter.
Notes
The Notes app was one of the best apps I’d ever used until I discovered last year what GNU meant by the expression Apple's Operating Systems Are Malware. Notes has no export option other than Export as PDF…. Seriously, that’s all you get. In the app at least…
To get your notes delivered in individual files request a copy of your Apple ID data using Apple’s Data & Privacy website. It may take a couple of days to get the data delivered, but it’s worth the wait.
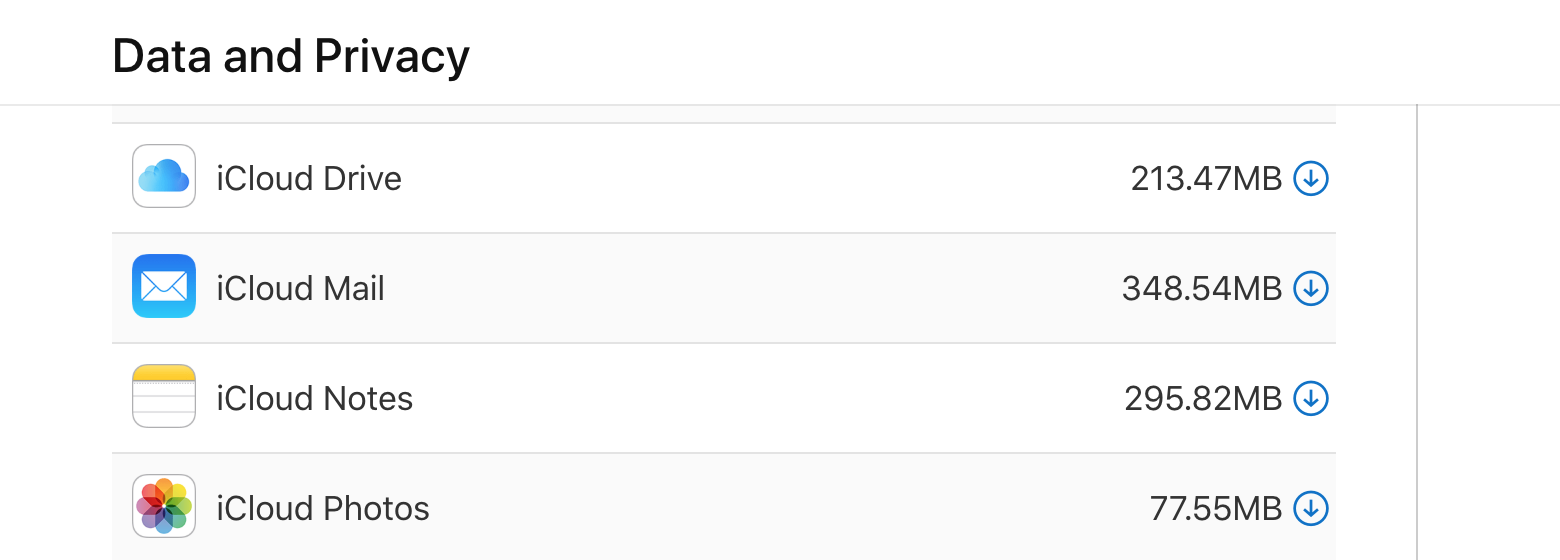
Upon download you’ll be presented with a zip of all of your notes in plain text format, neatly organized by folder.
iTunes
Recent versions of iTunes no longer store your data in a portable XML format like they used to. This presents a problem for data portability, further ensnaring you to the confines of the closed Apple ecosystem. And while this may seem reasonable to you right now you may come to learn the hard way Apple may delete your iTunes metadata.
To get your data back into a portable format:
- Create a Spotify account and import your data from iTunes.
- Use Stream Export to extract all of your music from Spotify.
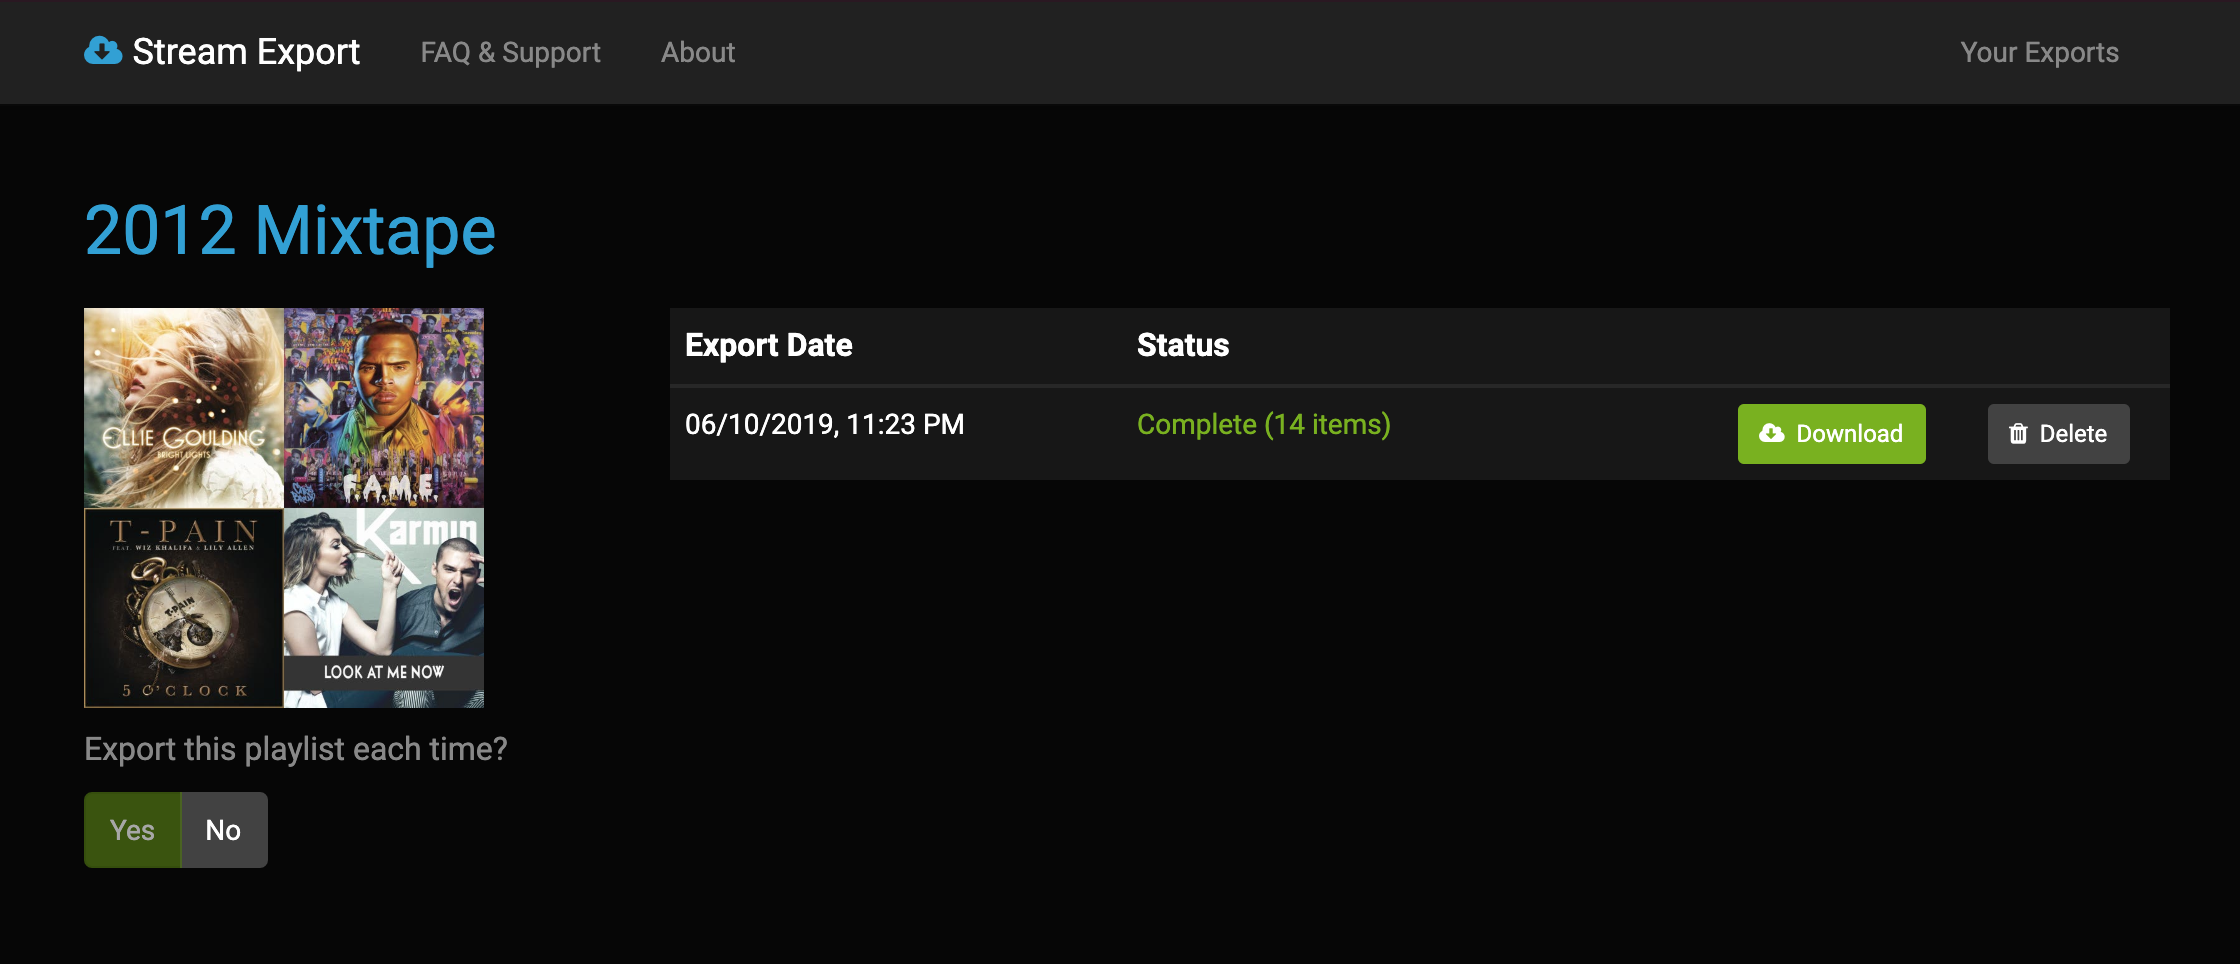
Stream Export will convert your playlists to into a portable CSV format which you may use to relocate your favorite music in a DRM-free format later on.
iMovies
If you’ve had a Mac for a while chances are you’ve used it to produce an iMovie or two. While export options are bountiful your actual Projects exist in a working state inside the Movies folder several levels below the current user.
An easy way to find them is to open a project in iMovie, press Shift+Cmd+R to Reveal in Finder and use Cmd+↑ in Finder to traverse directories and copy the project files to your SD card from there.
iCloud Photos
If you’ve ever owned an iPhone chances are you have a number of photos and videos on iCloud you may not have a physical back-up of – even on your Mac. To get at those open a web browser, log-in to your icloud.com account and click Photos. You’ll be able to download them as zip files 1000 at a time.
Keychain Access
The Keychain Access is an app macOS uses to store and manage secrets. It contains everything from Internet passwords to Xcode tokens. If already using time-tested practices for password management you should be in and out of here fairly quick.
If not, this is a good time to brush up on the fundamentals:
Use the system admin password to show login passwords in cleartext. If you’re like me you may also notice Mojave had the ability to lock keychains after a timeout in minutes, or while sleeping – but wasn’t. Next time, right?
User directories
Macs almost never show you the contents of your user directory. But I assure you, it’s still there. And the fastest way to view it from Finder is to press Shift+Cmd+H to go directly to it. Developers may find a folder here called VirtualBox VMs they’ll want to consider backing-up.
Review the files within and back-up the ones you wish to keep. Then open Terminal and cd /usr/local and review all that stuff for possible back-up items too. Developers may recognize this as the folder where Homebrew formulas are stored.
Developer files
There’s a trick on macOS when you create a folder called Developer:
mkdir /Users/"$(whoami)"/Developer
It gets a special folder icon with a hammer – incentive to use it for organizing work-related files and a place to save files you wouldn’t want hogging up space or potentially leaking secrets to a cloud.
If you use the Developer folder, back it up. Otherwise, back-up the one you use. And don’t forget to encrypt .env files and the like while doing so.
.DS_Store files and node_modules prior to copying developer files if using SD card suggested in Bill of Materials.
find . -name '.DS_Store' -print -delete
# Print out and delete all .DS_Store files in current working directory

find . -type d -name 'node_modules'
# Print a list of all 'node_modules' directories in current working directory

find . -type d -name 'node_modules' -prune -exec rm -rf '{}' +
# Delete all 'node_modules' directories in the current working directory
Before running the above I had over 500,000 developer files to copy. After clearing out .DS_Store and node_modules the number was slashed to 77,000.
If you still have a lot of files, you can increase the transfer speed by creating an archive of the entire Developer directory with the following:
cd ~ && tar -czvf Developer.tar.gz Developer
And extract it after copying it back to your machine later with:
tar --strip-components 1 -xvf Developer.tar.gz
The time savings here can be significant. With 77,000 developer files macOS estimated transfer time of dev files at 4 hours. After archiving the directory the transfer time was slashed down to about 13 minutes.
IDEs & Editors
If you’re a software developer you probably had a lot of dotfiles to backup and you’ll likely have settings for one or more IDEs to back-up as well.
Here are a few IDEs to consider:
- Android Studio
- Xcode
- Visual Studio
- PhpStorm
The individual approach used to back-up your goods will vary depending IDE and individual configuration. If you need to, review the IDE help docs and consult discussion forums so you don’t leave behind anything important.
Repeat the same process for any code Editors you’re using as well.
SSH
This should’ve been encrypted and saved earlier. If you missed it, or saved it without encrypting, consider this your chance to correct the mistake.
If you tree ~/.ssh in Terminal you should see something like:
├── config
├── gitea_rsa
├── gitea_rsa.pub
├── id_rsa
├── id_rsa.pub
└── known_hosts
In this case, both gitea_rsa and id_rsa contain private keys. You may have only id_rsa but, in either case, you shouldn’t be storing that in cleartext, let alone in cleartext alongside your known_hosts with your backup.
Crypto
Since at least 1992 cypherpunks the world over have been dreaming about the Nakamoto checkmate – a game already in play now for over 10 years. And while you nor I may be the next Satoshi Nakamoto, that doesn’t mean you shouldn’t take the back-up of your crypto-related files with the utmost importance.
Review the system for files like:
- Certificates (.crt)
- Privacy Enhanced Mail (.pem)
- Certificate Bundles (.p7b)
- Personal Information Exchange (.p12)
- GNU Privacy Guard (.gpg)
- Private Keys (.key)
- ASCII Armored Text (.asc)
And be sure they’re encrypted before moving them anywhere.
If you use GPG Suite your passwords should’ve been saved while backing-up Keychain Access. Double check to be sure and then open GPG Keychain and use the Export option back-up desired public and private keys. Finally, if you have or use any cryptocurrency apps be sure you consider those as well.
Validate Your Work
Once you’re confident you’ve really backed-up all of your important files and data go back and re-review the steps listed above – including any of your own – and use them to verify the integrity and completeness of your back-up.
Some things to consider:
- Will any special tools be needed to access data upon recovery? If so, is it possible to download and keep a copy of those tools with your back-up files?
- If you GPG Suite, are you sure you’ll be able to recover your secret keys once you restore? Will it possible to do even without Internet access?
- Are you able to copy files off the micro SD card back onto your hard disk? Are you able to access the files from another computer should you need them?
- Could you possibly be locked out of any important communications tools upon recovery? If so, do you have another means to access them in the meanwhile?
Once you’ve validated the integrity of your back-up, write-protect it.
Write Protect Your Backup
If you remember the days of 3.5" floppies you may recall there being a physical switch on the side of the disk allowing you to write-protect its contents. The micro SD card adapter from the Bill of Materials has a similar switch. Use it to write-protect the files on the back-up files on the disk. If you’ve done your diligence you will only need to do this one time until the recovery is complete.
Really Wiping Your Mac
Once you’re really finished backing-up your files and data, validating your work and and write-protecting your backup, it’s time to wipe your Mac.
Overview
Whether your Mac is using an HDD or SSD the method for wiping the hard disk – or an SD card for that matter – remains the same:
- Format and repartition disk
- Define logical disk volumes
- Install an operating system
More advanced techniques may include modifying the MBR or GUID Partition Map but we won’t be getting into that here as it’s not necessary to wipe macOS Mojave.
Getting Started
To get started, run Disk Utility to view your Mac’s internal hard disk:
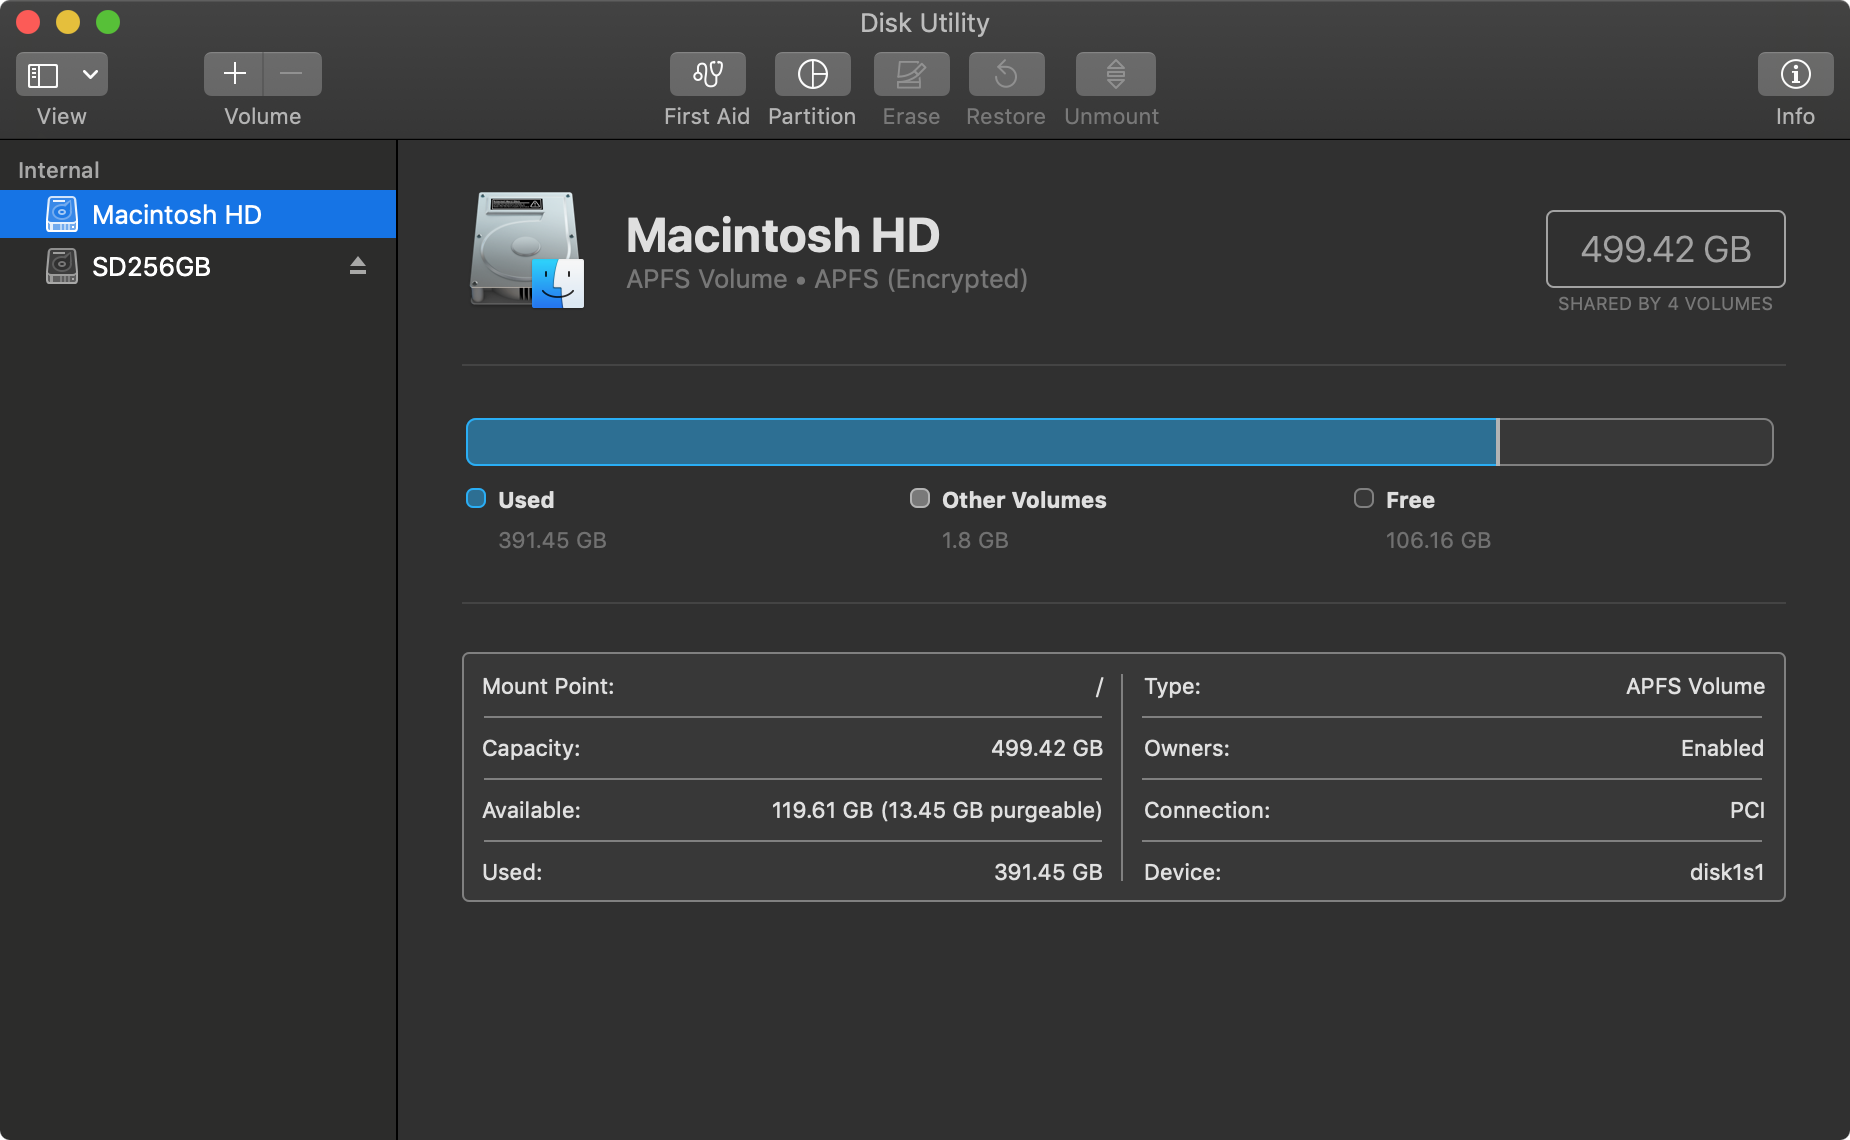
Notice how the Erase and Restore options are disabled. That’s because what you’re looking at is actually a simplified view showing logical volumes only.
To get a closer look at the disk press Cmd+2 to view the actual devices:
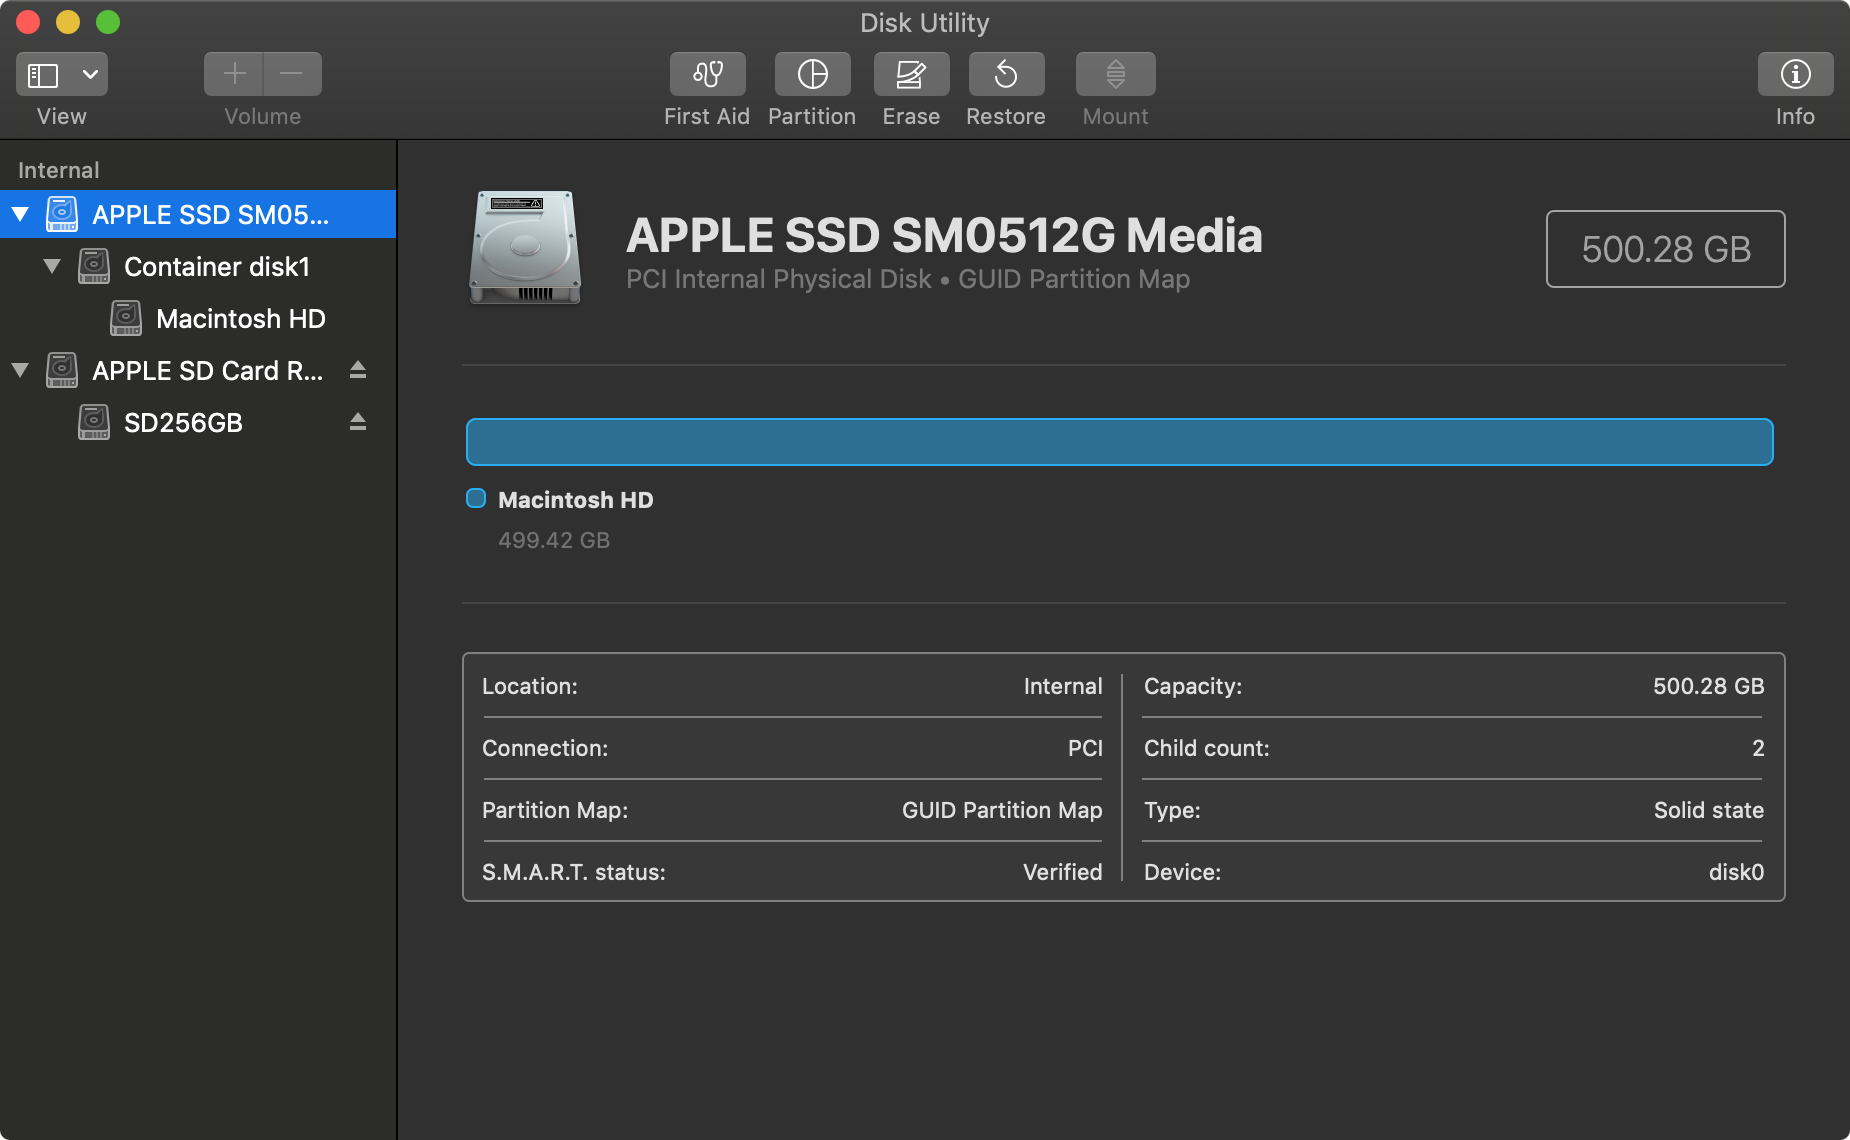
Notice how the Erase and Restore options have now become available. If you wanted you could erase the entire disk right now. But hang on a second. Before you erase your disk you need to think about how you’re going to recover.
Recovery planning
If you’ve got a high-speed connection you can simply download the latest version of Mojave over the Internet using macOS Recovery. But what if you don’t have access to high-speed Internet? What if you tether on a capped mobile plan?
The failed Mojave 10.14.3 update shown earlier itself was 1.85 GB and Mojave itself is closer to 6 GB. That’s quite a bit of data at today’s mobile transfer speeds.
And even if an over-the-air install is feasible do you really want to be waiting around for it to finish when you could install directly from some other media? Not if you have a USB flash drive you can use as a bootable installer.
Create a Bootable Installer
The steps to create a bootable installer for Mojave, High Sierra, Sierra and El Capitan may be found on the Apple Support page titled How to create a bootable installer for macOS. Follow the instructions there if you’ll be creating a bootable installer from which to recover after formatting your Mac’s hard disk.
Format (Erase) the Hard Disk
There are two ways to go about this:
-
If you want to experiment with Disk Utility you can erase the disk from there as mentioned above. This method will give you hands-on experience with disk management and the interface is very forgiving. If you do this just don’t forget to back-up all your data first and have your recovery plan in place.
-
Alternatively, you may reformat and recover Mojave using macOS Recovery. This is the method Apple Care recommended to me when my Mojave installation wasn’t able to receive the zero-day exploit patches. To use macOS Recovery press and hold Cmd+R immediately after a device restart.
Regardless of which method you chose you’ll have the option to reinstall Mojave following a system restart. And if you chose to create a bootable installer you should be back up and running in no time. And if you’re enterprising you may be able to figure out how to dual-boot Linux and macOS from a single hard disk.
Troubleshooting
If you run into any problems restoring Mojave don’t panic. Apple has a large support Knowledge Base at support.apple.com to help guide you.
One trick is to Reset the NVRAM or PRAM by holding Alt+Cmd+P+R for 20 seconds while the system is starting to cure common start-up ailments. Another is to Reset the SMC when the system doesn’t appear to be turning on. And if you really get stuck you can always get ahold of Apple Support.
What Apple Support doesn’t cover is how to fix a corrupted SD card. If you manage to corrupt your SD card during your back-up you can attempt to restore it following the steps in Unbrick a Micro SD Card using Tails and macOS Mojave.
Summary
In this article I provided background on how a failed Mojave update spurred me into action for creating a back-up of my Mac. Then I covered both basic and more thorough techniques for backing-up, validating and protecting your data; how to plan for a restore, how to actually restore, techniques for wiping your hard disk and, finally, where to turn for troubleshooting information.
Even if you’re not having any issues with your Mac right now it’s a important to keep back-ups of your data to prevent possible data loss. Because if there’s one thing computers do well, it’s malfunction.
Best of luck!