
Three years ago I started a website called cabinhack.com to scratch an itch after discovering Hugo and starting development on After Dark. At the time my primary website was running Jekyll and build times were nearing the 2-3 minute mark for little more than 70-80 blog posts.
In order to optimize the speed of my publishing workflow I ended up creating several different workflows until finally settling on a semi-convoluted yet functional Travis + GitHub CI pipeline. By offloading work to Travis I was able to overcome the sluggishness of running jekyll build locally at the expense of complexity and loss of control of my own builds. And even though this workflow served my needs for 2-3 years I knew it was a hack because I’d still have to wait 2-3 minutes for changes to become visible on my website.
Before deciding to leave GitHub following the Microsoft acquisition I knew Travis, which relies solely on GitHub for SSO, was a blocker so I finally decided to bite the bullet and consolidate my S3-hosted Jekyll blog with my cabinhack.com site – also hosted on S3 with the same deployment process.
Here’s how I consolidated two static websites together on AWS using S3.
Get Friendly with Hugo
I’m not going to lie. Hugo isn’t everyone’s cup of tea. But after spending over two years working with HTML (Go) templates I can attest to their superiority over Liquid templates both in form and function. Hugo’s templating system is a damn pleasure to use but comes with a steep learning curve.
Before you think about using Hugo as your main static site generator I highly encourage you to kick the tires by creating a test site like I did and actually trying to use it for a while before committing.
If you skip this step prepare to spend some time on Hugo’s help forums.
Run the Jekyll Importer
There’re plenty of blogs on how to run the hugo jekyll import command so I’m not going to get into any detail here other than to say it’s an incredibly fast process – but it’s not going to hand you a new website on a silver platter.
Tip: If you’re migrating from WordPress run the Jekyll importer first.
Get Your Theme Working First
Before you consolidate anything, get one site working with the Hugo theme of your choice. Besides After Dark my favorite Hugo themes are these two.
Know what your theme can and cannot do prior to consolidation. And start a TODO list of things you need to come back to later as you go, opening any theme/hugo issues, or discussion threads, where appropriate.
If you can get the theme you chose working with one website chances are you’ll be able to get it working with other websites imported though YMMV.
Tip: Use Hugo aliases if you’ll be doing any URL restructuring. You can always go back and add more SEO-friendly 301 redirects at a later stage.
Consolidate Next Site
If the next site is already on Hugo this process should be a breeze unless it’s using a bunch of shortcodes created before Hugo introduced Theme Components and has a wonky license requiring you to give attribution when copying.
Repeat process, site by site, until all sites are consolidated and you’re confident the theme you chose will get the job done.
To Netlify or Not to Netlify
If you’re moving off GitHub pages and have any respect at all for your code do not waste your time with Netlify. Like GitHub Pages, Netlify is a PaaS. And while they offer a hand-rolled CDN and Image Transformations using them will add opportunity cost in the form of vendor-lock.
Instead, if you have the technical ability and just an hour or two, I strongly encourage you to consider an IaaS such as AWS as I describe in Zero to HTTP/2 with AWS and Hugo. Costs are negligible and what you lose in affordance from the spiffy Netlify features you will gain back later in technical prowess.
If you’re not technical or don’t care about vendor-lock, proceed with Netlify and then blog about your experiences trying to scale two years down the line. I’ll be waiting to read your post, and interested to know how things pan out.
Configure Redirects
Once your sites are consolidated using the Hugo theme it’s time to configure your redirects. This will vary depending on your hosting provider and server set-up. For this section I’ll provide a tooling-agnostic approach as well as examples using my tool du jour: s3_website by Lauri Lehmijoki.
Replace Hugo aliases with 301 redirects
First get rid of those pesky meta redirect aliases. They’re slowing down your pages and causing your SEO – not to mention your users – to suffer.
Approach
FOR EACH alias in page with aliases in front matter:
- ADD a redirect from the aliased page to the new page (canonical reference)
- COMMENT OUT the alias from the page front matter
- TEST redirect then remove the alias from the page if successful
Example using S3 Website Gem
For example, if your alises looked like:
aliases:
  - "/jamstack-css-frameworks/"
  - "/jamstack-css-framework-tool-library/"
  - "/jamstack-frameworks-tools-tips/"
And the content for that page moved to:
domain.example/post/jamstack-frameworks-tips-tools/
Add the following to your s3_website.yml:
redirects:
  - "jamstack-css-frameworks/": "/post/jamstack-frameworks-tips-tools/"
  - "jamstack-css-framework-tool-library/": "/post/jamstack-frameworks-tips-tools/"
  - "jamstack-frameworks-tools-tips/": "/post/jamstack-frameworks-tips-tools/"
Redirect from one domain to another
If you’re consolidating two websites on different domains as I was when I combined a Hugo site with a Jekyll site you’ll likely want to prevent linkrot from incoming links by redirecting between domains.
There are a few ways to handle this. Generally what you’ll want is a wildcard redirection so requests to the old site flow to the new one vis-à-vis. At that point the 301 redirects created above move users to the expected destination.
Specific methods available vary by service used. Following are some notes based on high-level research along with the approach I took using AWS.
CNAME Flattening
This is a Cloudflare-specific option.
You could use CNAME flattening for this, and it’s actually fairly simple to set-up. But the future of Cloudflare seems questionable following the introduction of GPDR given Cloudflare cookies every request and experienced a major security leak in 2017 affecting millions and millions of people.
In addition to cookies, Cloudflare occasionally will challenge visitors attempting to browse their stake of the Web a with a Google reCAPTCHA. Now you’ve got even more cookies. And if you’re trying to use something like Tor or I2P, or are simply browsing from a non-Western country like Indonesia, reCAPTCHAs can be major barrier to viewing content online now to mention a BIG PROBLEM in general.
Pass.
Out-of-Zone Redirection with DNAME DNS records
DNAME records were introduced in RFC 2672 and obsoleted by RFC 6672. Unless you’re a networking buff there’s a good chance you’ve never heard of DNAME.
Here’s a overview straight from the RFC:
The DNAME record provides redirection for a subtree of the domain name tree in the DNS. That is, all names that end with a particular suffix are redirected to another part of the DNS.
Given DNAME is not supported by AWS I won’t be delving further into this right now. Regardless it’s good to know it exists and is a viable option.
Moving on.
Zone Apex redirect using a CNAME DNS record
This seems like the most straight-forward way to create a wildcard redirect from one domain to another. You just slap a CNAME record at the zone apex, naked domain, or root (i.e. *.cabinhack.com) and you’re off to the races, right?
Haha! Not so fast. This is forbidden. If you’re using AWS Route53 and try to do this AWS will error so you know you’re trying to do something naughty.
Next!
Webpage redirects using aliases
Okay, so we’ve crossed three options off the list. Four times the charm? Both AWS and Netlify support domain aliasing, albeit in different ways. Here’s the relvant docs for each:
- Domain aliases on Netlify.
- Configuring a Webpage Redirect on AWS.
Alright, now we’re getting somewhere…
Approach
FOR EACH top-level domain to redirect:
- ADD a domain alias using the methods available for that service
- TEST redirects to ensure they’re working as expected
- VERIFY the redirect is a 301 or sequence thereof for best SEO
Example using AWS
From the docs:
To redirect all requests to the bucket’s website endpoint to another host, you only need to provide the host name.
Seems simple enough. From the AWS Management Console we access the S3 bucket containing the domain we wish to redirect and only provide the host name to redirect all requests:
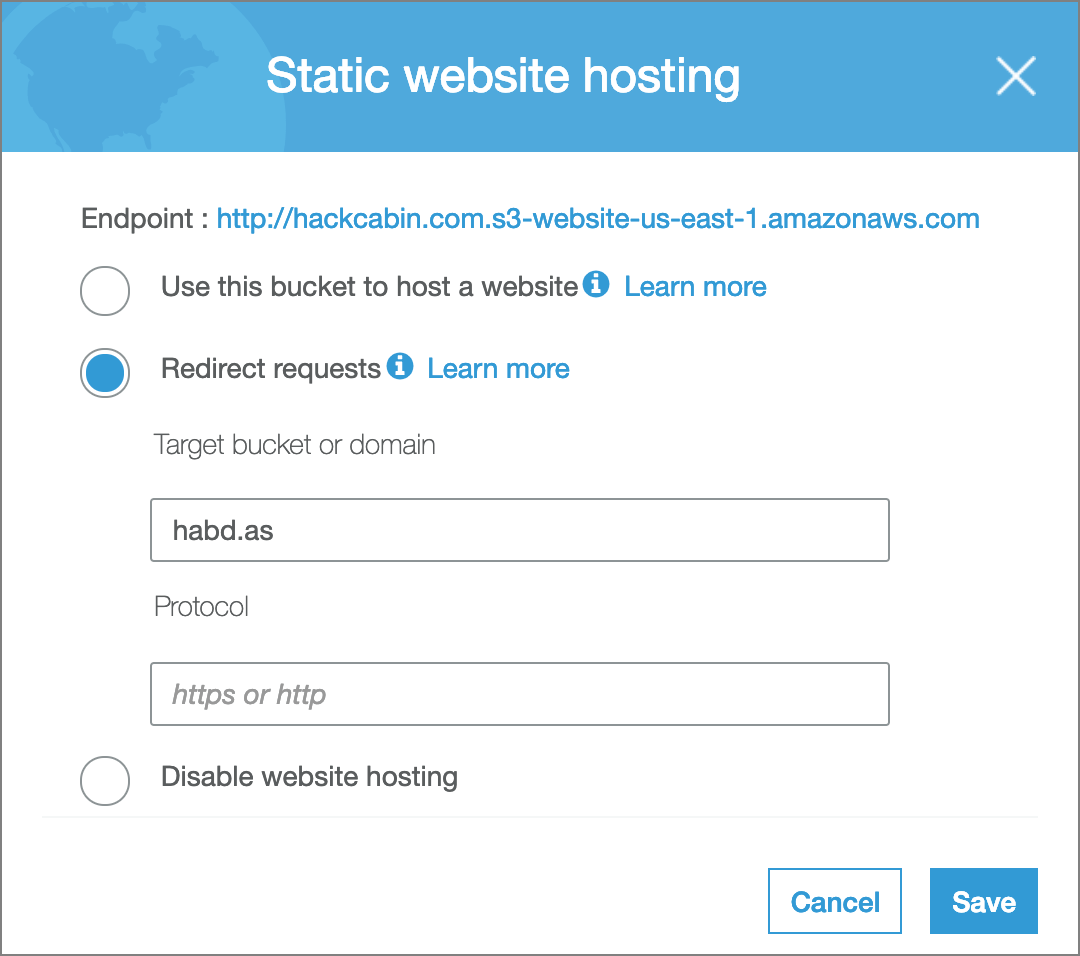
Do the the same for the www subdomain, if necessary, then test your redirects for http and https to verify they’re all working.
Tip: For HTTPS redirection in addition to HTTP use a CloudFront distribution as described here and create a domain alias in Route53 to point to CloudFront instead of the S3 bucket as mentioned here.
Configure Deployments
Since moving off Jekyll my build times shrunk from three-and-a-half minutes down to about 1 second. This works out great as I’m able to build and view my entire site as it will appear in production using hugo serve on my local machine then run the following to publish my site:
hugo && s3_website push
You could always deploy with Drone CI and Gitea, or use scp, rsync or even SFTP to deploy your site. But this suits me and you should do what suits you.
Summary
In this article I’ve explained the steps necessary to consolidate an existing Jekyll website into an existing Hugo website and covered the essentials of how to redirect your links to avoid linkrot, improve SEO and combine domains.
That’s all for now. See you all in a couple of years when we’re all porting back to WordPress or getting our Rust on with Zola.