
When I discovered Pantheon in early 2017 I thought I’d found an a hidden gem. The honeymoon ended when Pantheon hiked costs 40% (while taking away Redis) after about six months on their platform. That was a bummer, but not a deal breaker.
Fast-forward three years and Pantheon struck again. Only this time intead of instead of another 40% increase they went for the whole cookie jar with a jaw-dropping 1185.71% increase to $450 per month with a 10-day lead on the bill.
With little time to react to Pantheon’s change I did the most reasonable thing I could think of: let the site go down while I learned to move it to Kubernetes.
My requirements:
- Get site back up-and-running with the least amount of effort
- Eliminate visitor-based pricing imposed by hosting company
- Use minimum possible resources to run WordPress at scale
- Restore Redis cache Pantheon used to offer with $25 hosting
The rest of this post describes how I moved the Chicago Gang History WordPress website off Pantheon and onto Kubernetes. If you follow this guide, you can retrace my footsteps to migrate from Pantheon to Kubernetes too. At the outset you’ll have a 3-node WordPress cluster on Digital Ocean for $30 a month.
Migration Process
Migrating a WordPress site from Pantheon to a self-hosted Kubernetes cluster running on Digital Ocean can be accomplished with the following steps:
All steps can be completed in a few hours the first time around, and you won’t need a Ph.D. in clusterology to get to the finish line. Just be persistent. And follow each step through to completion before starting the next one.
Not using Pantheon? Don’t have a WordPress site? No problem! Substitute the Pantheon WordPress template as your own site to emulate the experience.
Pantheon customers with more than 80,000 visitors per month will be able to reduce their hosting costs by about $420 per month by following this tutorial.
Step 1: Backup Pantheon Site
Before you back-up toggle your Dev site to Git mode and apply the latest updates. This will help ensure your website is still fresh after the move to Kubernetes.
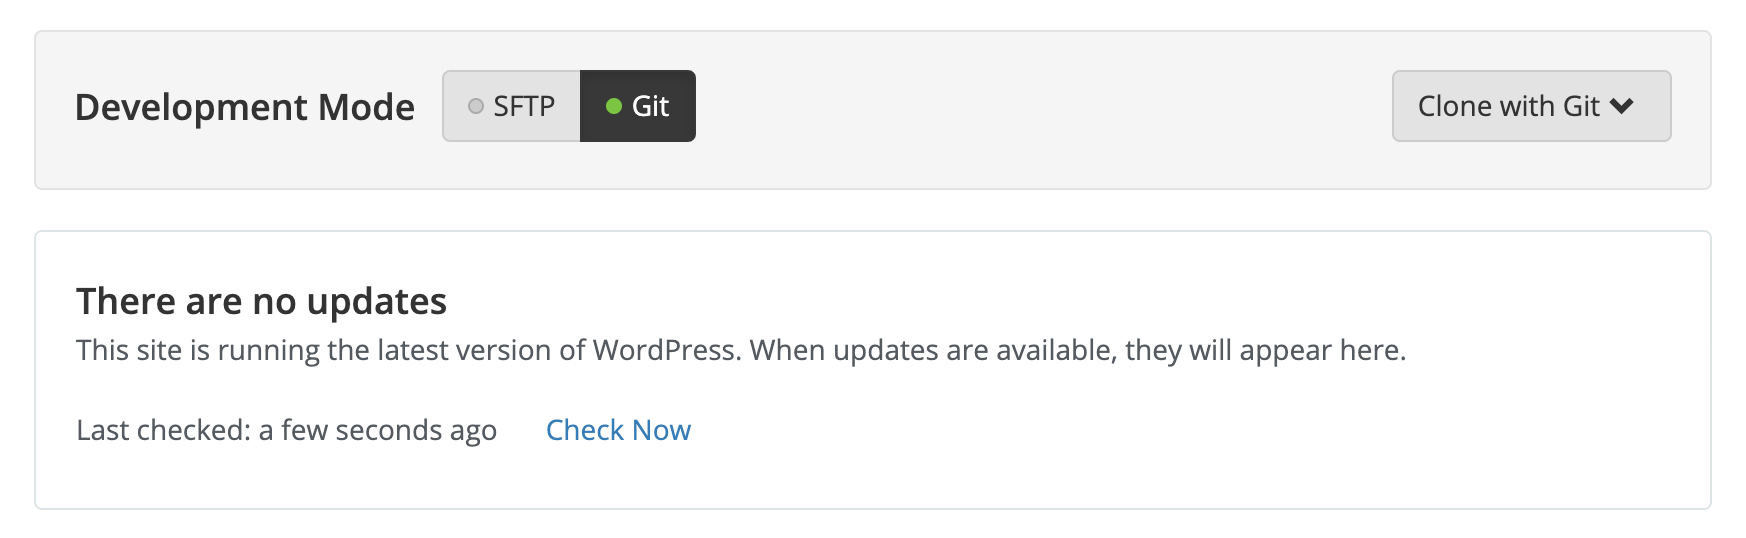
Switch back to SFTP mode and install the following plugins:
- Redis Object Cache By Till Krüss
- WP Migrate DB by Delicious Brains
Migrate all changes to your Live environment and create a new backup:
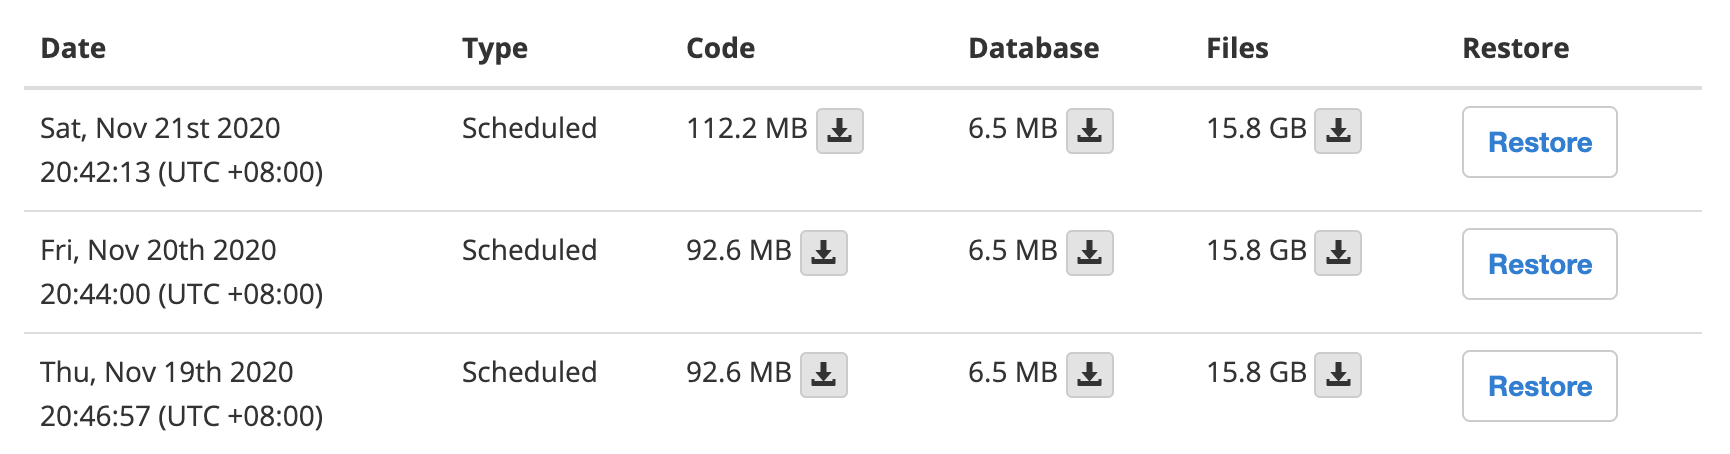
The Terminus CLI can be used to automate parts of this process if needed. Save off each of the latest back-up archives and keep them together for later. After you leave Pantheon you can still take advantage of this WordPress template. Simply set the repo as a git upstream after you download and extract your code.
Step 2: Test Cluster Locally
Complete WordPress K3s — Init Containers and Helm to set-up a WordPress cluster running on your local machine for development and testing (macOS assumed). When you’re finished come back to learn how to create your production environment.
Step 3: Provision Your Nodes
You’ll be creating a 3-node K3s cluster on Digital Ocean with these specs:
| Node | CPU | Memory | Disk | Cost |
|---|---|---|---|---|
| k3s-agent-1 | 1 | 1Gi | 25Gi | $5/month |
| k3s-agent-2 | 1 | 1Gi | 25Gi | $5/month |
| k3s-server-1 | 1 | 2Gi | 50Gi | $10/month |
Don’t have a DigitalOcean account? Here’s $100 in credit good for 60 days.
Specs are intentionally limited and will be adjusted later in Step 8. Each of the nodes will run Ubuntu 20.10 and the latest version of K3s shown via Lens here:
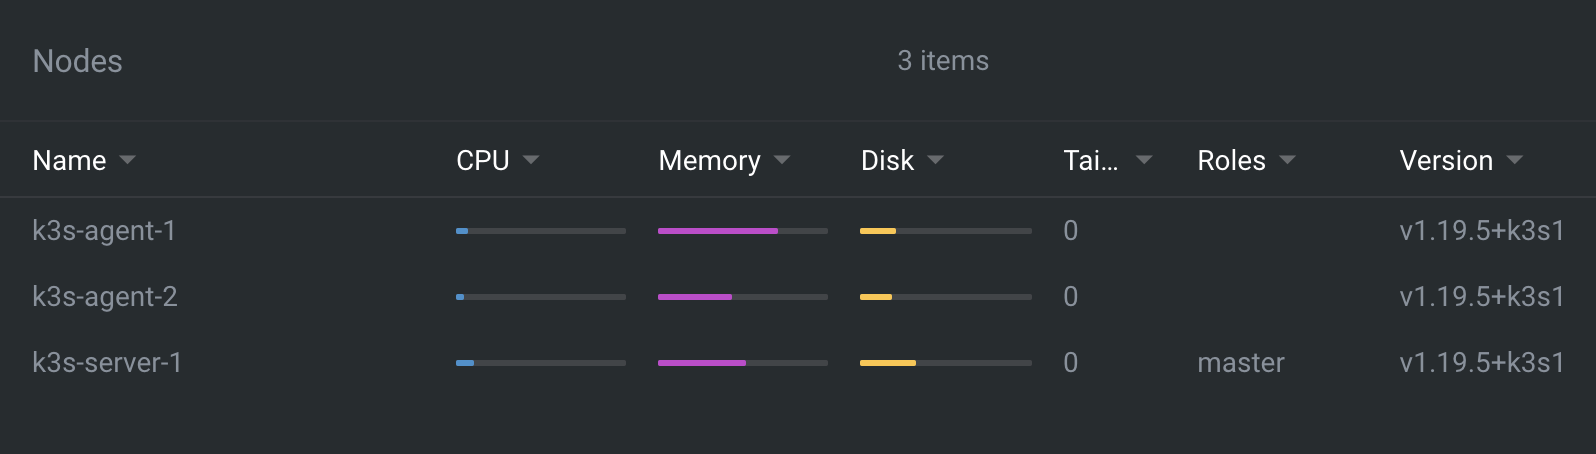
Complete Lens App Primer for Kubernetes with K3s to provision K3s on the three servers and connect everyting to Lens. When you’re finished Lens should show a Nodes setup like in the above screenshot. Only using less resources.
With the above Nodes setup you’re ready to restore your Pantheon backup.
Step 4: Restore Pantheon Backup
Backup restoration is part automated and part manual. We will start with the automated portion followed by the manual steps needed to recover your data.
As shown in Step 2 WordPress is being built from scratch using WP-CLI via Ansible plays running inside an Init Container. The playbook is configured to allow a private GitLab repo to be used while building the final WordPress image.
Activate the feature by setting git_repo.enabled to true as shown here:
Expand to view sample configuration
# These variables allow you to configure a git repository that contains custom
# wpContent content.
git_repo:
  enabled: true
  # Directory that contains the wp-content content in your repo. The default is
  # `.`, which means that your repository contains folders like languages,
  # plugins and themes in the root of the repo. If your git repository has a
  # `wp-content` folder in it, point to that folder instead.
  wp_content_dir: "./wp-content"
  # URL to your GitLab
  url: gitlab.com
  # Part after the GitLab URL to the gitlab repo
  name: /vhs/chicagoganghistory-website
  version: "pantheon-exit-refresh"
  # GitLab token and key to get access to repo
  token_user: vhs
  token_key: w4KkmtbSiBdP3tyrxHCt
Use a private GitLab repo with personal access token set for token_key value.
Once the git_repo is enabled save values-local.yaml and run ./install.sh to build and deploy WordPress using the configured Git settings. This will rebuild and redeploy any WordPress Pods automatically.
Whether you just installed locally or on Digital Ocean depends on your Kubectl context. If you updated the wrong cluster by accident, rollback your changes with helm rollback wordpress-production, switch contexts then reinstall.
Wait for the Init Container to complete:

To know if your WordPress backup made it into the Pod wait for a Status of Running and view the contents of the wp-config.php file inside the pod:
kubectl exec -it wordpress-production-0 -- bash -c "cat wp-config.php | more"
Notice file contents are not the same as the Pantheon backup. What you’re seeing is the hardened version of wp-config.php which prevents secrets from leaking into source control. The Pantheon-ified version is effectively no longer used.
How's security? Tight as a drum, sir.
Fight Club
Though some files like wp-config.php are overridden during the build, other files in the GitLab repo are copied into the Pod. Commit a change to your GitLab repo removing the Pantheon MU plugin, then run ./install.sh to update pods:
rm -rf mu-plugins/pantheon* && \
git add mu-plugins && \
git commit -m "feat: 🎉 remove pantheon mu plugin" && \
git push gitlab master
You just removed 900+ lines of legacy plugin code.
The next job is to restore the database and media library. Both of these items are covered in detail in the wordpress-helm README. Follow the instructions there to import each into your cluster. Here’re direct links as of v0.1.5:
Repeat import steps for development and production. Running the included scripts is similar to useing the “migrate” buttons Pantheon. Only now your development environment is nearly identical to production. And they’re both cloud-native.
For each environment you should:
- Customize wordpress.site.url and ingress.host in values-local.yaml. Use them like
example.localhostfor development andexample.comfor production. - Use WP Migrate DB (installed in Step 1) to adjust URLs for each environment:

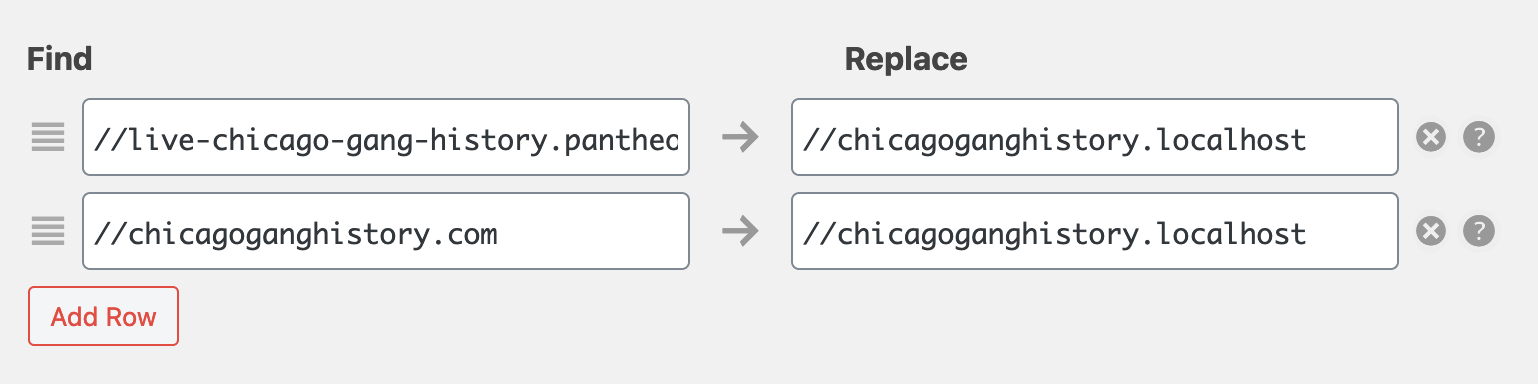
Once URLs are updated and DB exported, restore from the export:
kubectl exec -i wordpress-master-mariadb-master-0 -- \
    mysql -uwordpress -p<your password> --database=wordpress_db < dump.sql
Where -u and -p values match user-defined settings in values-local.yaml and dump.sql is the path to the exported database file (or original Pantheon backup).
Rinse and repeat this process as needed for other URLs.
Then switch contexts and confirm you’re able to access both development and production WordPress websites from your local machine via port-forwarding:
sudo -E kubectl port-forward service/wordpress-production 80:8080
Once you’re able to forward WordPress in local and Digital Ocean clusters you’re done restoring the Pantheon backup and ready configure an Ingress to allow web traffic to reach your Digital Ocean cluster from the outside world.
Step 5: Configure Traefik Ingress
K3s simplifies ingressing by providing a functional CNI called Flannel with a pre-installed reverse proxy Traefik and a service-based software load balancer called Klipper straight out of the box. All you need is to define an Ingress resource in your cluster.
To define an ingress resource for your WordPress site simply modify the values for ingress in values-local.yaml, define you desired settings and then re-run ./install.sh to apply the settings, capture the revision and rollout the site.
Here’re the settings I used to get the ingress up-and-running initially:
Expand to view/edit sample ingress config
ingress:
  enabled: true
  annotations:
    kubernetes.io/ingress.class: traefik
    kubernetes.io/tls-acme: "true"
    cert-manager.io/cluster-issuer: letsencrypt-staging
  path: /
  hosts:
    - chicagoganghistory.com
    - www.chicagoganghistory.com
  tls:
    - hosts:
        - chicagoganghistory.com
        - www.chicagoganghistory.com
      secretName: www-chicagoganghistory-com-tls
Modify ingress.hosts, ingress.tls.hosts and add your own secretName then run ./install.sh to rollout changes to the Digital Ocean cluster. This step assumes you’ve alerady installed cert-manager and created a ClusterIssuer called letsencrypt-staging as detailed when you set up Lens in Step 3 above.
Once Pods are restarted you should be able to access your WordPress site over the Internet by navigating to the IP of the Load-Balancer Ingress Point as shown:
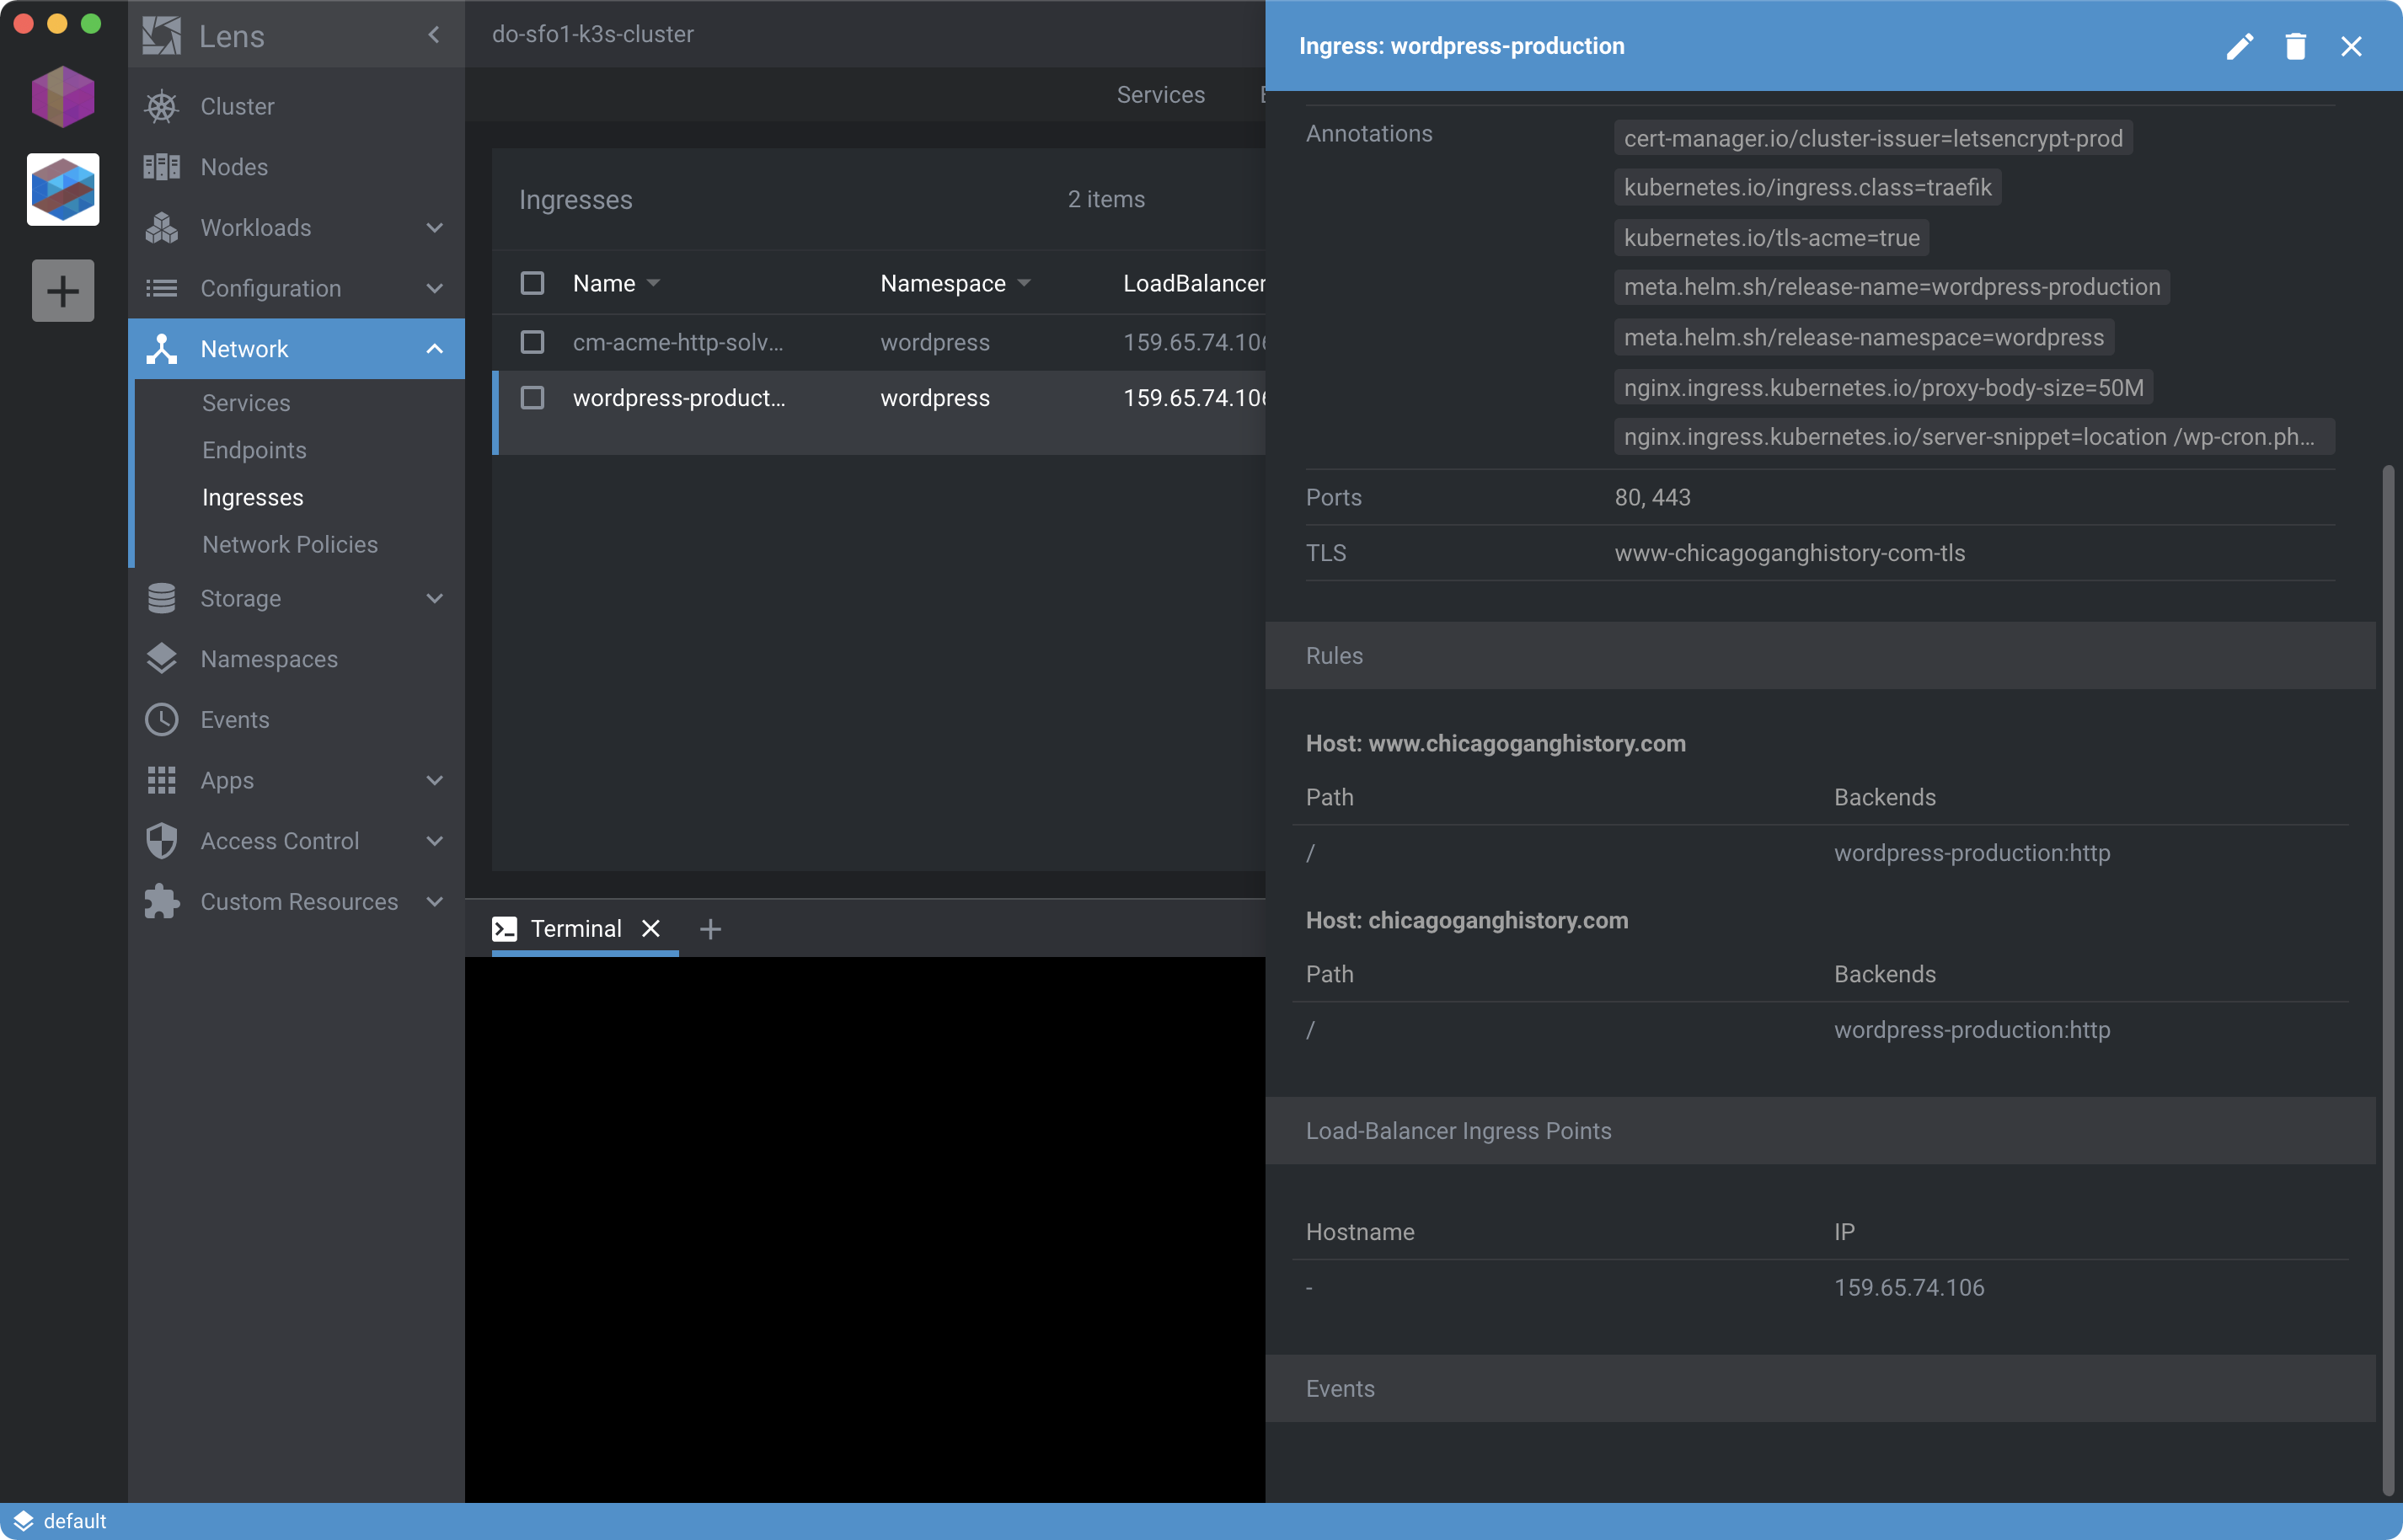
If you’re have trouble connecting directly by IP address, update your /etc/hosts file with a “temporary” DNS entry like 178.128.74.60 www.chicagoganghistory.com until DNS is configured. If needed, you can retrieve the server IP address programmatically using doctl (installed in Step 3) like so:
doctl compute droplet ls --tag-name k3s-server --no-header | awk '{ print $3 }'
Once your hosts file is updated, view your WordPress site by browsing to the temporary host name using an ephemeral/private browsing context. Using Incognito helps prevent issues with local DNS caching, session stickiness, cookies and generally looks less like CSRF to the browser.
If you still can’t connect, make sure ports 80 and 443 are not blocked by any firewall rules on your Digital Ocean k3s-server-1 droplet. Check both for Digital Ocean and host-based firewall rules if at some point configured.
After that if you’re still having issues, attempt to browse the site using a rarely used web browser such as Safari, Firefox or Vivaldi. Or from a different machine alltogether to rule out any DNS collisions preventing access.
Step 6: Update DNS and Firewall
With the Ingress configured update your DNS and firewall settings. For DNS you need to add an A record pointing at your Ingress Point for each ingress.hosts:
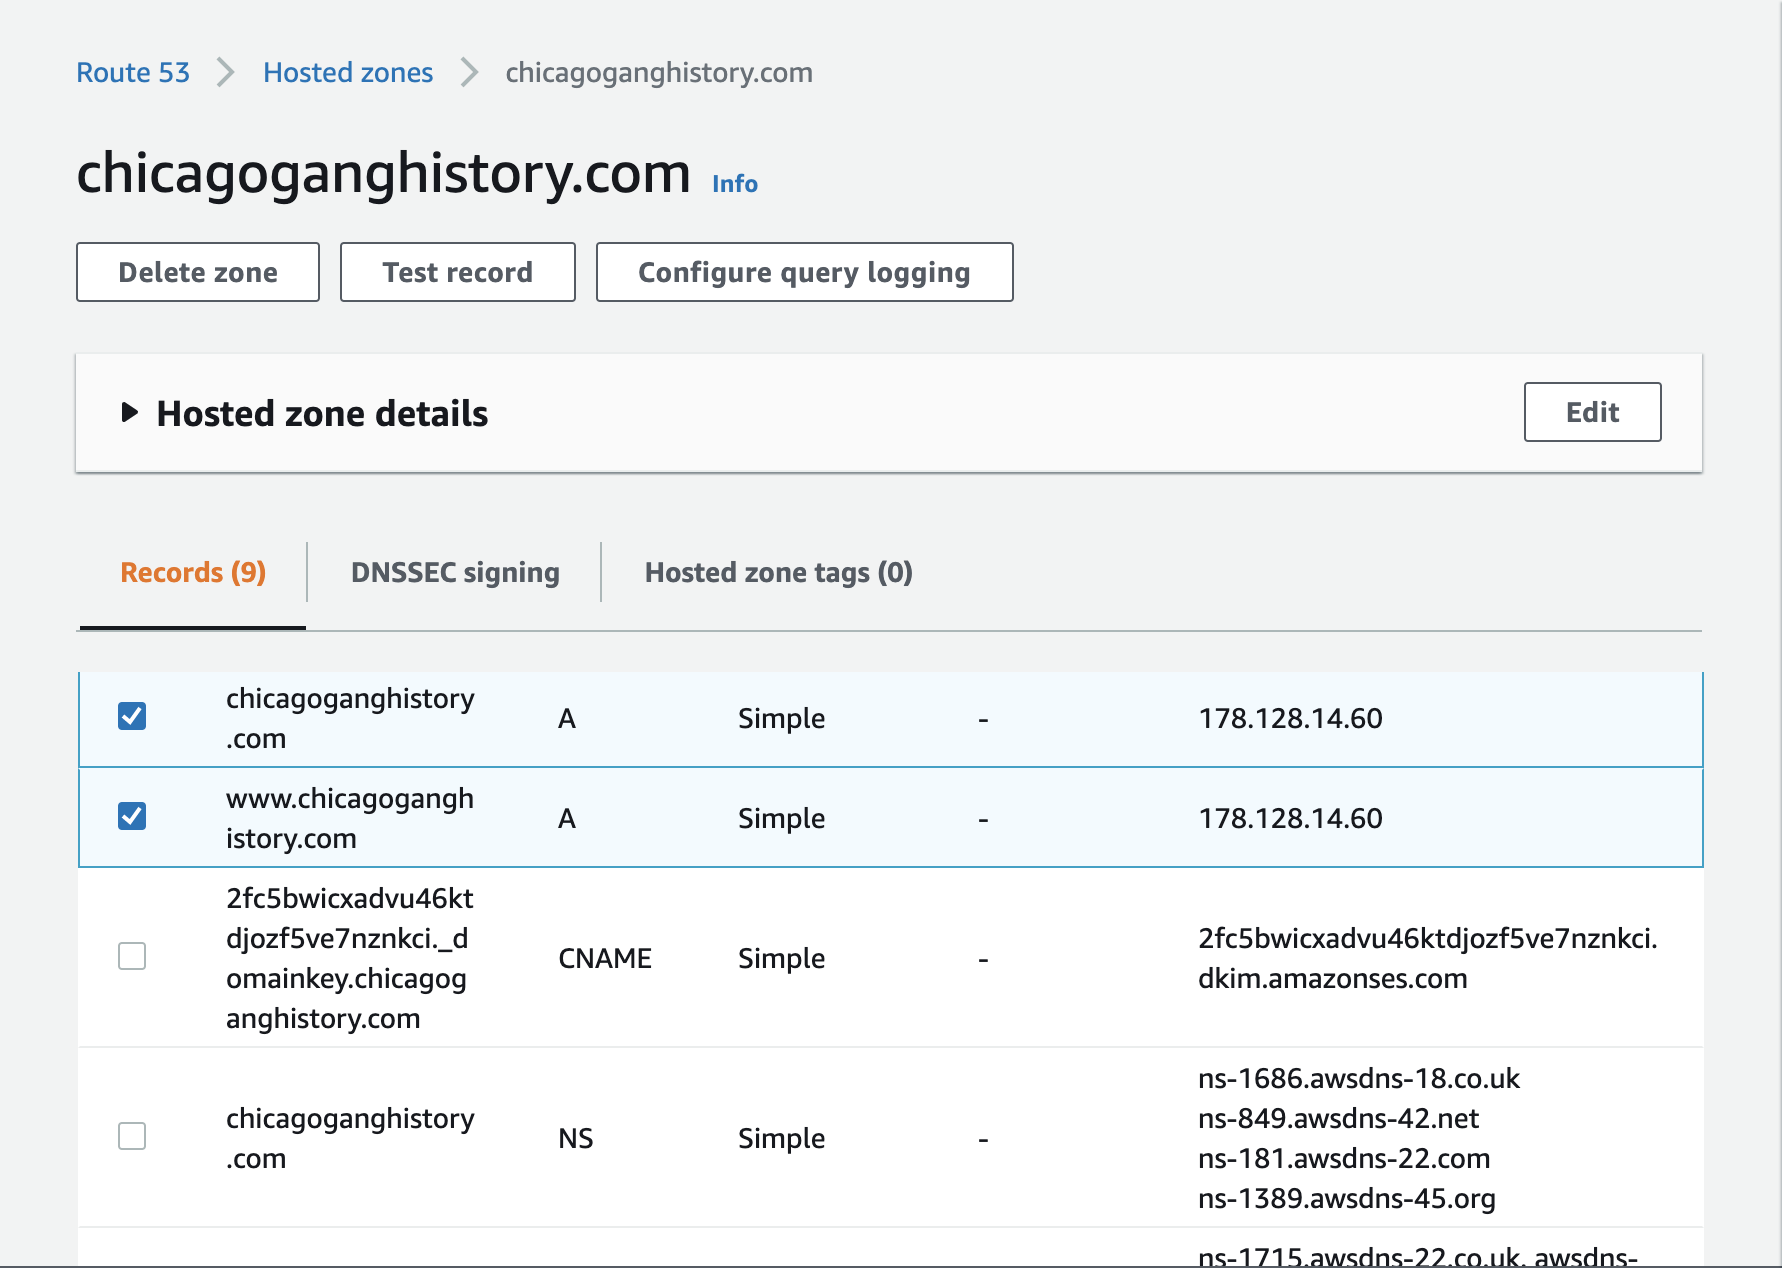
Now run dig +short www.chicagoganghistory.com and verify the IP is as expected and matches the IP address used by the K3s server node in your setup.
Then comment out or remove any temporary entries in /etc/hosts. If you don’t, you may experience DNS caching issues and collision weirdness on your machine.
Once DNS is updated and you’ve verified you can connect to WordPress via your domain, harden the installation by creating a Digital Ocean firewall.
Note: Digital Ocean firewalls are free to use and help limit the need to configure things like ufw on Nodes or, say, an Istio gateway limiter.
For the sake of simplicity, your firewall will be applied to all nodes in the cluster. Here’re the firewall settings we’ll be applying to inbound ports:
| Type | Protocol | Port Range | Sources |
|---|---|---|---|
| All TCP | TCP | All ports | 10.120.0.0/20 |
| SSH | TCP | 22 | All IPv4, All IPv6 |
| HTTP | TCP | 80 | All IPv4, All IPv6 |
| HTTPS | TCP | 443 | All IPv4, All IPv6 |
| Custom | TCP | 6443 | All IPv4, All IPv6 |
| All UDP | TCP | All ports | 10.120.0.0/20 |
Warning: I haven’t completely ironed out the firewall rules yet. Currently these rules are causing the wordpress-prodution-* Pods to stop serving web traffic and I’m still investigating the root cause.
Where 10.120.0.0/20 is the IP range of the VPC assigned to the droplets during Step 3. To determine the specific address range you should use run:
doctl vpcs get $(doctl compute droplet get k3s-server-1 \
    --no-header --template {{.VPCUUID}}) --no-header | awk '{ print $4 }'
You should see output like:
10.120.0.0/20
Use the value to modify the following code defining the firewall:
DROPLET_IDS=$(doctl compute droplet ls --tag-name k3s --no-header | awk '{ print $1 }' | xargs | sed -e 's/ /,/g')
doctl compute firewall create --name k3s-cluster-firewall \
    --droplet-ids $DROPLET_IDS \
    --inbound-rules "protocol:tcp,ports:all,address:10.120.0.0/20 protocol:tcp,ports:22,address:0.0.0.0/0,address:::/0 protocol:tcp,ports:80,address:0.0.0.0/0,address:::/0 protocol:tcp,ports:443,address:0.0.0.0/0,address:::/0 protocol:tcp,ports:6443,address:0.0.0.0/0,address:::/0 protocol:udp,ports:all,address:10.120.0.0/20" \
    --outbound-rules "protocol:icmp,address:0.0.0.0/0,address:::/0 protocol:tcp,ports:all,address:0.0.0.0/0,address:::/0 protocol:udp,ports:all,address:0.0.0.0/0,address:::/0"
You only need to update the IP range in two places above. Everything else can remain the same. Run it to create a new firewall and add your droplets to it.
You should see output like:
ID                                      Name                    Status     Created At              Inbound Rules                                                                                                                                                                                                                                                                                                   Outbound Rules                                                                                                                                          Droplet IDs                      Tags    Pending Changes
588db333-91d6-4ea2-b09c-50e752e1913d    k3s-cluster-firewall    waiting    2020-12-20T17:51:33Z    protocol:tcp,ports:0,address:10.120.0.0/20 protocol:tcp,ports:22,address:0.0.0.0/0,address:::/0 protocol:tcp,ports:80,address:0.0.0.0/0,address:::/0 protocol:tcp,ports:443,address:0.0.0.0/0,address:::/0 protocol:tcp,ports:6443,address:0.0.0.0/0,address:::/0 protocol:udp,ports:0,address:10.120.0.0/20    protocol:icmp,address:0.0.0.0/0,address:::/0 protocol:tcp,ports:0,address:0.0.0.0/0,address:::/0 protocol:udp,ports:0,address:0.0.0.0/0,address:::/0    221561062,221561070,221561079            droplet_id:221561062,removing:false,status:waiting droplet_id:221561070,removing:false,status:waiting droplet_id:221561079,removing:false,status:waiting
Be carefull when adding rules. Even a small mistake creating the firewall can instantly sever connections, take down pods, limit all access to the Kubernetes API and turn Lens IDE into nothing more than a progress indicator:
If you do make any mistakes, you’ll still be able to backpedal by deleting the firewall using doctl compute firewall list/delete. Once the firewall is deleted you may need to delete and restart the WordPress Pod due to this known issue.
Otherwise, if evertying worked, continue securing your website with TLS.
Step 7: Add TLS Security
In Step 3 you added cert-manager and a staging ClusterIssuer to issue test SSL certificates. Now you’ll add letsencrypt-prod to issue fully-valid SSL certs.
The manifest for the letsencrypt-prod production ClusterIssuer is the same as staging only with a modified server URL and unique resource identifiers:
Expand to view/edit sample manifest
apiVersion: cert-manager.io/v1
kind: ClusterIssuer
metadata:
  name: letsencrypt-prod
  namespace: default
spec:
  acme:
    # The ACME server URL
    server: https://acme-v02.api.letsencrypt.org/directory
    # Email address used for ACME registration
    email: user@example.com
    # Name of a secret used to store the ACME account private key
    privateKeySecretRef:
      name: letsencrypt-prod
    # Enable the HTTP-01 challenge provider
    solvers:
    # An empty 'selector' means that this solver matches all domains
    - selector: {}
      http01:
        ingress:
          class: traefik
Above manifest modified from HTTP Validation tutorial original on 2020-12-20. Adjust email and namespace, save to file then kubectl apply to your cluster:
kubectl apply -f letsencrypt-issuer-production.yaml
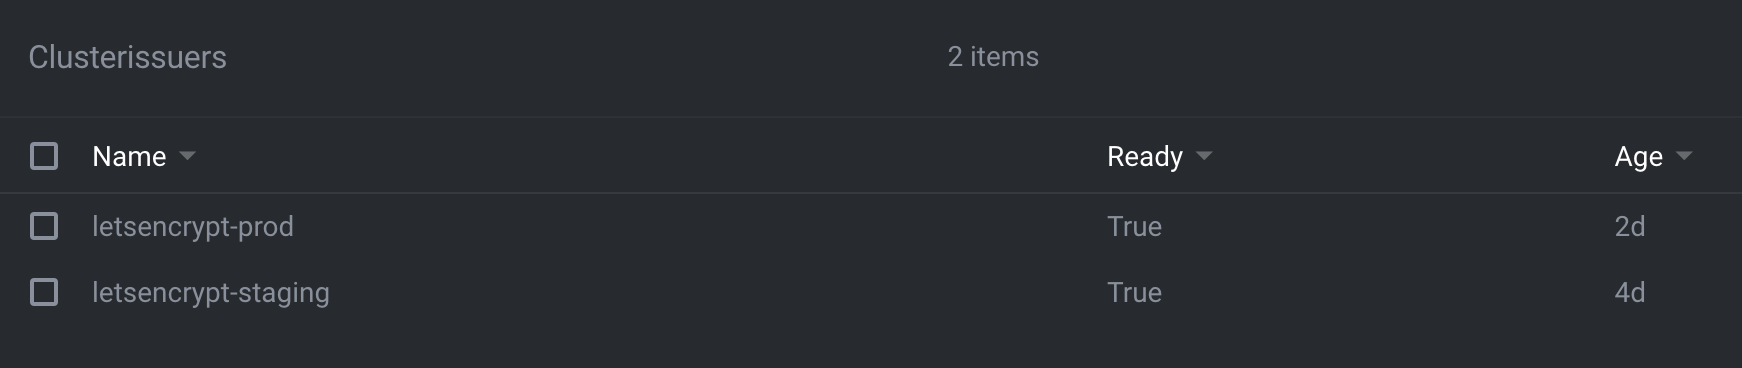
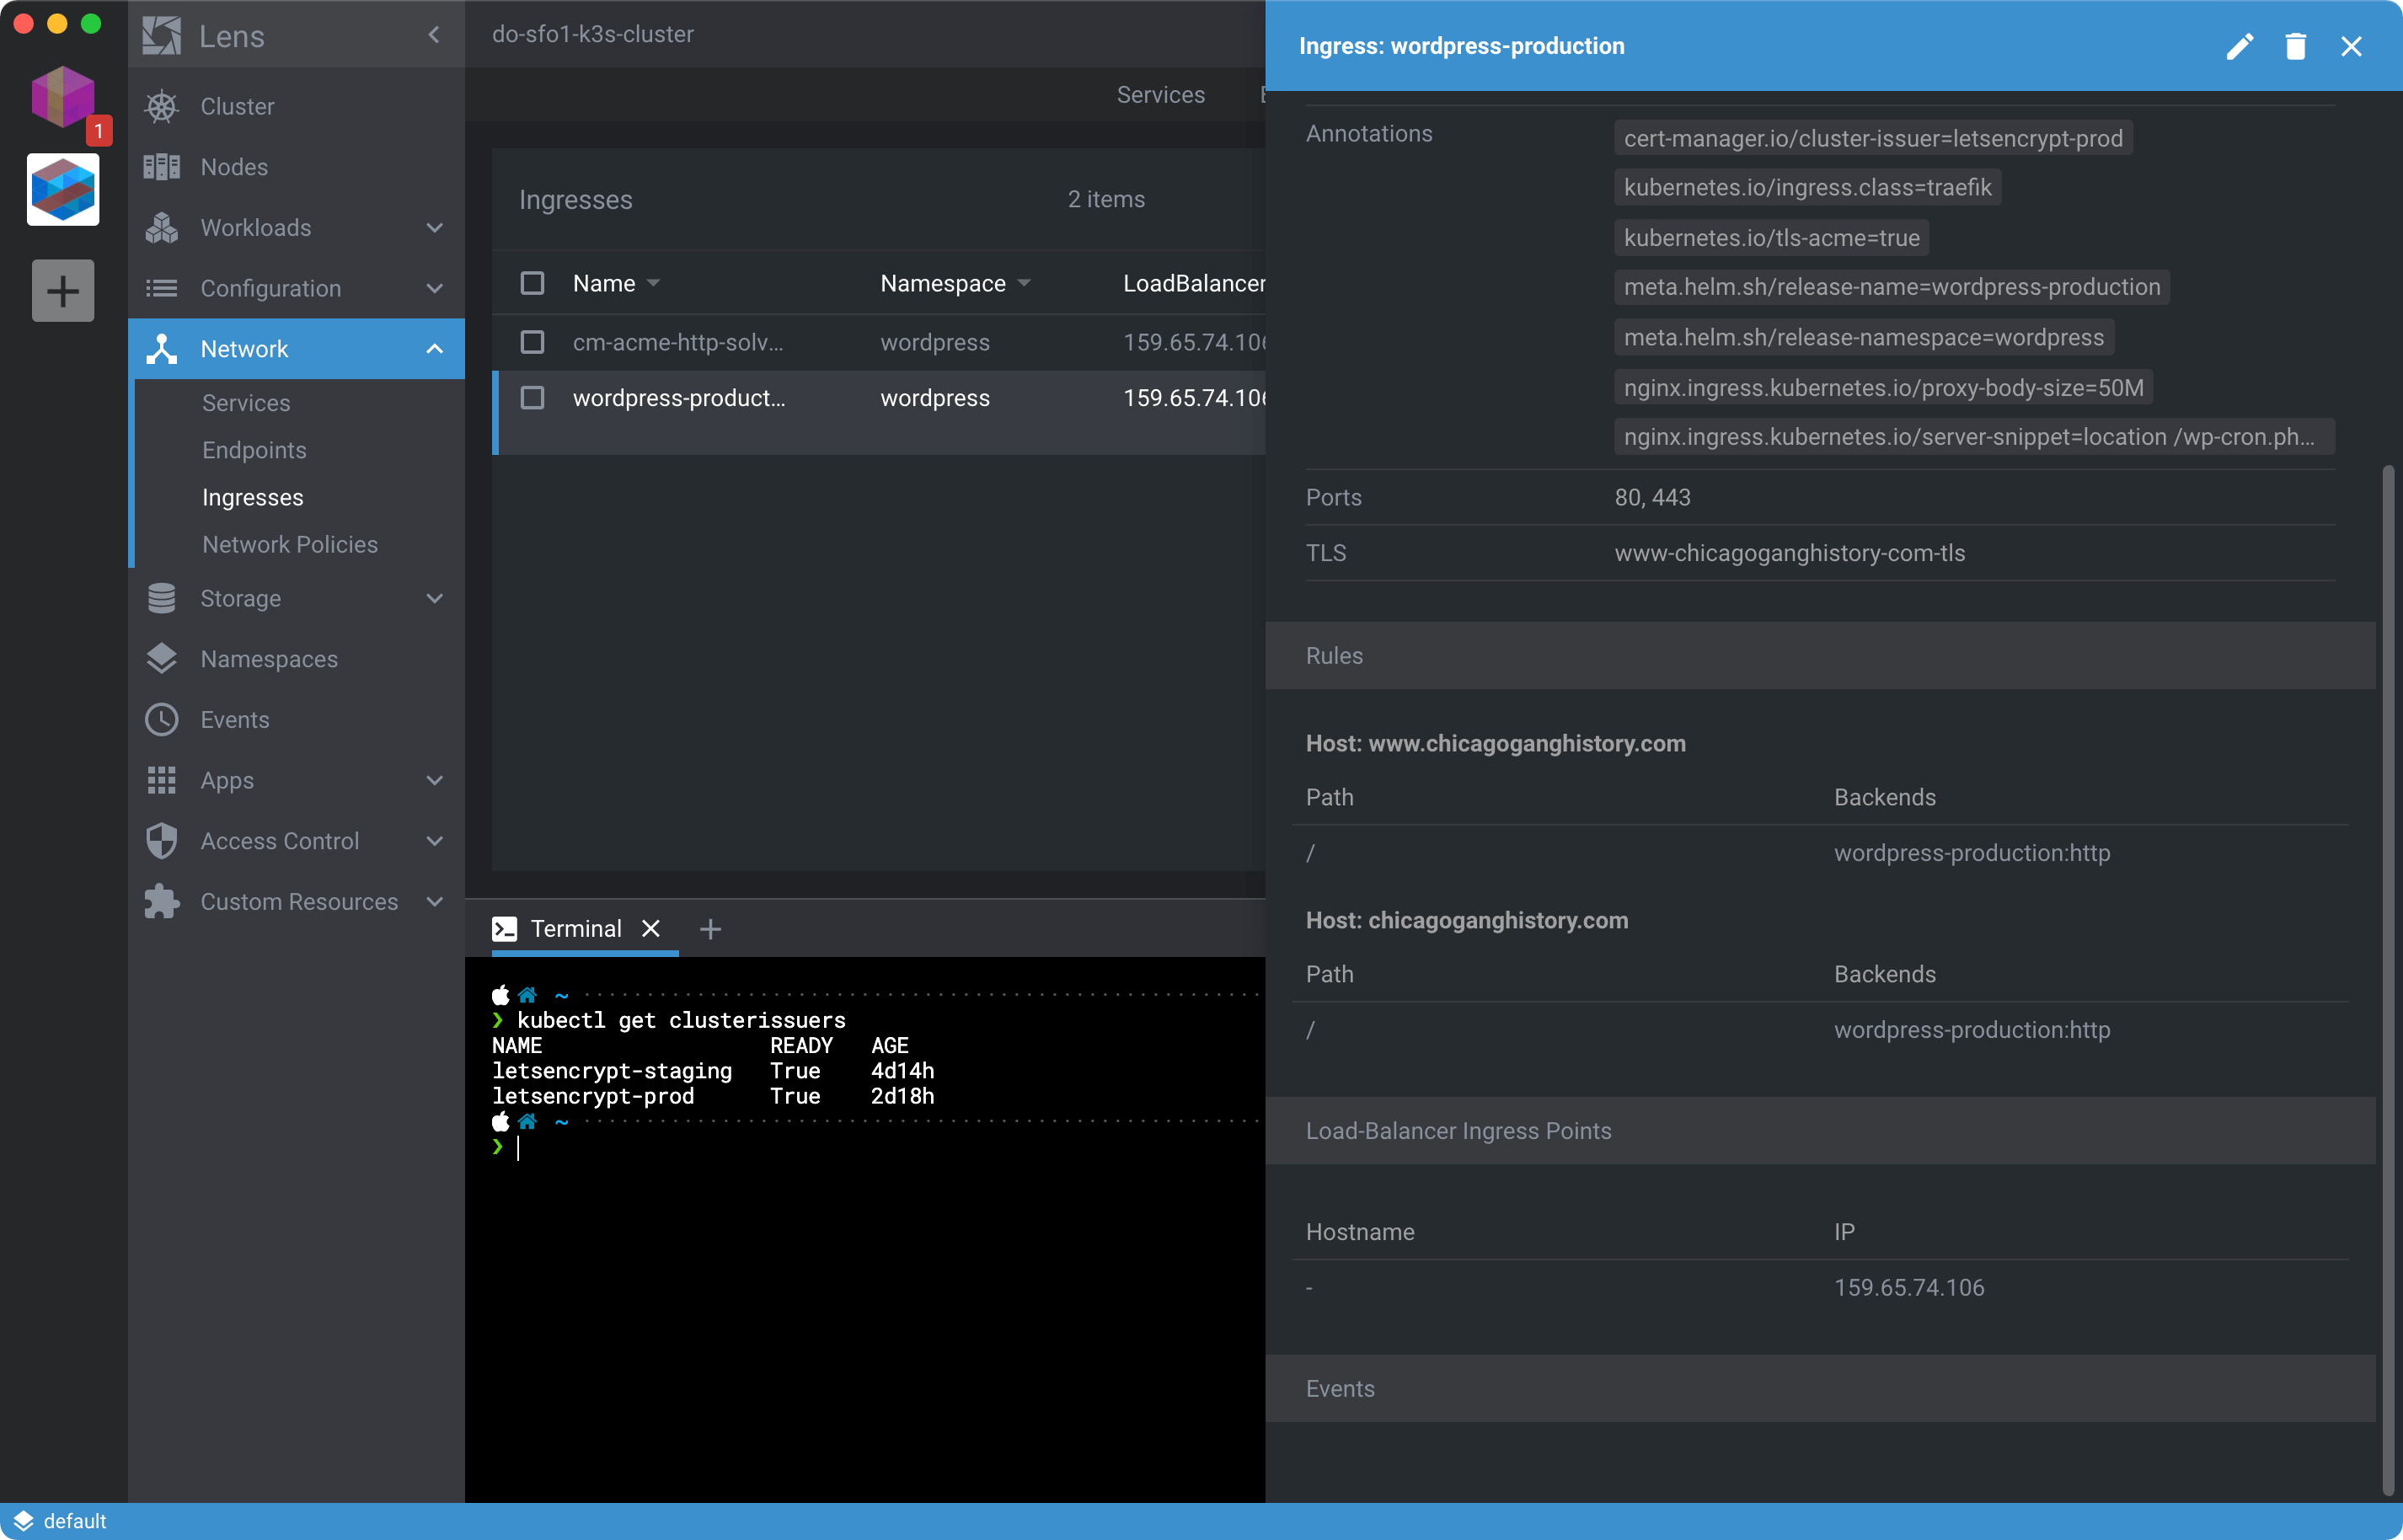
Once the manifest is applied list out the cluster certificate issuers with kubectl get clusterissuers. You should see output like:
NAME                  READY   AGE
letsencrypt-staging   True    1d18h
letsencrypt-prod      True    20s
When Ready is True for letsencrypt-prod you’re finished configuring TLS. If False instead, use Lens to help debug using Status of CertificateIssuer to identify and fix the problem. See Installing and using cert-manager with k3s for more help.
If you’re geting stuck check the Ingress with Lens and make sure you’ve created DNS A records pointing at the Ingress Point shown for the WordPress Ingress:
You can also view the status of Certificate and CertificateRequest resources from the cert-manager.io rollup under Custom Resources as shown here:
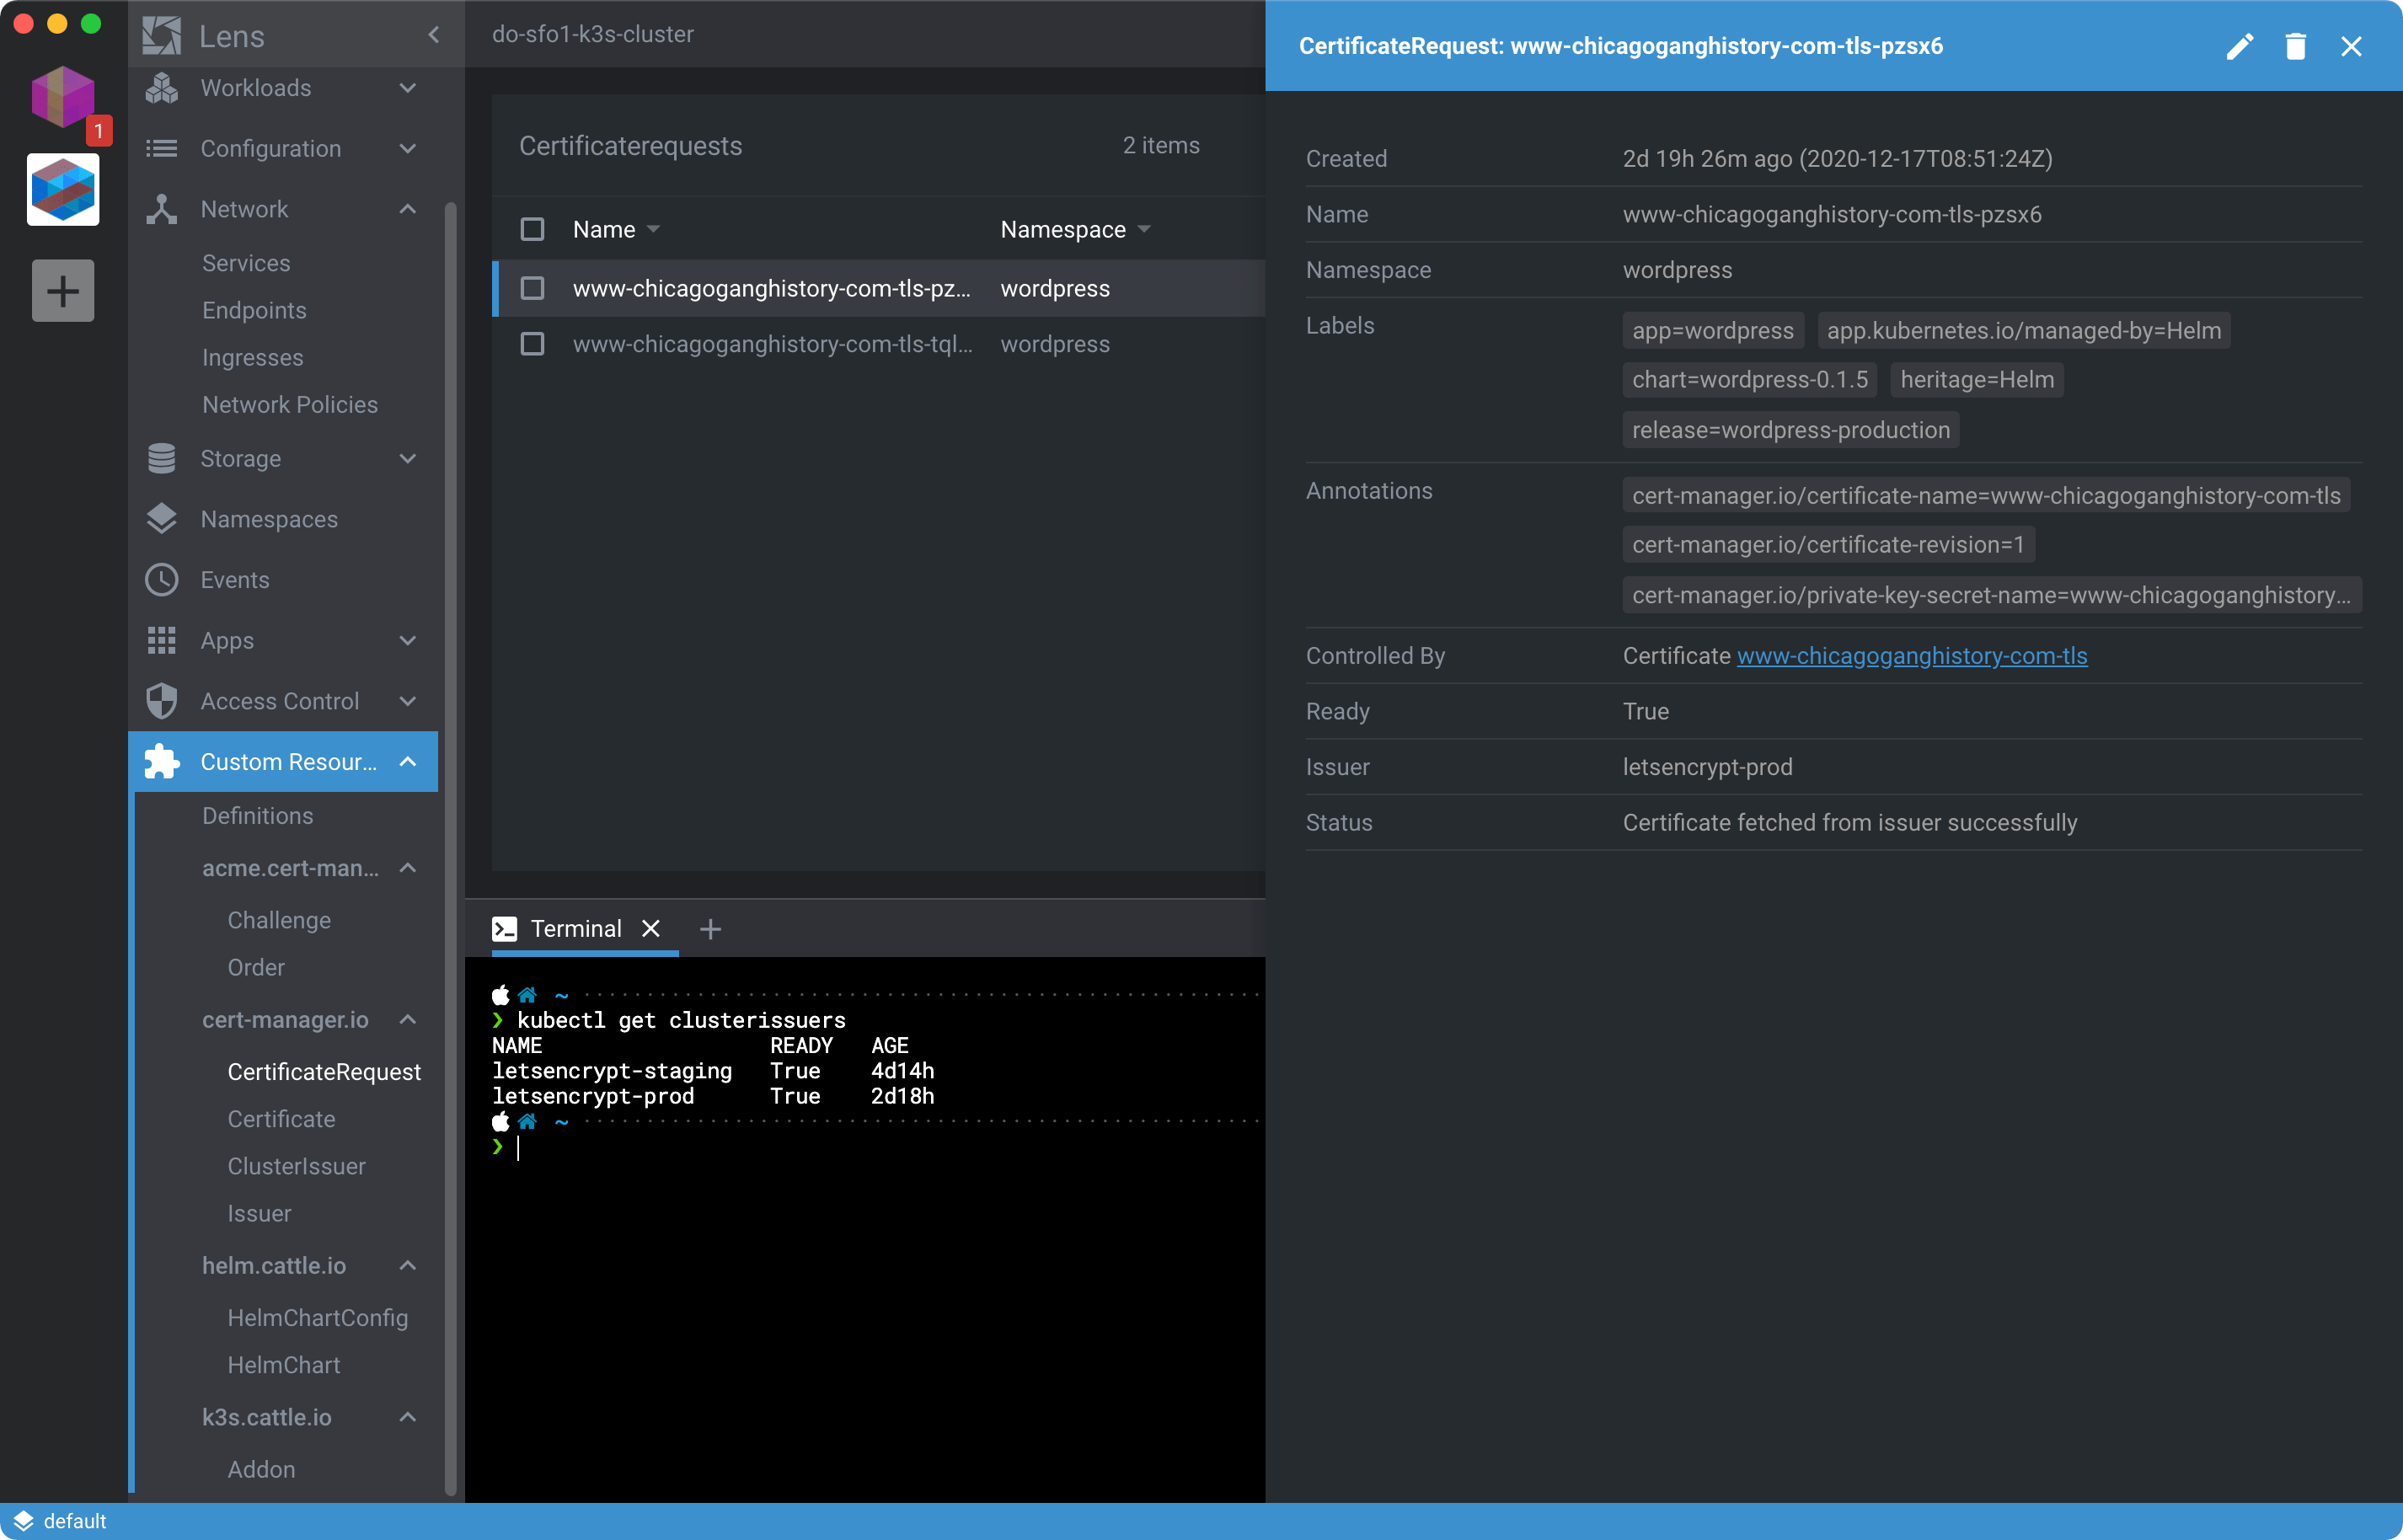
If you continually have issues getting letsencrypt-prod configured and the SSL certificate generated, it may be possible you’ve hit the production rate limit. That’s Let’s Encrypt letting you know you should probably go back and practice more with the letsencrypt-staging cluster issuer before proceeding. See Easier Troubleshooting of cert-manager Certificates for more help debugging.
When your cert is generated successfully your site will be available over HTTPS and is ready for prime time with one caveat: If you had 80,000 visitors a month while hosted on Pantheon, you’re going to want beefier server specs.
Step 8: Beef Up the Server
In Step 3 we created a three-node cluster intentionally constrained by limited resources. For Pantheon sites serving 80K visitors a month, a 2GB server may get you by but performance, and as a consequence, your search rankings, will suffer.
Let’s remedy that by resizing the server and doubling the CPU and Memory:
| Node | CPU | Memory | Disk | Cost |
|---|---|---|---|---|
| k3s-server-1 | 2 | 4Gi | 80Gi | $20/month |
The resize can be done using doctl but resizing should be infrequent enough to use as an excuse to resize from the Digital Ocean web interface instead.
Log into your account and locate your K3s droplets:
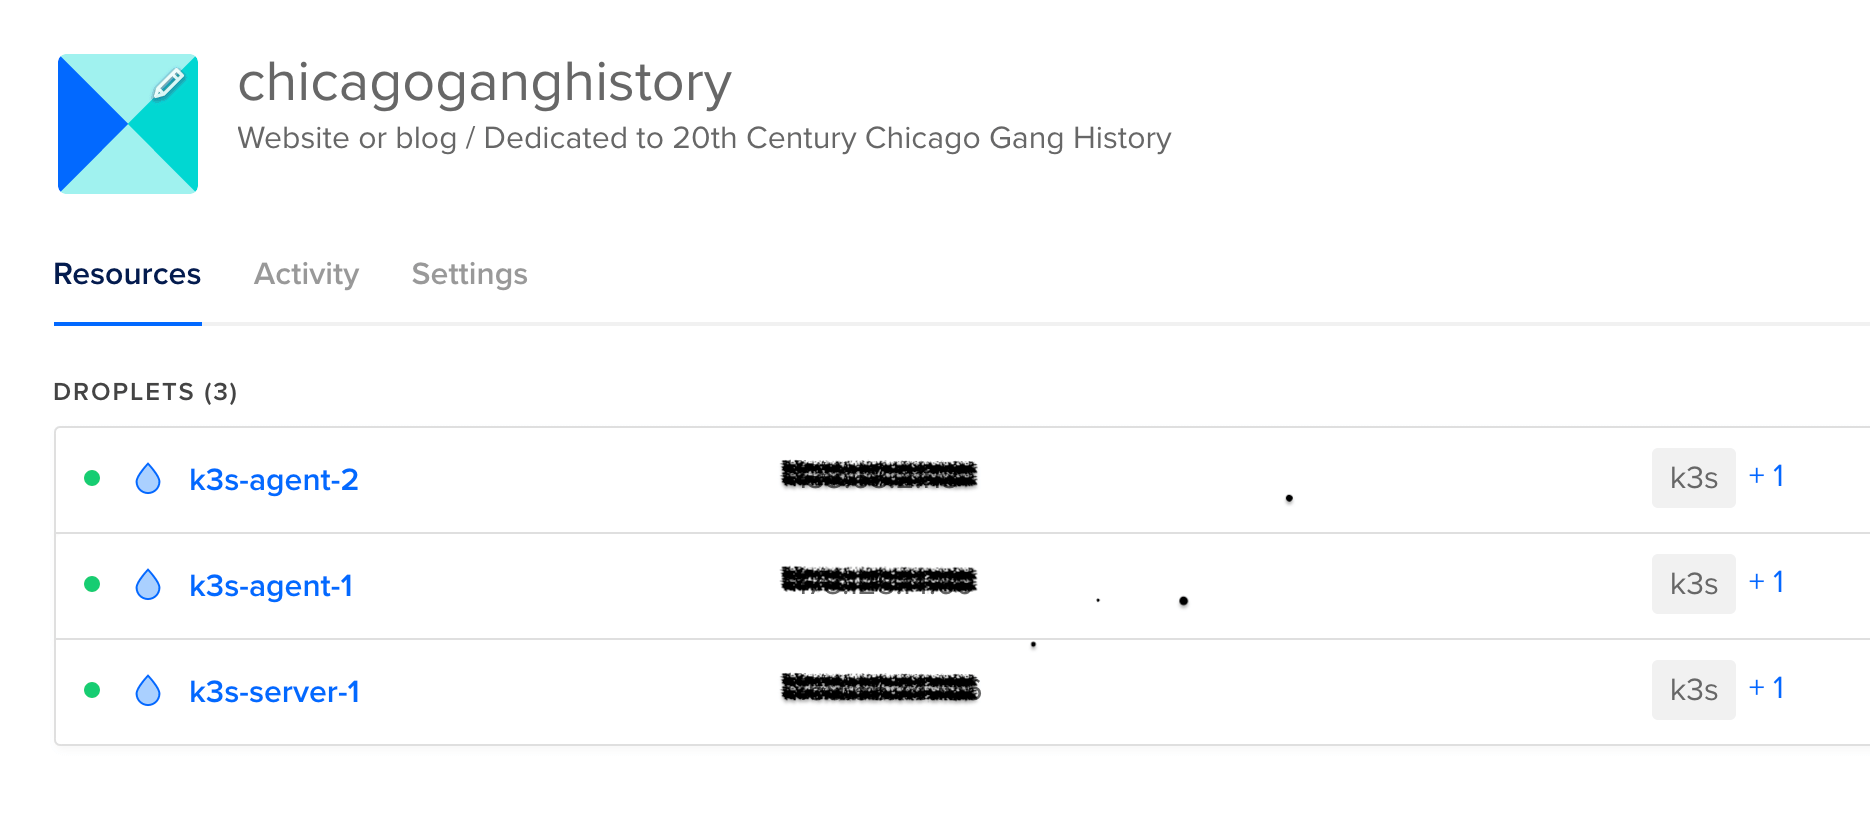
Click k3s-server-1 to show the droplet and Resize option:
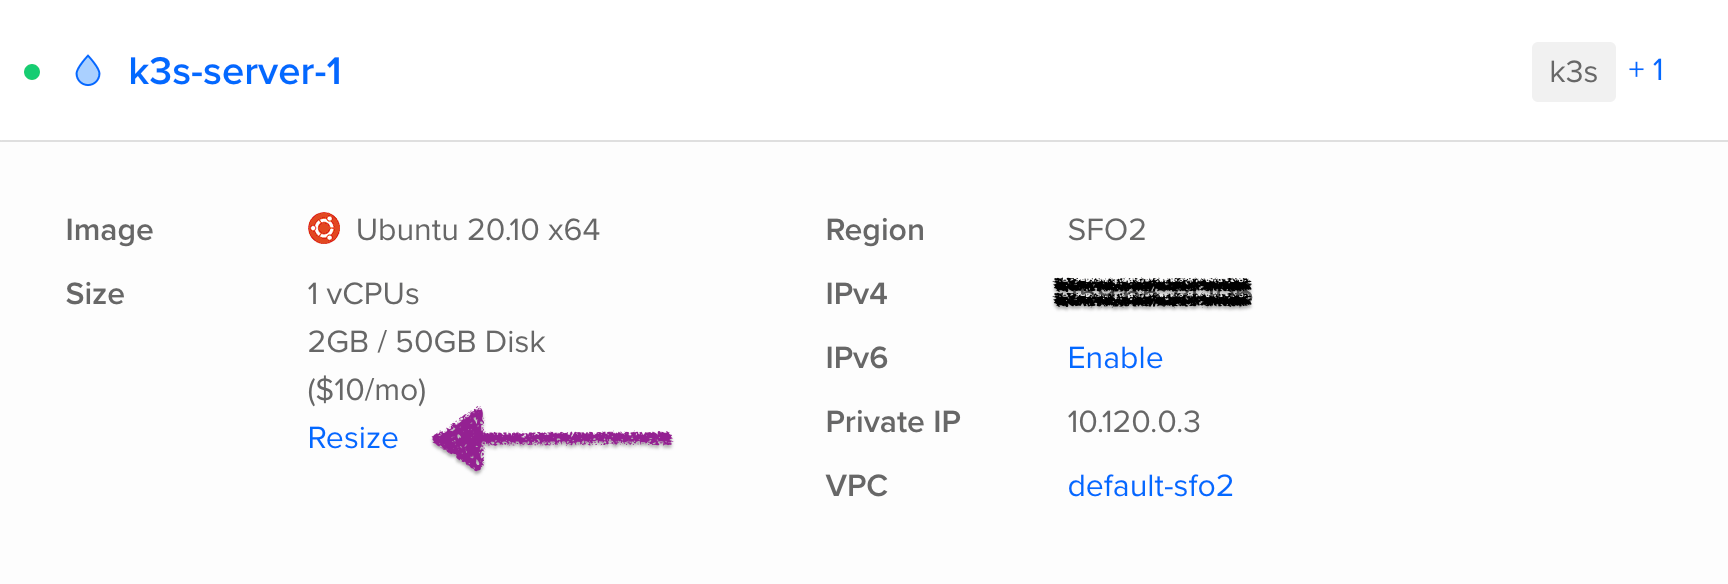
Choose Disk, CPU and RAM for the upgrade:
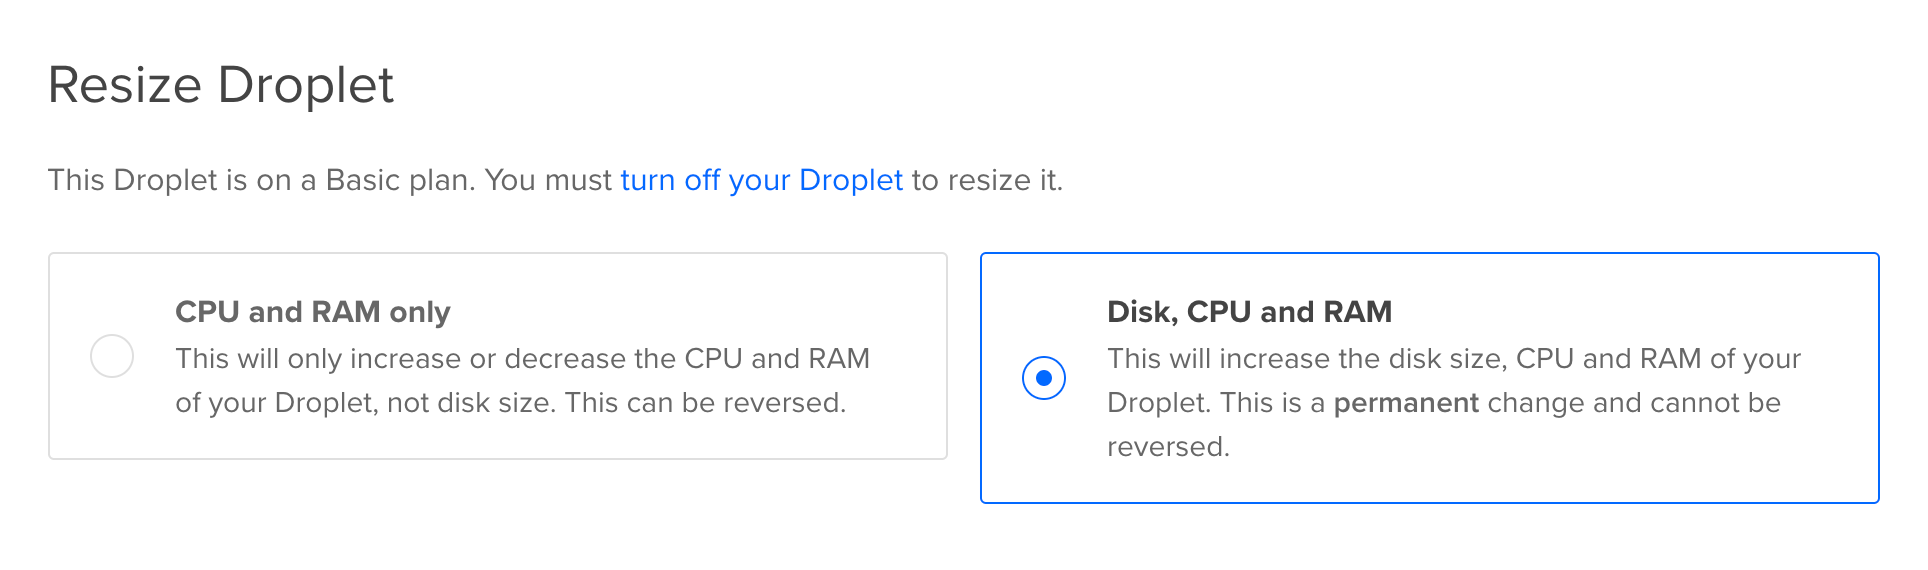
Resize the droplet following the on-screen instructions, including turning the droplet off prior to the resize operation. Select the 2vCPU/4GB/80GB Disk from the resize options and choose Resize to begin the operation.
Once the resize is complete it’ll take a minute or two before the server node rejoins with its agents. If you have problems connecting via the Kubernetes API after the node comes back up from the resize, shell into the node and run:
sudo systemctl restart k3s.service
That’ll should cajole things back into shape and get the Kubernetes API working. You may need to delete the WordPress Pod once more as mentioned towards the bottom of Step 6 to workaround a known issue where the Init Container will fail unexpectedly and WordPress will be unable to start on its own as a result.
After that, take a look at Lens and see how the Nodes have changed:
Notice persistent volumes stayed in tact, preventing any data loss in the during the resize. And that’s all it takes to beef up the server. If only Pantheon could do that they might’ve been able to keep more of their customers.
Summary
In this post you learned how save over $400 a month in hosting costs by Migrating a WordPress site from Pantheon to a hardened WordPress website with Redis cache on Kubernetes in 8 steps. If like me you were one of the unlucky onces who faced downtime as a result of a last-minute notice from Pantheon, now you know it’s possible to skip searching for a new host and become the WordPress host yourself.
So long Pantheon. I wouldn’t want to be in your sandals.