
Previously I’ve discussed the basics of init containers and shown how to deploy WordPress locally. But if you’ve already got a domain handy and are ready to move your WordPress site to a staging or production environment please continue. I’ll use Digital Ocean but you could use any hosting provider you like so long as you can use them to deploy some VPS instances for yourself during the setup below. I’ve been using this method to host Chicago Gang History for over three years.
When you are finished you will have a hardened WordPress site deployed to Kubernetes using Ansible capable of handling up to 80K users per month.
Provision nodes
In this section we’ll provision three VPS nodes for use by the cluster. In addition, some basic security maintenance and hardening is also performed. At the end of this section you will have three hardened Ubuntu nodes.
Start by provisioning 3 nodes, one 4GB RAM server and two 1GB RAM workers:
doctl compute droplet create --image ubuntu-22-10-x64 \
  --size s-2vcpu-4gb --region nyc1 k3s-server \
  --tag-names k3s,k3s-server-1 --ssh-keys $SSH_KEY

doctl compute droplet create --image ubuntu-22-10-x64 \
  --size s-1vcpu-1gb --region nyc1 k3s-agent-1 \
  --tag-names k3s,k3s-agent --ssh-keys $SSH_KEY

doctl compute droplet create --image ubuntu-22-10-x64 \
  --size s-1vcpu-1gb --region nyc1 k3s-agent-2 \
  --tag-names k3s,k3s-agent --ssh-keys $SSH_KEY
Take inventory of the nodes:
doctl compute droplet ls --tag-name k3s
Wait for public IP addresses to become available:
ID           Name                    Public IPv4        Private IPv4    Public IPv6    Memory    VCPUs    Disk    Region    Image               VPC UUID                                Status    Tags              Features                            Volumes
281189459    k3s-server-1            159.223.158.116    10.114.0.2                     4096      2        80      nyc1      Ubuntu 22.10 x64    fda185a1-5304-4165-860d-2c1dbb2fdca9    active    k3s,k3s-server    droplet_agent,private_networking
281189419    k3s-agent-1             159.223.158.112    10.114.0.3                     1024      1        25      nyc1      Ubuntu 22.10 x64    fda185a1-5304-4165-860d-2c1dbb2fdca9    active    k3s,k3s-agent     droplet_agent,private_networking
281189380    k3s-agent-2             159.223.158.104    10.114.0.4                     1024      1        25      nyc1      Ubuntu 22.10 x64    fda185a1-5304-4165-860d-2c1dbb2fdca9    active    k3s,k3s-agent     droplet_agent,private_networking
Export aliases to each node’s IP address:
export SERVER1=159.223.158.116
export AGENT1=159.223.158.112
export AGENT2=159.223.158.104
Begin hardening server, rebooting for kernel updates:
ssh root@"$(echo $SERVER1)"
root@k3s-server-1:~# apt update && apt upgrade -y
root@k3s-server-1:~# reboot
root@k3s-server-1:~# adduser deployer
New password: ******************
root@k3s-server-1:~# mkdir /home/deployer/.ssh
root@k3s-server-1:~# cp .ssh/authorized_keys /home/deployer/.ssh/
root@k3s-server-1:~# chown deployer:deployer /home/deployer/.ssh/authorized_keys
root@k3s-server-1:~# usermod -aG sudo deployer
Start second login shell to deployer and edit SSH config using sudo privileges:
ssh deployer@"$(echo $SERVER1)"
deployer@k3s-server-1:~$ sudo vim /etc/ssh/sshd_config
[sudo] password for deployer: ******************
Disable password auth and root login:
PasswordAuthentication no
PermitRootLogin no
Restart SSH server and exit:
deployer@k3s-server-1:~$ sudo service --status-all
deployer@k3s-server-1:~$ sudo service ssh restart
deployer@k3s-server-1:~# exit
Confirm only deployer can login now and has root access:
ssh root@"$(echo $SERVER1)"
root@k3s-server-1: Permission denied (publickey)
ssh deployer@"$(echo $SERVER1)"
deployer@k3s-1:~$ su -
Password: ******************
root@k3s-server-1:~# exit
Switch back to first shell session, set root password and exit:
root@k3s-server-1:~# passwd
New password: ******************
Retype new password: ******************
passwd: password updated successfully
root@k3s-server-1:~# exit
Now only deployer may login via SSH to access the root account. Use this account to configure banning with
Fail2ban:
ssh deployer@"$(echo $SERVER1)"

deployer@k3s-server-1:~$ sudo apt install fail2ban -y
[sudo] password for deployer: ******************
deployer@k3s-server-1:~$ sudo cp /etc/fail2ban/jail.conf /etc/fail2ban/jail.local
deployer@k3s-server-1:~$ sudo service fail2ban restart
deployer@k3s-server1:~$ sudo fail2ban-client status sshd
Status for the jail: sshd
|- Filter
|  |- Currently failed:	2
|  |- Total failed:	2
|  `- File list:	/var/log/auth.log
`- Actions
   |- Currently banned:	0
   |- Total banned:	0
   `- Banned IP list:
After a week your Fail2ban sshd stats may look more like this:
deployer@k3s-server-1:~$ sudo fail2ban-client status sshd
Status for the jail: sshd
|- Filter
|  |- Currently failed:	15
|  |- Total failed:	14228
|  `- File list:	/var/log/auth.log
`- Actions
   |- Currently banned:	0
   |- Total banned:	2105
   `- Banned IP list:
14 thousand failed ssh attempts 7 days? Good thing we hardened the server node. Now repeat the above process for the two worker nodes AGENT1 and AGENT2. Once you’re finished you’ll be ready to network the nodes in a Kubernetes cluster.
Provision cluster
With nodes provisioned we will now network them into a Kubernetes cluster. To accomplish this task we’ll leverage K3s for Kubernetes and use a handy CLI tool called k3sup (pronounced “Ketchup”) to bootstrap the cluster.
deployer account requires passwordless sudo access in order to complete. Please configure visudo and give deployer passwordless sudo access on each of the three nodes created to continue.
Install or upgrade k3sup on host machine (macOS example using Homebrew):
HOMEBREW_NO_AUTO_UPDATE=1 brew install k3sup
Verify auth socket for ssh on host (example using gpg-agent for auth):
env | grep SOCK
SSH_AUTH_SOCK=/Users/host/.gnupg/S.gpg-agent.ssh
Create a single-node cluster from host machine using SSH_AUTH_SOCK:
k3sup install --ip $SERVER1 --user deployer \
  --context nyc1-k3s-cluster-1
This node will become your control plane for the cluster so be sure the node used has as least 4GB RAM and is not one of the two agent nodes provisioned earlier.
sudo: a terminal is required to read the password; please see the passwordless sudo note above.
A successful installation will show you output like:
Expand to view sample output
Running: k3sup install
2023/03/05 13:21:32 159.223.158.116
Public IP: 159.223.158.116
[INFO]  Finding release for channel stable
[INFO]  Using v1.25.6+k3s1 as release
[INFO]  Downloading hash https://github.com/k3s-io/k3s/releases/download/v1.25.6+k3s1/sha256sum-amd64.txt
[INFO]  Downloading binary https://github.com/k3s-io/k3s/releases/download/v1.25.6+k3s1/k3s
[INFO]  Verifying binary download
[INFO]  Installing k3s to /usr/local/bin/k3s
[INFO]  Skipping installation of SELinux RPM
[INFO]  Creating /usr/local/bin/kubectl symlink to k3s
[INFO]  Creating /usr/local/bin/crictl symlink to k3s
[INFO]  Creating /usr/local/bin/ctr symlink to k3s
[INFO]  Creating killall script /usr/local/bin/k3s-killall.sh
[INFO]  Creating uninstall script /usr/local/bin/k3s-uninstall.sh
[INFO]  env: Creating environment file /etc/systemd/system/k3s.service.env
[INFO]  systemd: Creating service file /etc/systemd/system/k3s.service
Created symlink /etc/systemd/system/multi-user.target.wants/k3s.service → /etc/systemd/system/k3s.service.
[INFO]  systemd: Enabling k3s unit
[INFO]  systemd: Starting k3s
Result: [INFO]  Finding release for channel stable
[INFO]  Using v1.25.6+k3s1 as release
[INFO]  Downloading hash https://github.com/k3s-io/k3s/releases/download/v1.25.6+k3s1/sha256sum-amd64.txt
[INFO]  Downloading binary https://github.com/k3s-io/k3s/releases/download/v1.25.6+k3s1/k3s
[INFO]  Verifying binary download
[INFO]  Installing k3s to /usr/local/bin/k3s
[INFO]  Skipping installation of SELinux RPM
[INFO]  Creating /usr/local/bin/kubectl symlink to k3s
[INFO]  Creating /usr/local/bin/crictl symlink to k3s
[INFO]  Creating /usr/local/bin/ctr symlink to k3s
[INFO]  Creating killall script /usr/local/bin/k3s-killall.sh
[INFO]  Creating uninstall script /usr/local/bin/k3s-uninstall.sh
[INFO]  env: Creating environment file /etc/systemd/system/k3s.service.env
[INFO]  systemd: Creating service file /etc/systemd/system/k3s.service
[INFO]  systemd: Enabling k3s unit
[INFO]  systemd: Starting k3s
 Created symlink /etc/systemd/system/multi-user.target.wants/k3s.service → /etc/systemd/system/k3s.service.

Saving file to: /Users/host/kubeconfig

# Test your cluster with:
export KUBECONFIG=/Users/host/kubeconfig
kubectl config use-context nyc1-k3s-cluster-1
kubectl get node -o wide

🐳 k3sup needs your support: https://github.com/sponsors/alexellis
With K3s installed on your control plane, provision and join 2 agent nodes:
k3sup join --ip $AGENT1 --server-ip $SERVER1 --user deployer
k3sup join --ip $AGENT2 --server-ip $SERVER1 --user deployer
For each agent joined you should see output like:
Expand to view sample output
Running: k3sup join
Server IP: 159.223.158.112
K108aa4be9816cb05bc00668dcd44bab239552dab93ad86a97b92723dfdcfc5469c::server:a758035006d7788060bc3f7330ee1d0d
[INFO]  Finding release for channel stable
[INFO]  Using v1.25.6+k3s1 as release
[INFO]  Downloading hash https://github.com/k3s-io/k3s/releases/download/v1.25.6+k3s1/sha256sum-amd64.txt
[INFO]  Downloading binary https://github.com/k3s-io/k3s/releases/download/v1.25.6+k3s1/k3s
[INFO]  Verifying binary download
[INFO]  Installing k3s to /usr/local/bin/k3s
[INFO]  Skipping installation of SELinux RPM
[INFO]  Creating /usr/local/bin/kubectl symlink to k3s
[INFO]  Creating /usr/local/bin/crictl symlink to k3s
[INFO]  Creating /usr/local/bin/ctr symlink to k3s
[INFO]  Creating killall script /usr/local/bin/k3s-killall.sh
[INFO]  Creating uninstall script /usr/local/bin/k3s-agent-uninstall.sh
[INFO]  env: Creating environment file /etc/systemd/system/k3s-agent.service.env
[INFO]  systemd: Creating service file /etc/systemd/system/k3s-agent.service
[INFO]  systemd: Enabling k3s-agent unit
Created symlink /etc/systemd/system/multi-user.target.wants/k3s-agent.service → /etc/systemd/system/k3s-agent.service.
[INFO]  systemd: Starting k3s-agent
Logs: Created symlink /etc/systemd/system/multi-user.target.wants/k3s-agent.service → /etc/systemd/system/k3s-agent.service.
Output: [INFO]  Finding release for channel stable
[INFO]  Using v1.25.6+k3s1 as release
[INFO]  Downloading hash https://github.com/k3s-io/k3s/releases/download/v1.25.6+k3s1/sha256sum-amd64.txt
[INFO]  Downloading binary https://github.com/k3s-io/k3s/releases/download/v1.25.6+k3s1/k3s
[INFO]  Verifying binary download
[INFO]  Installing k3s to /usr/local/bin/k3s
[INFO]  Skipping installation of SELinux RPM
[INFO]  Creating /usr/local/bin/kubectl symlink to k3s
[INFO]  Creating /usr/local/bin/crictl symlink to k3s
[INFO]  Creating /usr/local/bin/ctr symlink to k3s
[INFO]  Creating killall script /usr/local/bin/k3s-killall.sh
[INFO]  Creating uninstall script /usr/local/bin/k3s-agent-uninstall.sh
[INFO]  env: Creating environment file /etc/systemd/system/k3s-agent.service.env
[INFO]  systemd: Creating service file /etc/systemd/system/k3s-agent.service
[INFO]  systemd: Enabling k3s-agent unit
[INFO]  systemd: Starting k3s-agent

🐳 k3sup needs your support: https://github.com/sponsors/alexellis
You now have a three node Kubernetes cluster and the ability to control it via kubectl Kubernetes CLI or using an IDE for Kubernetes. Inspect the output from the k3sup install command issued above to find your KUBECONFIG file.
Cluster provisioning complete. You may disable passwordless sudo now if desired.
Configure Lens
To simplify management of the cluster we’ll use Lens. See my Lens app primer for a basic introduction to Lens for cluster management. With Lens we’ll be more effective at managing the Kubernetes cluster with less effort than using the CLI alone thanks to Lens analytics including push-button Prometheus installation.
Start by installing Lens and importing your KUBECONFIG to connect to the K3s cluster created in the last section. Once the cluster is accessible from within Lens, install Lens metrics including Prometheus. Once the metrics server is finished installing you should see an interface similar to the following:
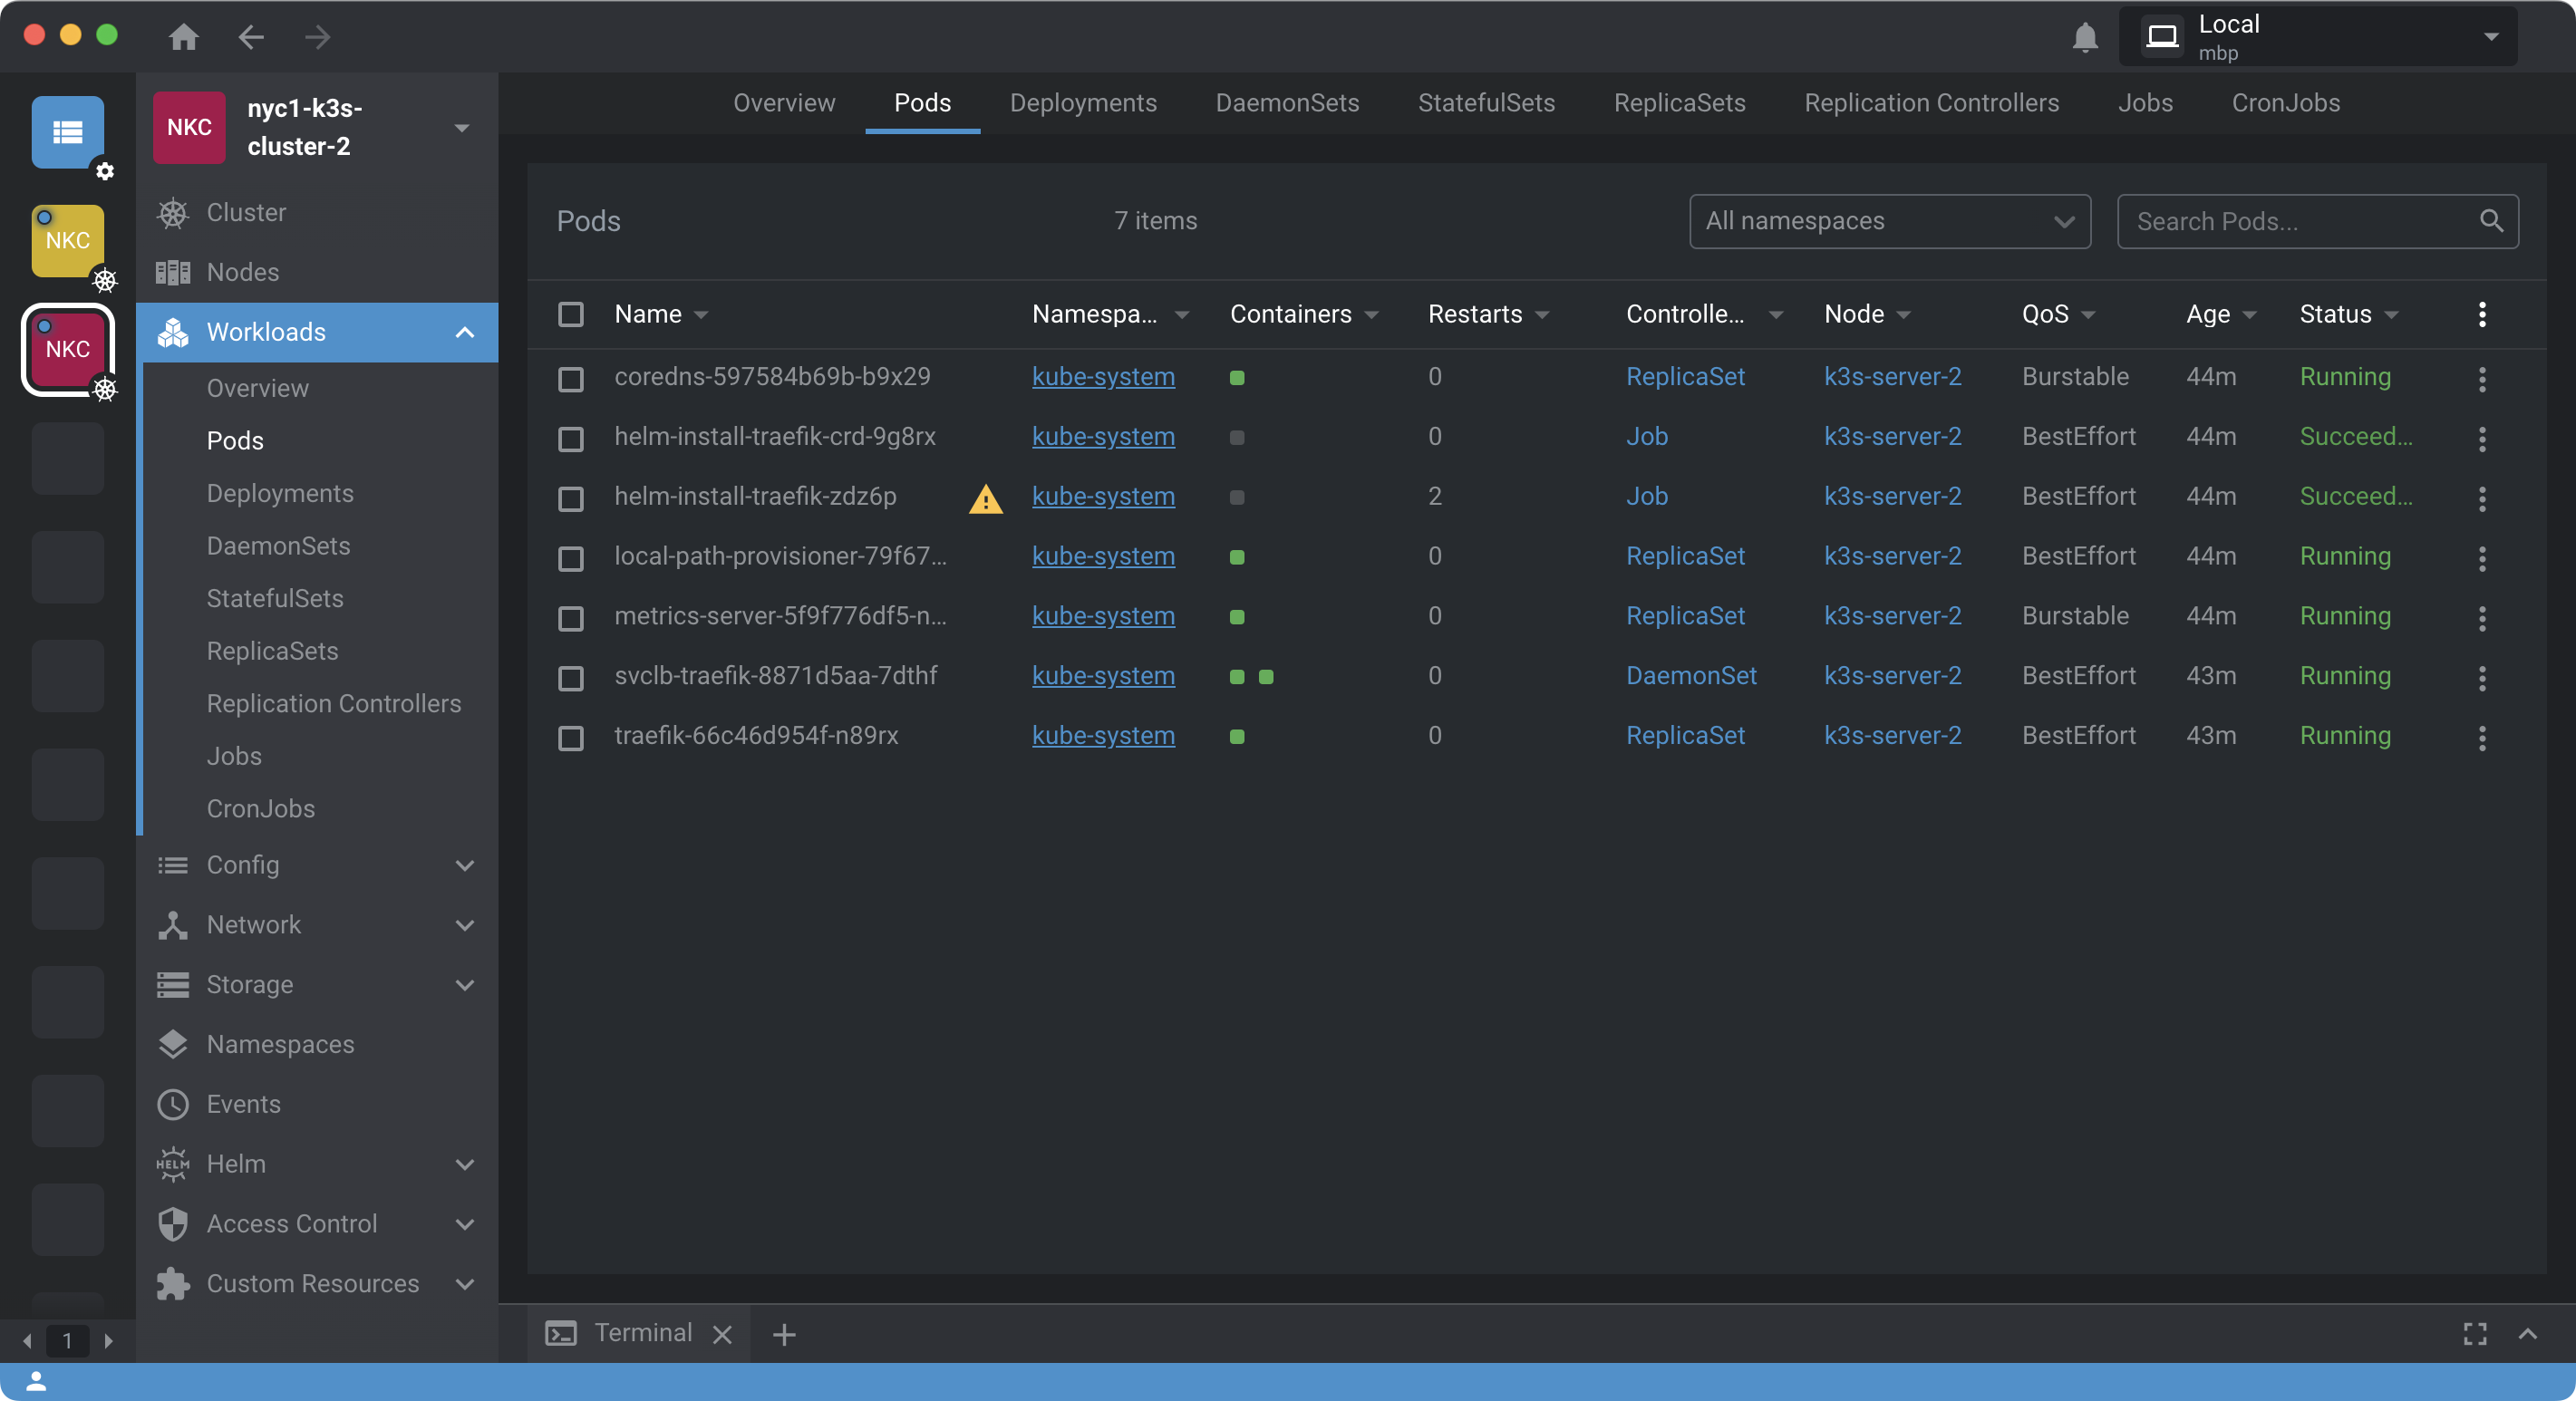
Confirm metrics-server under Pods section of Workloads in kube-system workspace. Without this you will not be able to introspect on the cluster with Lens.
Configure chart
With provisioning complete and Lens ready we can configure and deploy the Helm chart. The chart we’ll be deploying is the Stackspin WordPress Helm chart. A functional configuration example file is provided below for reference.
Start by copying the example config file:
cp values-local.yaml.example values-local.yaml
Update configuration for your cluster:
Expand to view sample configuration
wordpress:
  config:
    db:
      prefix: wp_
    adm:
      usid: admin
      pssw: ******************
  site:
    # NOTE: Make sure you use underscore and that the localisation is in full caps
    default_language: en_US
    # NOTE: Optionally set a Wordpress version number to override the default
    # version: LOCAL-WORDPRESS-VERSION-NUMBER-OR-DELETE-THIS-LINE
    # NOTE: This is the URL that points to your WordPress installation. If this
    # URL is set incorrectly your site will most likely not work. You can not
    # change it after you have run helm install once because WordPress saves the
    # site URL in its database. To change this value, you would need to helm
    # delete and then helm install the chart again, or manually change the
    # WordPress database fields that contain the URL.
    url: "https://www.chicagoganghistory.com"
    title: "Chicago Gang History"
    # If you are including a plugin to alias wp login then set an alt.path and set alt.config options
    # NOTE: The value of alt enabled must be set as true or false
    alt:
      enabled: false
    # config: PATH-SETTING-IN-OPTIONS-TABLE
    # path: SOME-LOGIN-PATH
    # # Path used by the liveness and readiness probes to see if the site runs
    # # correctly. Defaults to `/wp-login.php`. Be sure to make this the same as
    # # alt_path if you use it!
    # probe_path: /wp-login.php
    # debug:
    #   # Set to true to set WP_DEBUG on in the configuration. This enables the
    #   # usage of wp_debug_log and wp_debug_display.
    #   wp_debug: false
    #   # IF debug.wp_debug, log to wp-content/debug.log
    #   wp_debug_log: true
    #   # IF debug.wp_debug, log to display (i.e. inside the site)
    #   wp_debug_display: false

  # Uncomment and edit this list to add plugins that will be installed before
  # the WordPress container starts.
  #
  # plugins:
  #   # Download plugin by slug from WordPress
  #   - classic-editor
  #   # Download plugin from extraordinary location
  #   - https://github.com/level73/stackspin-plugin/archive/refs/heads/main.zip
  plugins:
    # Download plugin by slug from WordPress
    - classic-editor
    # Download plugin from extraordinary location
    - https://github.com/level73/stackspin-plugin/archive/refs/heads/main.zip
    # Download plugins added for Chicago Gang History
    - cryout-serious-slider
    - wp-migrate-db
    - pods
    - pods-seo
    - photoswipe-masonry
    - akismet
    - newsletter
    - easy-google-adsense
    - honeypot

  # Install includes all parent, child, default, active and fallback themes
  # NOTE: Use theme *slugs* here. Can also be a URL to a theme zip file.
  themes_install:
   - twentytwentythree
   - bravada

  wp_content:
    # The directory to mount the files placed in wp-content. You shouldn't have to
    # change this.
    mount_path: /var/www/wp-content-mount
  wp_upload:
    # Contents of the .htaccess file that is mounted in the `wpUploadMnt` directory
    htaccess: |
      # Disable access to all file types except the following
      Require all denied
      <Files ~ ".(woff|xml|css|js|jpe?g|png|gif)$">
        Require all granted
      </Files>

  ## Set default permissions given to files and directories by Wordpress
  ## Strong and writeable defaults are 750 and 640
  #permissions:
  #  directory_mode: 0750
  #  files_mode: 0640

  ## mu_plugins are installed as hidden and cannot be updated from the UI
  ## mu_dir  'mu-plugins' maps to wp-content/mu-plugins
  ## mu_plugins supplies a detailed list of mu values and plugins with versions

  mu_plugins_enabled: true
  mu_plugins_dir: mu-plugins
  mu_plugins:
    - name: Block Bad Queries
      # Path to the PHP files inside the plugin zip
      path: block-bad-queries
      # Entrypoint to plugin inside `path`
      phpfile: block-bad-queries.php
      url: https://downloads.wordpress.org/plugin/block-bad-queries.20230303.zip

  ## Enable externally triggered cron for an MU cron plugin
  # NOTE: mu_plugins *must* be enabled if you want to enable mu_cron
  mu_cron:
    enabled: false
    secret: ******************
    # # By default cron runs every 3 minutes, but you can change the schedule
    # # here:
    # cronjob:
    #   schedule: "*/3 * * * *"

# These settings make sense to overwrite if you want to use the OpenID connect
# plugin
openid_connect_settings:
  enabled: false
  client_id: OPENID_CLIENT_ID
  client_secret: OPENID_CLIENT_SECRET
  endpoint_login: https://login-endpoint-url
  endpoint_userinfo: https://userinfo-endpoint-url
  endpoint_token: https://token-validation-endpoint-url
  endpoint_end_session: https://end-session-endpoint-url
  no_sslverify: "0"
  enable_logging: "1"
  role_mapping_enabled: false
  role_key: roles

smtp_settings:
  # Enable using these SMTP settings
  enabled: false
  # Username for SMTP authentication
  smtp_user: admin@example.com
  # Password for STMP authentication
  smtp_pass: password
  # Hostname of the mailserver
  smtp_host: smtp.example.som
  # SMTP from email address
  smtp_from: admin@example.com
  # SMTP from name
  smtp_name: WordPress Admin
  # SMTP port number - likely to be 25, 465 or 587
  smtp_port: 587
  # Encryption system to use - ssl or tls
  smtp_secure: 'tls'
  # Use SMTP authentication (true|false)
  smtp_auth: true
  # Can be set to 1 or 2 for debug logs
  smtp_debug: 0

database:
  auth:
    username: wordpress
    password: ******************
    rootPassword: ******************
    replicationPassword: ******************

# Set this to true to have a Redis container next to your WP. The WP will be
# configured to connect to this Redis and `Redis Object Cache` plugin will be
# installed as a convential plugin and configured to connect to this Redis
# Change Redis MU plugin configurations to use MU instead
redis:
  # Set redis.enabled to true to have a Redis container next to your WP. The WP will be
  # configured to connect to this Redis and `Redis Object Cache` plugin will be
  # installed as a conventional plugin.
  enabled: false
  auth:
    password: ******************
  master:
    persistence:
      # Set persistence to true you want redis to have persistence
      enabled: false
    # disableCommand is set as null to enable FLUSHALL and FLUSHDB and allow cache purge and flush
    disableCommands: []
  # Set architecture to "replication" to have a primary and secondary redis. Not necessary for caching
  architecture: "replication"


# This will add a cronjob that performs backups of the wordpress
# database, copying an sql file created by `wp db export` to the given target.
#
# The backups are saved as yyyy-mm-dd and as such if you do several backups per
# day, previous backups of the same day will be overwritten. There is no cleanup
# of backups: it is assumed that cleanup is done on the target server.
# backup:
#   enabled: true
#   # The target location of the backup. This can be a local directory (not
#   # advisable) or a remote directory reachable over SSH. backup command uses
#   # this value as the second argument for `rsync`
#   target: <username@server.example.org:backup-dir/>
#   # If `backup.target` is an SSH address, use this private key:
#   sshPrivateKey: |
#     -----BEGIN OPENSSH PRIVATE KEY-----
#     ...
#     -----END OPENSSH PRIVATE KEY-----
#   # This string is mounted as a text file to /etc/ssh/ssh_known_hosts.
#   # Required when `sshPrivateKey` is provided. Required for SSH host key
#   # verification. If this is ill-configured, expect a host key verification
#   # error in the logs of the wordpress-backup container.
#   # Read the SSH documentation for the correct contents of the ssh_known_hosts
#   # file. You can use `ssh-keyscan` on a trusted network to find host keys.
#   sshKnownHosts: |
#     <hostname> <keytype> <key>
#   # when isDate is true or unset the database is backed up as wp-db-RELEASE-DATE.sql
#   # If isDate is set to false then backup names are a 2 week cycle of A(day number) or B(day number)
#   # A monthly database backup and monthly wordpress manifest are always made with monthnumber prefix
#   isDate: true
#   # The cron schedule that determines when backups are made.
#   # Run at 3:37 every day.
#   schedule: "37 3 * * *"

# customCron:
# - schedule: "5 * * * *"
#   command: "echo test"

# It's advisable to set resource limits to prevent your K8s cluster from
# crashing
# resources:
#   limits:
#     cpu: 100m
#     memory: 512i
#   requests:
#     cpu: 50m
#     memory: 256Mi

ingress:
  # If this is false, no ingress is created by the helm chart
  enabled: true
  # Example annotation to make cert-manager manage the TLS certificates for
  # this ingress (Don't supply crt and key to the tls config in this case).
  # annotations:
  #   kubernetes.io/tls-acme: "true"
  annotations:
    kubernetes.io/ingress.class: traefik
    kubernetes.io/tls-acme: "true"
    cert-manager.io/cluster-issuer: letsencrypt-staging
    traefik.ingress.kubernetes.io/redirect-regex: ^http://(?:www.)?chicagoganghistory.com/(.*)"
    traefik.ingress.kubernetes.io/redirect-replacement: https://chicagoganghistory.com/$1
  path: /
  hosts:
    - www.chicagoganghistory.com
    - chicagoganghistory.com
  tls:
    - hosts:
        - www.chicagoganghistory.com
        - chicagoganghistory.com
      secretName: wordpress-cert
      # crt: |
      #   Optionally insert your certificate here, it will be saved as a
      #   Kubernetes secret. You can insert the whole certificate chain here.
      #   NOTE: Don't do this if you use cert-manager to get your certificates!
      # key: |
      #   If you use a custom certificate, insert your TLS key here, it will be
      #   saved as a Kubernetes secret.

# Set this for use with Minikube:
# service:
#   type: NodePort
#   port: 12345

# Labels that will be added to pods created by the wordpress StatefulSet.
# podLabels:
#   key: value
#   something: else

# Labels that will be added to the wordpress StatefulSet itself.
# statefulSetLabels:
#   someCustom: labelValue

# This will restrict WordPress deployment to the specified node. This is useful
# when you are working with limited resources and do not want to run WordPress
# on a resourced-constrained node.
#
# See https://kubernetes.io/docs/concepts/scheduling-eviction/assign-pod-node/
# for more information on assigning pods to nodes.
# nodeSelector:
#   kubernetes.io/hostname: k3s-server-1
Leave Redis disabled for now if you plan to restore from backup. In a later section we’ll come back and explicitly enable it.
Once satisfied with your chart configuration, deploy it to the cluster using the letsencrypt-test cluster issuer as shown in the example config. In a later section we’ll create a similarly named certificate for HTTPS access to the site.
Deploy chart
Before deployment create an A record at your DNS provider so the domain name specified in the Helm chart config points to the IP of the $SERVER1 control plane node. Bear in mind it can take some time for the change to propagate.
Then install or upgrade Helm on host machine (macOS example using Homebrew):
HOMEBREW_NO_AUTO_UPDATE=1 brew install helm
With Helm installed, deploy chart to a new wordpress namespace:
cp install.sh.example install.sh
chmod +x install.sh
./install.sh --namespace wordpress --create-namespace
You should see output like the following:
Expand to view sample output
releaseName="wordpress-production"

# Upgrade or install application using the current git branch as docker tag
helm upgrade $releaseName . --install -f values-local.yaml "$@"
Release "wordpress-production" does not exist. Installing it now.
NAME: wordpress-production
LAST DEPLOYED: Sun Mar 19 10:26:22 2023
NAMESPACE: wordpress
STATUS: deployed
REVISION: 1
TEST SUITE: None
NOTES:
1. Get the application URL by running these commands:
  https://www.chicagoganghistory.com/
  https://chicagoganghistory.com/
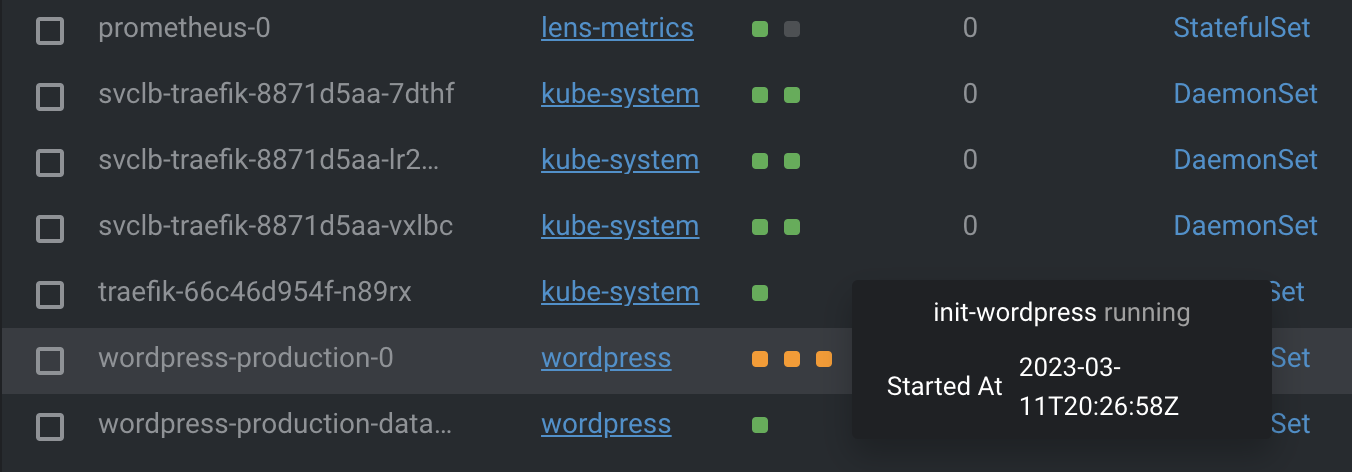
Each time the chart is deployed a WordPress init container will run and build WordPress from scratch based on included Ansible script. Before you will be able to access your site use Lens to ensure the init container builds successfully:
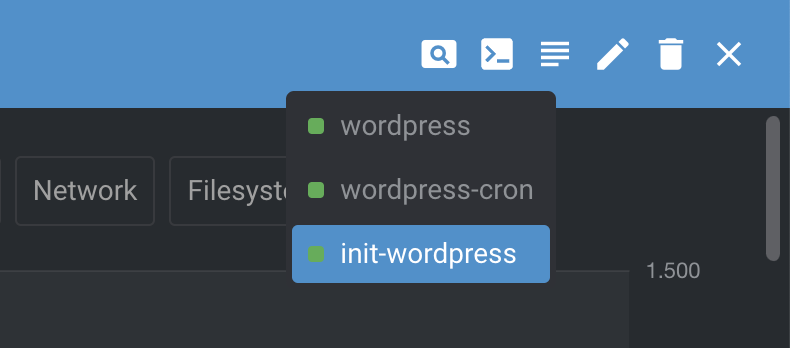
Leverage Pod logs in Lens to identify and debug any errors:
When the init-wordpress container finishes, your installation of WordPress will be deployed and and publicly accessible via DNS lookup. Confirm with:
curl --head --insecure https://chicagoganghistory.com
You should see output like:
HTTP/2 301
content-type: text/html; charset=UTF-8
date: Sun, 19 Mar 2023 14:29:53 GMT
location: https://www.chicagoganghistory.com/
server: Apache/2.4.54 (Debian)
x-powered-by: PHP/8.1.12
x-redirect-by: WordPress
A record pointing at the server node has already propagated.
Confirm Helm chart created Ingress resource in wordpress namespace:
kubectl get Ingress --all-namespaces
You should see output like:
NAMESPACE   NAME                   CLASS    HOSTS                                               ADDRESS                                           PORTS     AGE
wordpress   wordpress-production   <none>   www.chicagoganghistory.com,chicagoganghistory.com   159.223.158.116,159.223.158.112,159.223.158.104   80, 443   22h
At this point you may wish to configure any plugins and themes you plan to use by modifying values-local.yaml and redeploying with ./install.sh -n wordpress. Repeat this process until your ready to create an SSL certificate for the site.
Create certificate
Next we’ll use cert-manager to create a certificate issuer for the cluster.
First take inventory of any issuers with:
kubectl get Issuer,ClusterIssuer --all-namespaces
Since this is a new cluster you should see an error like:
error: the server doesn't have a resource type "Issuer"
Use Helm to install Cert Manager and its CRDs to resolve error:
helm repo add jetstack https://charts.jetstack.io && \
helm repo update && \
helm install \
  cert-manager jetstack/cert-manager \
  --namespace cert-manager \
  --create-namespace \
  --version v1.11.0 \
  --set installCRDs=true
Consider version will change over time. Use the latest release version when installing. See github.com/cert-manager/cert-manager/releases for releases. To uninstall Cert Manager use kubectl delete namespace cert-manager to start over.
You should see output like:
Expand to view sample output
NAME: cert-manager
LAST DEPLOYED: Sun Mar 12 16:06:02 2023
NAMESPACE: cert-manager
STATUS: deployed
REVISION: 1
TEST SUITE: None
NOTES:
cert-manager v1.11.0 has been deployed successfully!

In order to begin issuing certificates, you will need to set up a ClusterIssuer
or Issuer resource (for example, by creating a 'letsencrypt-staging' issuer).

More information on the different types of issuers and how to configure them
can be found in our documentation:

https://cert-manager.io/docs/configuration/

For information on how to configure cert-manager to automatically provision
Certificates for Ingress resources, take a look at the `ingress-shim`
documentation:

https://cert-manager.io/docs/usage/ingress/
Next create an Issuer or ClusterIssuer for use obtaining TLS certificates from
LetsEncrypt. Here we’ll use a ClusterIssuer so we can assign certs to Ingress resources in any namespace using the
HTTP01 Ingress solver. We’ll start by issuing a test certificate and, once functional, move to production.
Create test ClusterIssuer resource definition and store in a file:
cat <<EOF > letsencrypt-issuer-staging.yaml
apiVersion: cert-manager.io/v1
kind: ClusterIssuer
metadata:
  name: letsencrypt-staging
  namespace: default
spec:
  acme:
    # The ACME server URL
    server: https://acme-staging-v02.api.letsencrypt.org/directory
    # Email address used for ACME registration
    email: user@example.com
    # Name of a secret used to store the ACME account private key
    privateKeySecretRef:
      name: letsencrypt-staging
    # Enable the HTTP-01 challenge provider
    solvers:
    # An empty 'selector' means that this solver matches all domains
    - selector: {}
      http01:
        ingress:
          class: traefik
EOF
Apply configured test issuer to cluster and get resource details:
kubectl apply -f letsencrypt-issuer-staging.yaml && \
kubectl get CertificateRequests,Orders,Challenges --all-namespaces
You should see output like:
NAMESPACE   NAME                                                      APPROVED   DENIED   READY   ISSUER                REQUESTOR                                         AGE
NAMESPACE   NAME                                                      APPROVED   DENIED   READY   ISSUER                REQUESTOR                                         AGE
wordpress   certificaterequest.cert-manager.io/wordpress-cert-bfwsp   True                False   letsencrypt-staging   system:serviceaccount:cert-manager:cert-manager   25s

NAMESPACE   NAME                                                         STATE     AGE
wordpress   order.acme.cert-manager.io/wordpress-cert-bfwsp-2053340489   pending   25s

NAMESPACE   NAME                                                                        STATE     DOMAIN                       AGE
wordpress   challenge.acme.cert-manager.io/wordpress-cert-bfwsp-2053340489-90611677     pending   www.chicagoganghistory.com   22s
wordpress   challenge.acme.cert-manager.io/wordpress-cert-bfwsp-2053340489-1678907108   pending   chicagoganghistory.com       22s
If you have an Order stuck in a pending state, try describing the resource as shown in
Troubleshooting Orders in the Cert Manager docs:
kubectl describe order wordpress-cert-6pnlc-739176700
Using describe on an Order stuck in pending will give a debug Event like:
Events:
  Type     Reason  Age   From                 Message
  ----     ------  ----  ----                 -------
  Warning  Solver  16m   cert-manager-orders  Failed to determine a valid solver configuration for the set of domains on the Order: no configured challenge solvers can be used for this challenge
A successful Order will have an Events section like this:
Events:
  Type    Reason    Age   From                 Message
  ----    ------    ----  ----                 -------
  Normal  Created   10m   cert-manager-orders  Created Challenge resource "wordpress-cert-bfwsp-2053340489-1678907108" for domain "chicagoganghistory.com"
  Normal  Created   10m   cert-manager-orders  Created Challenge resource "wordpress-cert-bfwsp-2053340489-90611677" for domain "www.chicagoganghistory.com"
  Normal  Complete  10m   cert-manager-orders  Order completed successfully
And a rerun of:
kubectl get CertificateRequests,Orders,Challenges --all-namespaces
Will yield a successful result like:
NAMESPACE   NAME                                                      APPROVED   DENIED   READY   ISSUER                REQUESTOR                                         AGE
wordpress   certificaterequest.cert-manager.io/wordpress-cert-bfwsp   True                True    letsencrypt-staging   system:serviceaccount:cert-manager:cert-manager   15m

NAMESPACE   NAME                                                         STATE   AGE
wordpress   order.acme.cert-manager.io/wordpress-cert-bfwsp-2053340489   valid   15m
Once the test CertificateRequest shows READY of True you’re ready to copy it for production and apply it to the WordPress Ingress controller:
cp letsencrypt-issuer-staging.yaml letsencrypt-issuer-prod.yaml && \
sed -ie 's/acme-staging-v02.api.letsencrypt.org/acme-v02.api.letsencrypt.org/g' \
    letsencrypt-issuer-prod.yaml && \
sed -ie 's/-staging/-prod/g' letsencrypt-issuer-prod.yaml && \
kubectl apply -f letsencrypt-issuer-prod.yaml
Then verify both cluster issues are deployed and READY for use:
watch kubectl get ClusterIssuer
Wait until it looks like:
NAME                  READY   AGE
letsencrypt-staging   True    13m
letsencrypt-prod      True    15s
And when you have READY of True for both test and production ClusterIssuer update the Ingress in values-local.yaml to use letsencrypt-prod and then run ./install.sh -n wordpress to update the WordPress deployment.
Remember to wait for the init container to complete and, once WordPress is back up, hit the site without using an --insecure flag via curl like:
curl -IsS https://chicagoganghistory.com http://chicagoganghistory.com \
    https://www.chicagoganghistory.com http://www.chicagoganghistory.com
You should see successful responses for all four URL configurations:
Expand to view sample output
HTTP/2 301
content-type: text/html; charset=UTF-8
date: Mon, 13 Mar 2023 02:11:22 GMT
location: https://www.chicagoganghistory.com/
server: Apache/2.4.54 (Debian)
x-powered-by: PHP/8.1.12
x-redirect-by: WordPress

HTTP/1.1 301 Moved Permanently
Content-Type: text/html; charset=UTF-8
Date: Mon, 13 Mar 2023 02:11:23 GMT
Location: http://www.chicagoganghistory.com/
Server: Apache/2.4.54 (Debian)
X-Powered-By: PHP/8.1.12
X-Redirect-By: WordPress

HTTP/2 200
content-type: text/html; charset=UTF-8
date: Mon, 13 Mar 2023 02:11:24 GMT
link: <https://www.chicagoganghistory.com/index.php?rest_route=/>; rel="https://api.w.org/"
server: Apache/2.4.54 (Debian)
x-powered-by: PHP/8.1.12

HTTP/1.1 200 OK
Content-Type: text/html; charset=UTF-8
Date: Mon, 13 Mar 2023 02:11:25 GMT
Link: <https://www.chicagoganghistory.com/index.php?rest_route=/>; rel="https://api.w.org/"
Server: Apache/2.4.54 (Debian)
X-Powered-By: PHP/8.1.12
Or in summary something like:
HTTP/2 301
HTTP/1.1 301 Moved Permanently
HTTP/2 200
HTTP/1.1 200 OK

content-type: text/html; charset=UTF-8
date: Mon, 13 Mar 2023 01:31:12 GMT
Now visitors may access the site using the https scheme. And later, when your cert is set to expire, Cert Manager will renew it for you automatically.
With the site up and encryption enabled it’s time to restore from backup.
Restore content
See the Spinstack repo README for an overview. My recommendation is to follow their instructions for importing the database but, unless you’ve got a content backup with only a few dozen files, use krsync to recover persistent volumes by attaching a data access container. Below I will describe recommended steps.
First create a Pod spec to access WordPress content:
---
apiVersion: v1
kind: Pod
metadata:
  name: dataaccess-wp-content
  namespace: wordpress
spec:
  containers:
  - name: alpine
    image: alpine:latest
    command: ['tail', '-f', '/dev/null']
    volumeMounts:
    - name: wordpress-production-wp-content
      mountPath: /data
  volumes:
  - name: wordpress-production-wp-content
    persistentVolumeClaim:
      claimName: wordpress-production-wp-content
Ensure the namespace is the same used while deploying WordPress and claimName corresponds with a Persistent Volume Claim created during the first deployment.
If everything checks out, apply the spec:
kubectl apply -f dataaccess-wp-content.yml
Once the Pod starts, shell into the data access container:
kubectl exec -n wordpress -it dataaccess-wp-content -- sh
Use ls to verify the contents of the /data directory:
/ # ls -1 data
cache
logs
mu-plugins
object-cache.php
plugins
themes
upgrade
uploads
Install rsync using apk add then exit the shell session:
/ # apk add --no-cache rsync
fetch https://dl-cdn.alpinelinux.org/alpine/v3.17/main/x86_64/APKINDEX.tar.gz
fetch https://dl-cdn.alpinelinux.org/alpine/v3.17/community/x86_64/APKINDEX.tar.gz
(1/5) Installing libacl (2.3.1-r1)
(2/5) Installing lz4-libs (1.9.4-r1)
(3/5) Installing popt (1.19-r0)
(4/5) Installing zstd-libs (1.5.2-r9)
(5/5) Installing rsync (3.2.7-r0)
Executing busybox-1.35.0-r29.trigger
OK: 8 MiB in 20 packages
/ # exit
Verify you also have rsync installed on the host machine as well then install krsync as described in Recover Files from a Kubernetes Persistent Volume.
Start by syncing the uploads directory from your backup:
./krsync -av --progress --stats uploads/ \
    dataaccess-wp-content@wordpress:/data/uploads/
If you’re on a MacBook, use Amphetimine to prevent the system from going to sleep during the transfer. 20GB of data for Chicago Gang History finished syncing in just under an hour. If your sync fails part way through, re-run krsync and the transfer will attempt to resume itself – something kubectl cp cannot do.
Once the sync is finished you’ll see output like:
Expand to view sample output
Number of files: 100886
Number of files transferred: 100829
Total file size: 20919306278 bytes
Total transferred file size: 20919306278 bytes
Literal data: 20919306216 bytes
Matched data: 62 bytes
File list size: 5772920
File list generation time: 3.955 seconds
File list transfer time: 0.000 seconds
Total bytes sent: 20932067720
Total bytes received: 2218612

sent 20932067720 bytes  received 2218612 bytes  6325513.32 bytes/sec
total size is 20919306278  speedup is 1.00
Confirm the uploads were synced to the correct location by listing the contents of the /data/uploads directory mounted to the Persistent Volume:
kubectl exec -n wordpress -it dataaccess-wp-content -- ls -1 /data/uploads
You should see output like:
Expand to view sample output
2016
2017
2018
2019
2020
2021
2022
2023
If you see an uploads folder nested inside of another uploads folder, shell into the data access container and move the contents out of the nested folder.
Then give WordPress permission to access the files:
kubectl exec -n wordpress -it dataaccess-wp-content -- \
    chown -R 33:33 /data/uploads
Repeat the sync process for any other files desired. WordPress child themes, for example, can be uploaded to the /data/themes directory. Do note, however, public themes installable via WordPress admin can be installed using the Helm chart.
When you’re finished remove the data access Pod from the cluster:
kubectl delete -f dataaccess-wp-content.yml
Now you’re ready to restore the database from backup.
Restore database
With your WordPress content restored it’s time to restore the database. The instructions on the Spinstack repo README are sufficient for this task. But they will likely need to be modified to point to the correct Pod name.
Restore the database using a command like:
export HISTCONTROL=ignorespace && \
 kubectl exec -n wordpress -i wordpress-production-database-primary-0 -- \
    mysql -uwordpress -p<your password> --database=wordpress_db < dump.sql
This will read a local file called dump.sql and redirect the output to mysql using the username -u and password -p specified. The -i flag passes stdin to the container which is why this command is able to read from the local system. Your database password was specified inside the Helm chart deployed earlier.
The import should complete within a few minutes.
Verify the results by visiting the site and regression testing. If you run into any problems, inspect the database pod in Lens and leverage the logs for debugging purposes. You can delete the database Pod and wait for it to come back in order to get at the logs. Similarly, you can delete the WordPress Pod to restart it as well once the Database Pod is running again.
Once your site is tested, redeploy the Helm chart with Redis activated.
Activte Redis
Enable Redis by setting redis.enabled to true in the Helm chart and redploying:
./install.sh -n wordpress
Now when the WordPress init container runs the Ansible script will additionally install and configure the Redis Object Cache plugin. Here’s a graph showing cluster CPU usage shortly after Redis is enabled:

Redis should automatically deploy to one of your two worker nodes. Once enabled, Redis Object Cache will query Redis and serve up faster, cached responses for requests which otherwise might’ve hit the database and slowed down responses.
As noted in the comments of values-local.yaml, you can also configure Redis Object Cache as a MU (“Must Use”) plugin. MU plugins are ideal to ensure specific plug-ins are not deactivated or removed inadvertently.
Hardening
Enable the
Block Bad Queries plugin for WordPress otherwise known as the BBQ Firewall. This is already configured as a MU (“Must Use”) plug-in based on the values-local.yaml provided earlier. To use it set mu_plugins_enabled to true and run ./install.sh -n wordpress to update your WordPress deployment.
Then take inventory of your cluster’s nodes:
export SERVER1=159.223.158.116
export AGENT1=159.223.158.112
export AGENT2=159.223.158.104
For each node, shell into the deployer user, access the root account and then run visudo to view user priviledge specifications:
ssh deployer@"$(echo $SERVER1)"
deployer@k3s-server-1:~$ su -
Password: ********************
root@k3s-server-1:~# visudo
Disable the NOPASSWD priviledge given to deployer while provisioning nodes and save the visudo settings. The deployer user will now need to authenticate with their own password in order to run sudo commands thereafter.
Exit out of the root user and verify sudo commands prompt for a password:
root@k3s-server-1:~# exit
deployer@k3s-server-1:~$ sudo fail2ban-client status sshd
[sudo] password for deployer: ********************
If you’re running Ubuntu, verify the unattended-upgrades service is active:
sudo systemctl status unattended-upgrades
Finally, consider opting into the Lens Pro trial which gives you access to tools which can be used to scan your cluster for vulnerabilities.
Handling crashes
If your WordPress site crashes, Kubernetes will attempt to automatically restart the WordPress Pod, rebuild the site and re-deploy it to the cluster. This will typically result in a few minutes of downtime while Ansible does its thing. Unlike a traditional WordPress install this recovery process is automamtic.
There are cases, however, which will lead to a node running out of memory and this may require the entire node to be rebooted. If it does, consider increasing the RAM on the node as described in Moving from Pantheon.io to Kubernetes. When a node is rebooted K3s will automatically reconnect it to the cluster and restart the Pods it was running. Restart Fail2ban on the node after upgrade, if needed.
Making backups
Always keep back-ups of your site. You can create backups from the WordPress Admin site but there are limitations if done that way, and there’s a good chance you’ll lose the users table in your database. For that reason, consider instead making backups using krsync, and kubectl with the -i as shown earlier and the mysqldump command similar to restoring a backup but in the reverse direction. As long as you have the content of the site and a copy of the database you can recover from just about anything.
Keeping secrets
Before you pat yourself on the back make sure you have kept track of all the passwords generated and used during the setup. These are easy to keep track of during set-up using a Logseq journal for installation notes. Just make sure you clear those out after you transfer them to your password manager. You may also wish to keep a copy of your KUBECONFIG file in your pasword manager as well. I tend to base64-encode these and drop them along with alll the passwords in a single plain text file which is then encrypted at rest using my GPG key.
Summary
In this tutorial you learned how to deploy a hardened WordPress to Kubernetes using Ansible capable of handling up to 80K users per month. As I mentioned earlier, I’ve been using this method for hosting Chicago Gang History for several years. And I expect to continue using this method for the forseeable future. I’m sharing this in the hopes it may help you as much as its helped me.